Toolpack:Creating an SNMPv1/SNMPv2 Community B
From TBwiki
(Difference between revisions)
(New 2.8 Article) |
(→Applies to version(s): v2.8.: Added links to parameters) |
||
| (4 intermediate revisions by one user not shown) | |||
| Line 2: | Line 2: | ||
{{DISPLAYTITLE:Creating an SNMPv1/SNMPv2 Community}} | {{DISPLAYTITLE:Creating an SNMPv1/SNMPv2 Community}} | ||
| − | + | New '''communities''' can be created for SNMP versions 1 or 2, By default, the standard communities '''public''' (read-only access), and '''private''' (read-write access) have been created. | |
| − | + | ||
| − | + | ||
| − | + | ||
| − | + | ||
| − | To create a new SNMPv1/SNMPv2 community, | + | To create a new SNMPv1/SNMPv2 community, do the following: |
| + | *Click '''Applications''' in the navigation panel. | ||
| + | [[Image:Snmp_cfg_0.png]] | ||
| + | <br/><br/> | ||
| − | * | + | *In the '''Application Configuration List''', select '''tbsnmpagent'''. |
| − | [[ | + | [[Image:Snmp_cfg_1.png]] |
<br/><br/> | <br/><br/> | ||
| + | |||
| + | *Click '''Application Params''' | ||
| + | [[Image:Snmp_cfg_2.png]] | ||
| + | <br/><br/> | ||
| + | |||
| + | *Click '''Create new community''' ) | ||
| + | [[Image:Snmp_CommunityV1V2_0.png]] | ||
| + | <br/><br/> | ||
| + | |||
*In the community creation window: | *In the community creation window: | ||
**Enter a unique '''name''' for the community | **Enter a unique '''name''' for the community | ||
| − | ** | + | **Select or clear the '''Write operation allowed''' check box to allow or disallow a write privilege for the current community |
**Click '''Create''' | **Click '''Create''' | ||
| − | [[ | + | [[Image:Snmp_CommunityV1V2_1.png]] |
<br/><br/> | <br/><br/> | ||
| − | *Verify that the ''' | + | |
| − | + | *Verify that the '''SNMP community was successfully created''' message is displayed and that the new community in '''SNMPv1 SNMPv2 Communities''' list. | |
| − | + | [[Image:Snmp_CommunityV1V2_2.png]] | |
| − | + | ||
| − | [[ | + | |
<br/><br/> | <br/><br/> | ||
| + | |||
| + | ==List of Parameters== | ||
| + | |||
| + | * [[Parameter: Application Type|Application Type]] | ||
| + | * [[Parameter: Name|Name]] | ||
| + | * [[Parameter: Bin Path|Bin Path]] | ||
| + | * [[Parameter: Location|Location]] | ||
| + | * [[Parameter: Working Path|Working Path]] | ||
| + | * [[Parameter: Commadn-line arguments|Command-line arguments]] | ||
| + | |||
| + | <br> | ||
| + | |||
| + | <div class="mw-collapsible mw-collapsed" data-collapsetext="Application Parameters" data-expandtext="Application Parameters" style="width: 400px;"> | ||
| + | {| class="wikitable" | ||
| + | |- | ||
| + | * [[Parameter: SNMP IP port|SNMP IP port]] | ||
| + | * [[Parameter: SNMP System Description|SNMP System Description]] | ||
| + | * [[Parameter: SNMP System Object ID|SNMP System Object ID]] | ||
| + | * [[Parameter: SNMP System Name|SNMP System Name]] | ||
| + | * [[Parameter: SNMP System Location|SNMP System Location]] | ||
| + | * [[Parameter: SNMP System Contact|SNMP System Contact]] | ||
| + | |||
| + | * Advanced SNMP Parameters | ||
| + | ** [[Parameter: Polling delay to generate Traps|Polling delay to generate Traps]] | ||
| + | ** [[Parameter: Use system names|Use system names]] | ||
| + | |||
| + | |} | ||
| + | </div> | ||
| + | |||
| + | <br> | ||
| + | <div class="mw-collapsible mw-collapsed" data-collapsetext="Advanced Parameters" data-expandtext="Advanced Parameters" style="width: 400px;"> | ||
| + | {| class="wikitable" | ||
| + | |- | ||
| + | * Log Parameters | ||
| + | ** [[Parameter: Default Trace Level|Default Trace Level]] | ||
| + | ** [[Parameter: Log File Path|Log File Path]] | ||
| + | ** [[Parameter: Max Log File Segment Size|Max Log File Segment Size]] | ||
| + | ** [[Parameter: Max Total Gzipped Log Files Size|Max Total Gzipped Log Files Size]] | ||
| + | |||
| + | * Network Lib Parameters | ||
| + | ** [[Parameter: Network Polling Delay|Network Polling Delay]] | ||
| + | ** [[Parameter: Network Switchover Delay|Network Switchover Delay]] | ||
| + | ** [[Parameter: Communication Down Delay|Communication Down Delay]] | ||
| + | |||
| + | |} | ||
| + | </div> | ||
| + | |||
| + | <br> | ||
Latest revision as of 12:01, 9 June 2015
Applies to version(s): v2.8.
New communities can be created for SNMP versions 1 or 2, By default, the standard communities public (read-only access), and private (read-write access) have been created.
To create a new SNMPv1/SNMPv2 community, do the following:
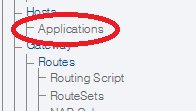
- Click Applications in the navigation panel.
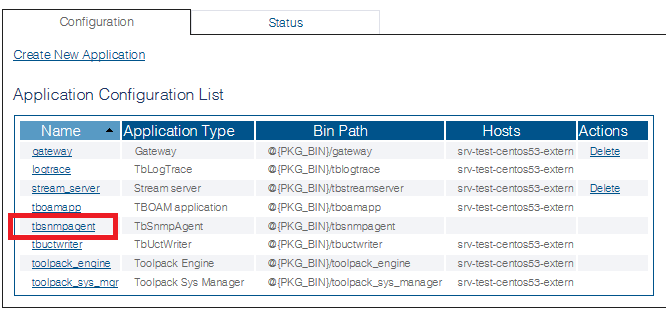
- In the Application Configuration List, select tbsnmpagent.
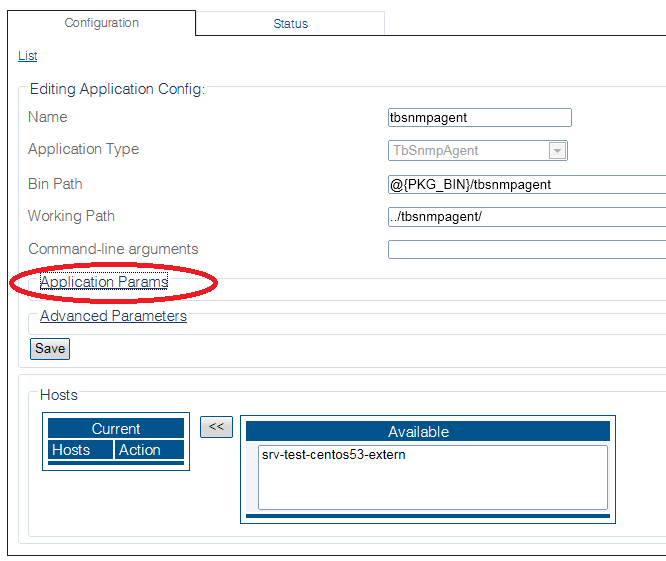
- Click Application Params
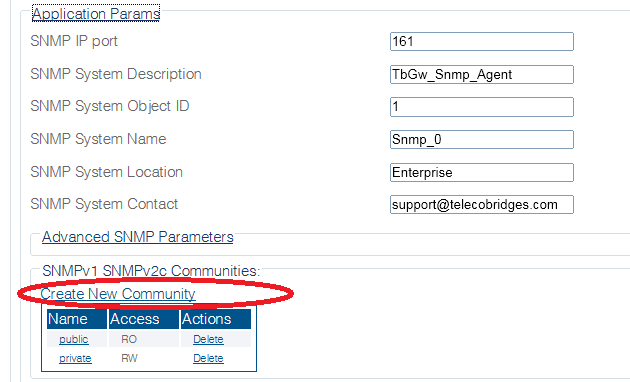
- Click Create new community )
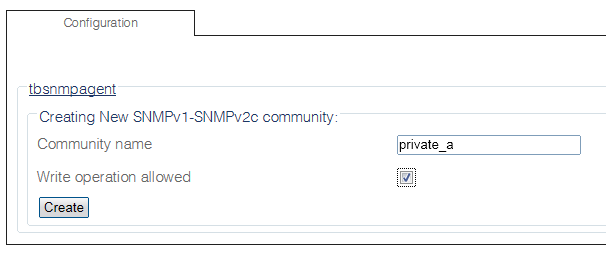
- In the community creation window:
- Enter a unique name for the community
- Select or clear the Write operation allowed check box to allow or disallow a write privilege for the current community
- Click Create
- Verify that the SNMP community was successfully created message is displayed and that the new community in SNMPv1 SNMPv2 Communities list.
List of Parameters
