7800 Replace Unit With Spare
(New page) |
(A few updates) |
||
| Line 1: | Line 1: | ||
| + | This procedure is used to replace a unit with a spare unit or another unit with a normal license. | ||
| + | |||
== Prerequisite== | == Prerequisite== | ||
Prior to replacing hardware, you must have the following: | Prior to replacing hardware, you must have the following: | ||
| − | + | * Phillips screwdriver | |
| − | + | *[[Gateway_Installation#TMG7800|TMG7800 Installation guide]] | |
| − | + | ||
| − | + | ||
| − | + | ||
=== Retrieve spare license === | === Retrieve spare license === | ||
| − | + | *Follow the instructions here: [[Support:License_server#Retrieve_a_license|Retrieve a license]] | |
| − | + | ||
| − | + | ||
| − | + | ||
| − | + | ||
| − | + | ||
| − | + | ||
| − | + | ||
| − | + | ||
| − | + | ||
To learn more about how to obtain a license key, refer to [[Support:License_server|How to use the license server]] | To learn more about how to obtain a license key, refer to [[Support:License_server|How to use the license server]] | ||
=== Backup your system configuration=== | === Backup your system configuration=== | ||
| − | + | Before Proceeding with the procedure, it is wise to backup your configuration. Please follow this link: [[Troubleshooting_Toolpack#System_configuration_backup|Backup procedure]]<br> | |
| − | + | ||
| − | + | ||
| − | + | ||
Note: The database backup should be done and stored at a safe place regularly | Note: The database backup should be done and stored at a safe place regularly | ||
| Line 47: | Line 34: | ||
== Pushing the configuration to the replacement unit == | == Pushing the configuration to the replacement unit == | ||
| − | 1- Connect to web portal and access the Hardware Units page: | + | 1- Upload the license of the new unit in the system. See [[Support:License_server#Upload_a_license_on_the_system|Uploading a license]].<br> |
| + | 2- Connect to web portal and access the Hardware Units page: | ||
Hardware Units | Hardware Units | ||
| − | + | 3- Identify the unit to replace and select it.<br> | |
[[image:List_of_hardware_units.png]] | [[image:List_of_hardware_units.png]] | ||
<br> | <br> | ||
| − | + | 4- Replace the Serial Number of the unit and '''Save'''. If the Name is the same as the Serial Number, we suggest to change this as well.<br> | |
[[image:Replace_serial_number.png]] | [[image:Replace_serial_number.png]] | ||
<br> | <br> | ||
| − | + | 5- [[Toolpack:Activating_the_Configuration_D|Activate the configuration.]] | |
[[Category:Revise on Major]] | [[Category:Revise on Major]] | ||
Revision as of 11:03, 12 August 2016
This procedure is used to replace a unit with a spare unit or another unit with a normal license.
Contents |
Prerequisite
Prior to replacing hardware, you must have the following:
- Phillips screwdriver
- TMG7800 Installation guide
Retrieve spare license
- Follow the instructions here: Retrieve a license
To learn more about how to obtain a license key, refer to How to use the license server
Backup your system configuration
Before Proceeding with the procedure, it is wise to backup your configuration. Please follow this link: Backup procedure
Note: The database backup should be done and stored at a safe place regularly
TMG7800 unit Replacement Procedure
Removing the Defective Unit
- Shutdown the TMG7800 unit
- Disconnect from the PSTN network
- Disconnect from the VoIP network
- Disconnect from the Management network
- Remove the TMG7800 from the equipment rack
Installing the Replacement Unit
Refer to TMG7800 Installation guide
- Rack-mount the Replacement Unit
- Connect to the Management Interface
- Connect to the VoIP Network
- Connect to the PSTN Network
Starting Up the TMG7800
- Power up the TMG7800
Pushing the configuration to the replacement unit
1- Upload the license of the new unit in the system. See Uploading a license.
2- Connect to web portal and access the Hardware Units page:
Hardware Units
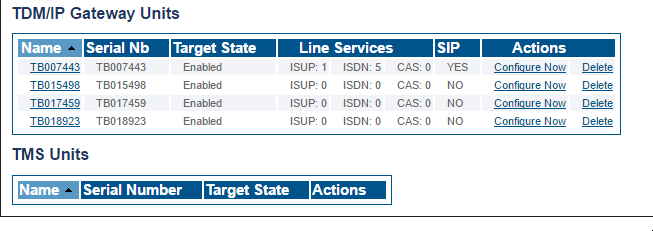
3- Identify the unit to replace and select it.

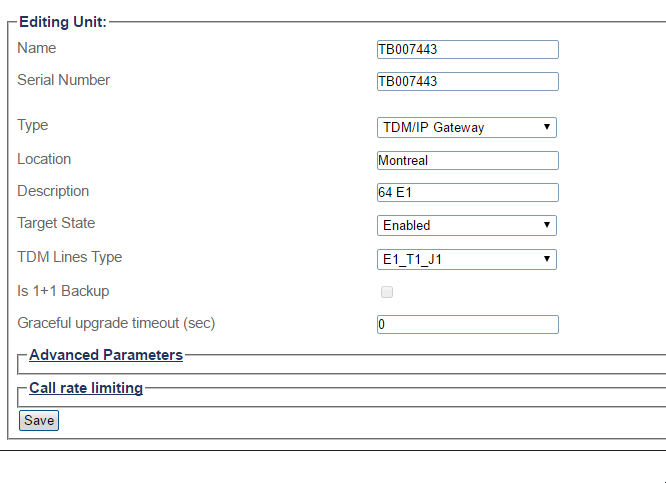
4- Replace the Serial Number of the unit and Save. If the Name is the same as the Serial Number, we suggest to change this as well.

5- Activate the configuration.