TSBC-SW:Cloud:VmWare Launching Instance Web A
From TBwiki
(Difference between revisions)
(Adjusting some screenshot width) |
(Enlarged the snapshots) |
||
| (14 intermediate revisions by 5 users not shown) | |||
| Line 1: | Line 1: | ||
| + | {{DISPLAYTITLE:FreeSBC:Cloud:VmWare Launching an Instance}} | ||
== Launching an instance using ESXi web interface == | == Launching an instance using ESXi web interface == | ||
# Log in using the Vmware web interface | # Log in using the Vmware web interface | ||
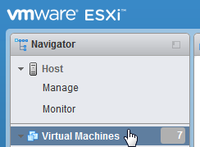
# Select 'Virtual Machines' from the left menu <br/>[[File:vmware_web_virtual_machines.png|200px]] | # Select 'Virtual Machines' from the left menu <br/>[[File:vmware_web_virtual_machines.png|200px]] | ||
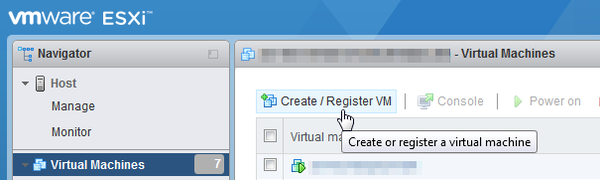
| − | # Click on 'Create / Register VM' <br/>[[File:vmware_web_create.png| | + | # Click on 'Create / Register VM' <br/>[[File:vmware_web_create.png|600px]] |
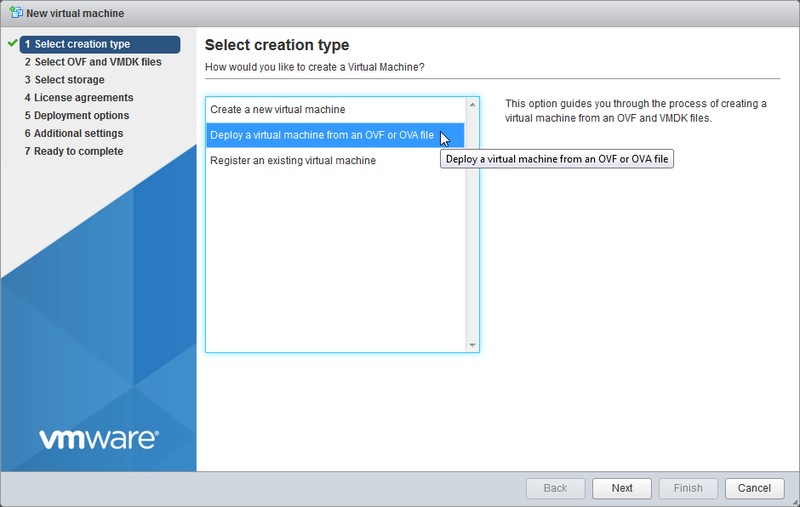
| − | # Select 'Deploy a virtual machine from an OVF or OVA file' then press 'next' <br/>[[File:vmware_web_select_type.png| | + | # Select 'Deploy a virtual machine from an OVF or OVA file' then press 'next' <br/>[[File:vmware_web_select_type.png|800px]] |
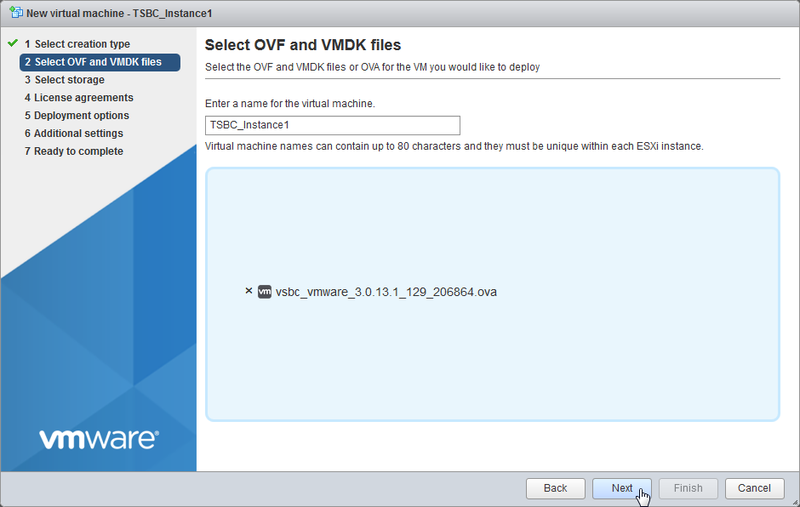
| − | # Enter the name. Drag the file or browse to the location of the | + | # Enter the name. Drag the file or browse to the location of the FreeSBC-SW image obtained from TelcoBridges. 'Click 'Next' <br/>[[File:vmware_web_browse_ova.png|800px]] |
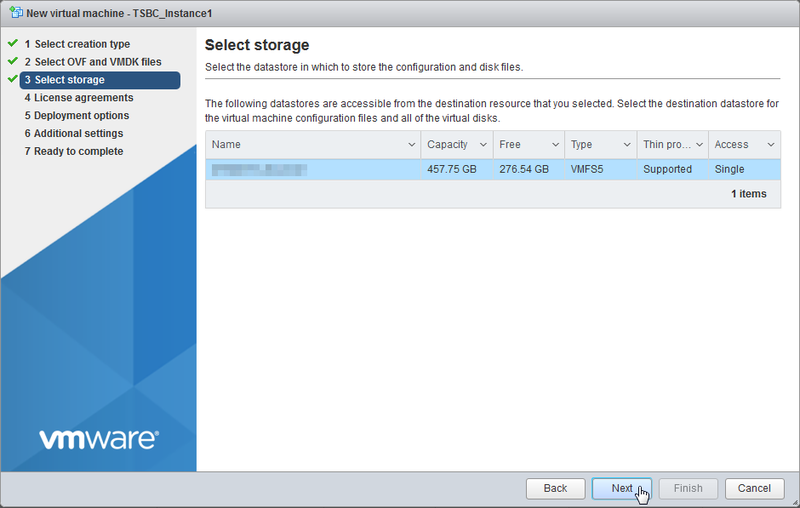
| − | # Select a datastore (if more than one are available) then click 'Next' <br/>[[File:vmware_web_select_storage.png| | + | # Select a datastore (if more than one are available) then click 'Next' <br/>[[File:vmware_web_select_storage.png|800px]] |
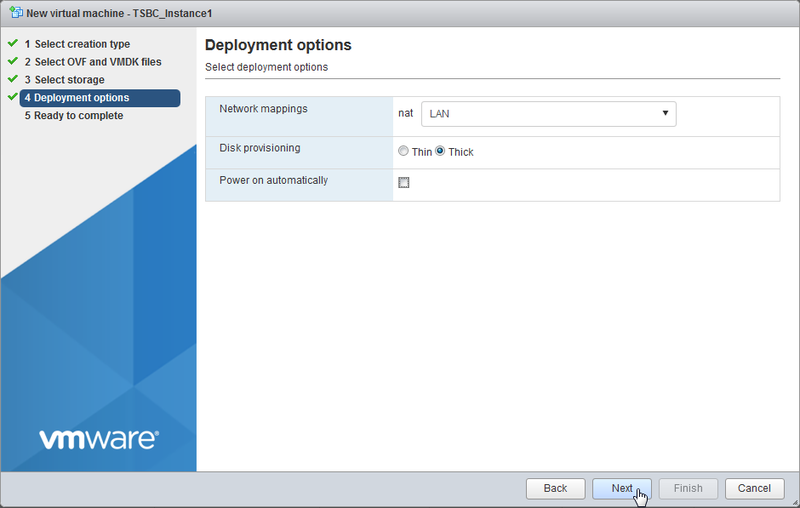
| − | # Choose your network. Select 'Thick' disk provisioning. Uncheck 'Power on automatically'. Click 'Next' <br/>[[File:vmware_web_deployment_options.png| | + | # Choose your network. Select 'Thick' disk provisioning. Uncheck 'Power on automatically'. Click 'Next' <br/>[[File:vmware_web_deployment_options.png|800px]] |
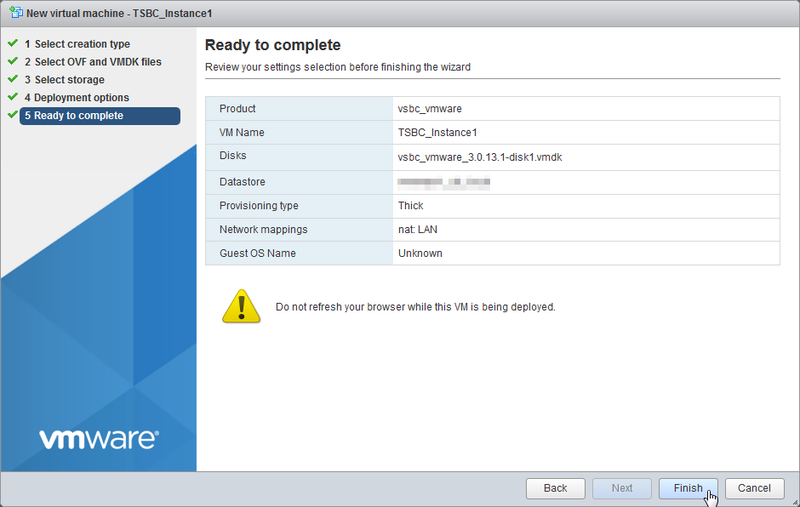
| − | # Click 'Next' <br/>[[File:vmware_web_ready_to_complete.png| | + | # Click 'Next' <br/>[[File:vmware_web_ready_to_complete.png|800px]] |
| − | # Do not refresh your browser and wait until the machine is deployed.<br/> [[File:vmware_web_installing.png| | + | # Do not refresh your browser and wait until the machine is deployed.<br/> [[File:vmware_web_installing.png|800px]] |
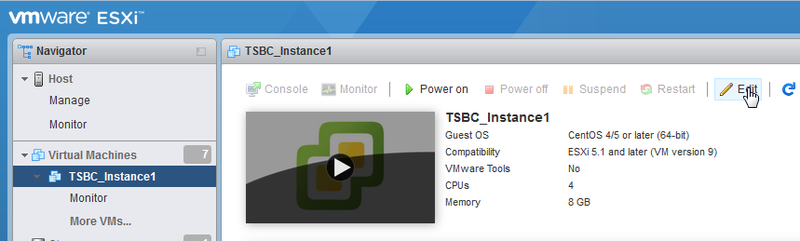
| − | # Once deployed, edit the VM <br/>[[File:vmware_web_edit_settings.png| | + | # Once deployed, edit the VM <br/>[[File:vmware_web_edit_settings.png|800px]] |
| − | # Edit network adapters to connect on proper networks. Make sure that at least one of the adapter connects to the private management network of the setup from which WebPortal access will be granted. Do '''not''' press the 'Save' button yet. <br/>[[File:vmware_web_network.png| | + | # Edit network adapters to connect on proper networks. Make sure that at least one of the adapter connects to the private management network of the setup from which WebPortal access will be granted. Do '''not''' press the 'Save' button yet. <br/>[[File:vmware_web_network.png|800px]] |
| − | # Click on 'CPU' to open the details. Set 'Shares' to 'high', enter the maximum number of MHz corresponding to your number of CPU cores in 'Reservation' (See [[TSBC-SW:Cloud:VmWare_Launching_Instance_Web_A#Calculating_Reserved_CPU_MHz|Calculating Reserved CPU]]) and make sure the 'Unlimited' option is selected. Do '''not''' press the 'Save' button yet. <br/>[[File:vmware_web_cpu.png| | + | #* If system requires 1+1 configuration or more network interfaces follow these steps: [[TSBC-SW:Cloud:VMware_Adding_Network_Intefaces_A|How to add VMware Network Interfaces]] |
| − | # Open the 'Memory' details and check-mark the 'Reserve all guest memory (All locked)' option. Do '''not''' press the 'Save' button yet. <br/>[[File:vmware_web_memory.png| | + | #* If system requires high performance, Passthrough interface can be configured. See [[TSBC-SW:Cloud:VMware_Adding_Passthrough_Interfaces_A|Configuring VMware Passtrough interfaces]] |
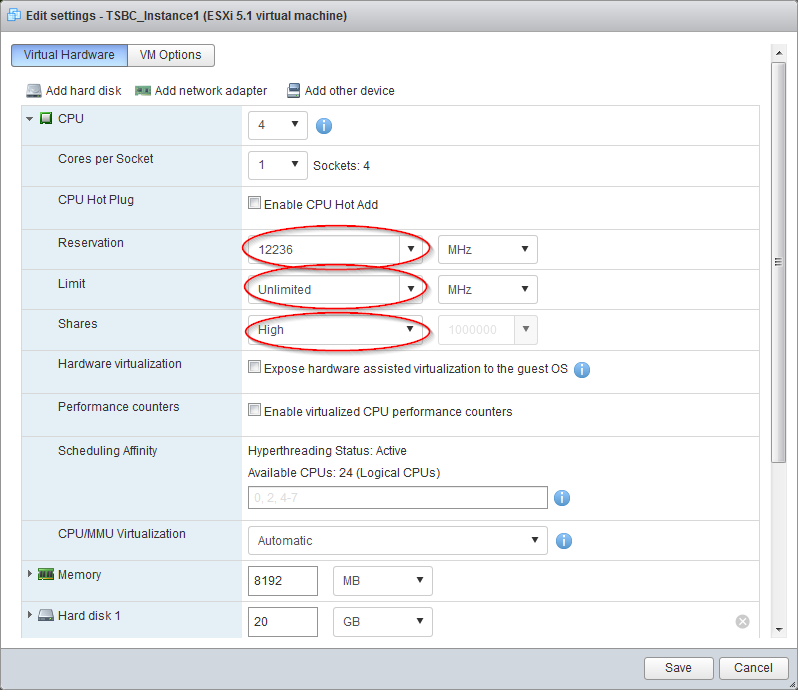
| − | # Open the 'Hard disk 1' details and set the 'Shares' to 'High'. Do '''not''' press the 'Save' button yet. <br/>[[File:vmware_web_disk_res.png| | + | # Click on 'CPU' to open the details. Set 'Shares' to 'high', enter the maximum number of MHz corresponding to your number of CPU cores in 'Reservation' (See [[TSBC-SW:Cloud:VmWare_Launching_Instance_Web_A#Calculating_Reserved_CPU_MHz|Calculating Reserved CPU]]) and make sure the 'Unlimited' option is selected. Do '''not''' press the 'Save' button yet. <br/>[[File:vmware_web_cpu.png|800px]] |
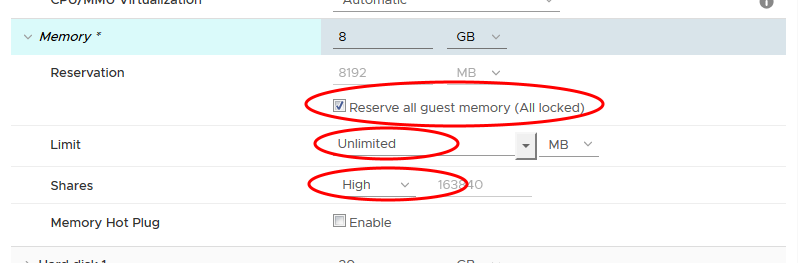
| − | # Click on the second tab 'VM Options', expand 'Advanced' and set 'Latency Sensitivity' to 'High' then press the 'Save' button. <br/>[[File:vmware_web_latency.png| | + | # Open the 'Memory' details and check-mark the 'Reserve all guest memory (All locked)' option, set '''Limit''' to 'Unlimited' and '''Shares''' to 'High'. Do '''not''' press the 'Save' button yet. <br/>[[File:vmware_web_memory.png|800px]] |
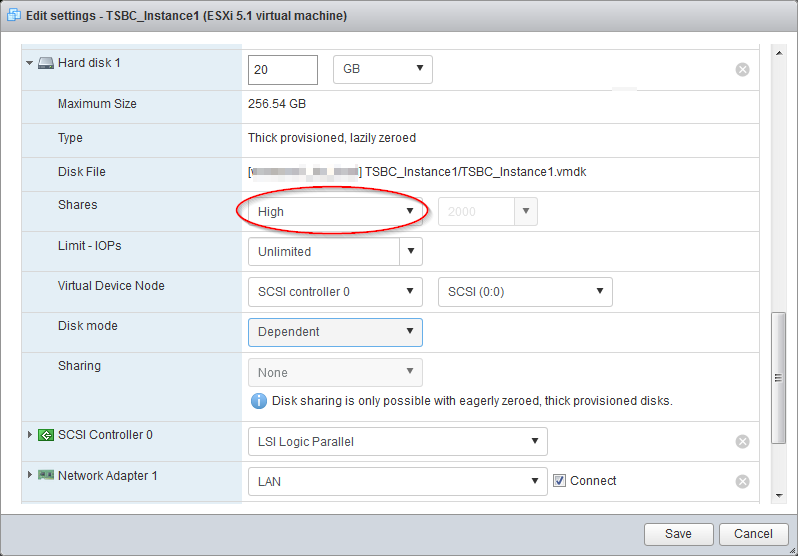
| − | # Back to the main screen, click on "Power On" to start the new VM. <br/>[[File:vmware_web_poweron.png| | + | # Open the 'Hard disk 1' details and set the 'Shares' to 'High'. Do '''not''' press the 'Save' button yet. <br/>[[File:vmware_web_disk_res.png|800px]] |
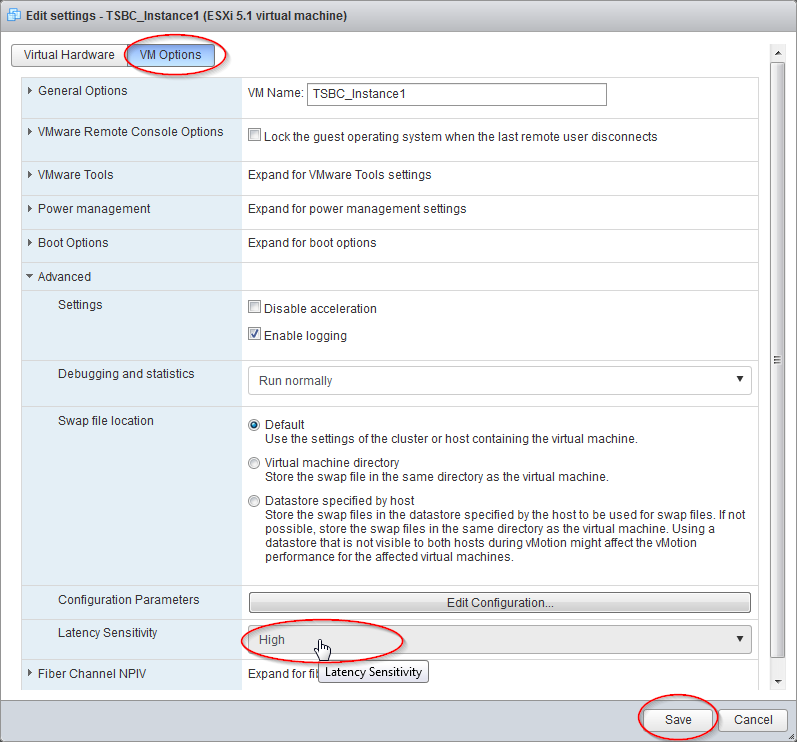
| − | # Once the VM had completely booted, its assigned DHCP IPs will be displayed in General Information -> Networking. Note this IP address to access the Web Portal configuration interface later. <br/>[[File:vmware_web_ip.png| | + | # Click on the second tab 'VM Options', expand 'Advanced' and set 'Latency Sensitivity' to 'High' then press the 'Save' button. <br/>[[File:vmware_web_latency.png|800px]] |
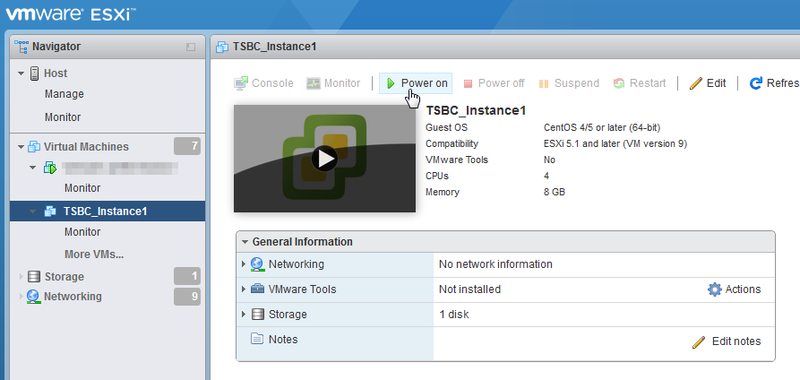
| + | # Back to the main screen, click on "Power On" to start the new VM. <br/>[[File:vmware_web_poweron.png|800px]] | ||
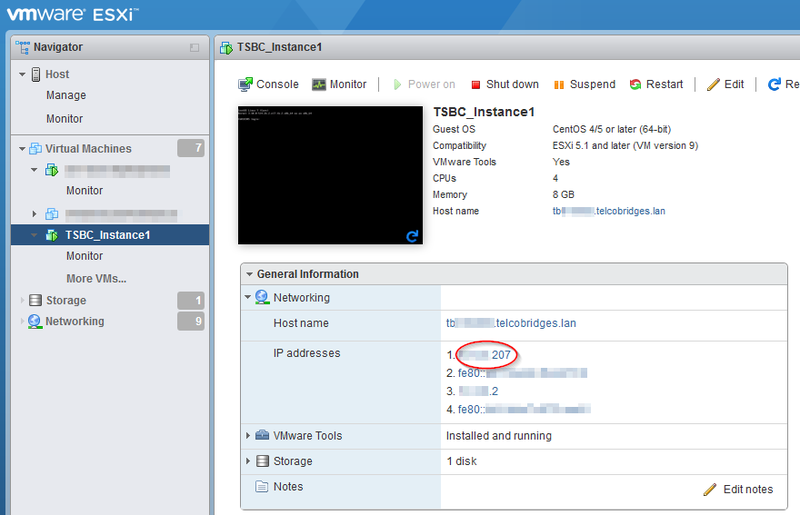
| + | # Once the VM had completely booted, its assigned DHCP IPs will be displayed in General Information -> Networking. Note this IP address to access the Web Portal configuration interface later. <br/>[[File:vmware_web_ip.png|800px]] | ||
=== Calculating Reserved CPU MHz === | === Calculating Reserved CPU MHz === | ||
To get the MHz per core, you need to figure out the total number of available MHz that your system has and divide by the total number of cores. | To get the MHz per core, you need to figure out the total number of available MHz that your system has and divide by the total number of cores. | ||
# Select 'Host' on the left menu <br/>[[File:vmware_web_host.png|200px]] | # Select 'Host' on the left menu <br/>[[File:vmware_web_host.png|200px]] | ||
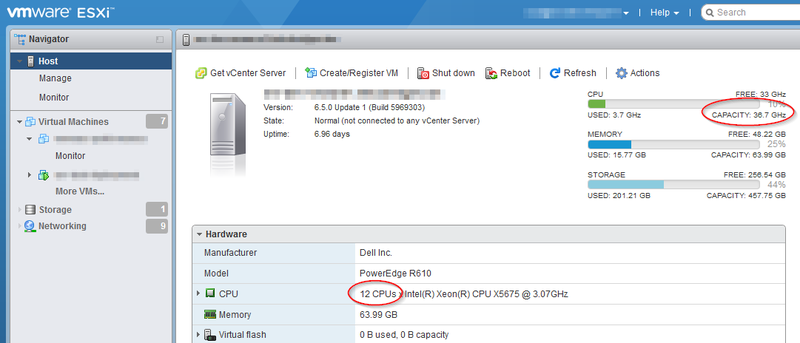
| − | # Take note of the number of cores this system has. (In this example: 12) Also take a look at the 'CAPACITY', but is is not precise down to the MHz (In this example 36.7 GHz) <br/>[[File:vmware_web_total_cpus.png| | + | # Take note of the number of cores this system has. (In this example: 12) Also take a look at the 'CAPACITY', but is is not precise down to the MHz (In this example 36.7 GHz) <br/>[[File:vmware_web_total_cpus.png|800px]] |
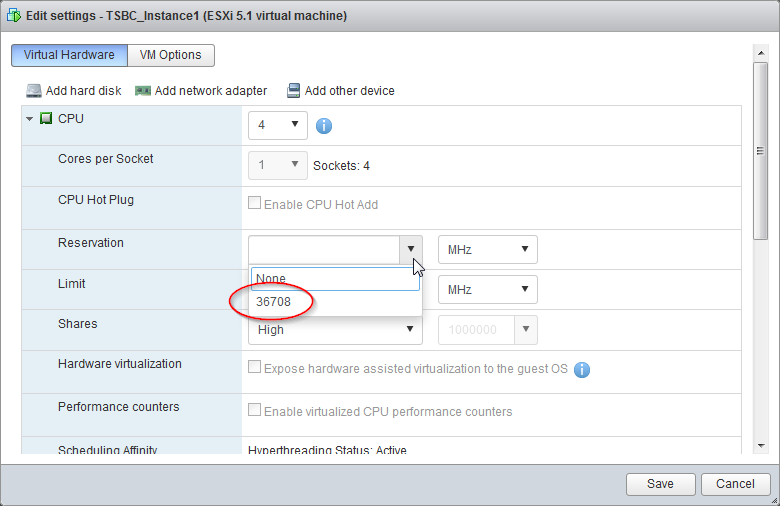
| − | # When editing the VM, in the disk details, expand the 'Reservation' combobox. There should be a number in exact MHz for the maximum capacity of the system (In this example: 36708) <br/>[[File:vmware_web_total_mhz.png| | + | # When editing the VM, in the disk details, expand the 'Reservation' combobox. There should be a number in exact MHz for the maximum capacity of the system (In this example: 36708) <br/>[[File:vmware_web_total_mhz.png|800px]] |
# Calculate your VM CPU MHz Reservation requirement | # Calculate your VM CPU MHz Reservation requirement | ||
::mhz_per_core = total_system_mhz / total_system_cpus (In this example: 3059 = 36708 / 12 ) | ::mhz_per_core = total_system_mhz / total_system_cpus (In this example: 3059 = 36708 / 12 ) | ||
| − | ::vm_reserved_mhz = vm_cpus * mhz_per_core (In this example: 12236 = 3059 * 4 ) | + | ::vm_reserved_mhz = vm_cpus * mhz_per_core (In this example: '''12236''' = 3059 * 4 ) |
Latest revision as of 16:42, 18 December 2019
Launching an instance using ESXi web interface
- Log in using the Vmware web interface
- Select 'Virtual Machines' from the left menu
- Click on 'Create / Register VM'
- Select 'Deploy a virtual machine from an OVF or OVA file' then press 'next'
- Enter the name. Drag the file or browse to the location of the FreeSBC-SW image obtained from TelcoBridges. 'Click 'Next'
- Select a datastore (if more than one are available) then click 'Next'
- Choose your network. Select 'Thick' disk provisioning. Uncheck 'Power on automatically'. Click 'Next'
- Click 'Next'
- Do not refresh your browser and wait until the machine is deployed.

- Once deployed, edit the VM
- Edit network adapters to connect on proper networks. Make sure that at least one of the adapter connects to the private management network of the setup from which WebPortal access will be granted. Do not press the 'Save' button yet.
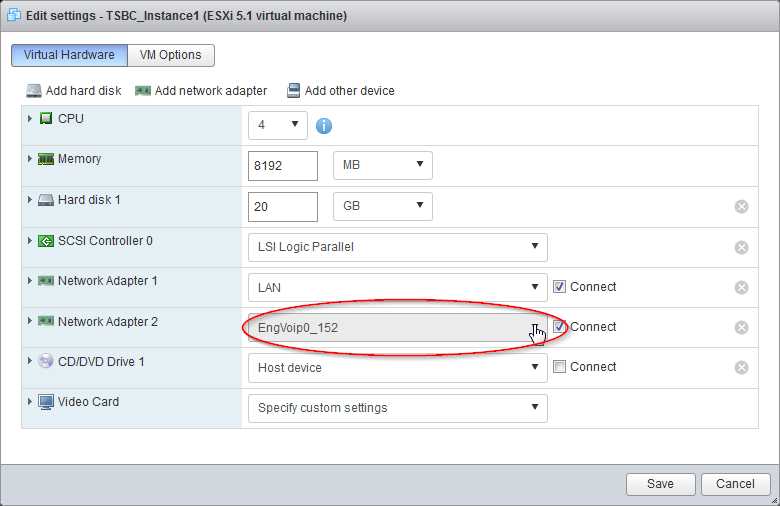
- If system requires 1+1 configuration or more network interfaces follow these steps: How to add VMware Network Interfaces
- If system requires high performance, Passthrough interface can be configured. See Configuring VMware Passtrough interfaces
- Click on 'CPU' to open the details. Set 'Shares' to 'high', enter the maximum number of MHz corresponding to your number of CPU cores in 'Reservation' (See Calculating Reserved CPU) and make sure the 'Unlimited' option is selected. Do not press the 'Save' button yet.
- Open the 'Memory' details and check-mark the 'Reserve all guest memory (All locked)' option, set Limit to 'Unlimited' and Shares to 'High'. Do not press the 'Save' button yet.
- Open the 'Hard disk 1' details and set the 'Shares' to 'High'. Do not press the 'Save' button yet.
- Click on the second tab 'VM Options', expand 'Advanced' and set 'Latency Sensitivity' to 'High' then press the 'Save' button.
- Back to the main screen, click on "Power On" to start the new VM.
- Once the VM had completely booted, its assigned DHCP IPs will be displayed in General Information -> Networking. Note this IP address to access the Web Portal configuration interface later.


Calculating Reserved CPU MHz
To get the MHz per core, you need to figure out the total number of available MHz that your system has and divide by the total number of cores.
- Select 'Host' on the left menu

- Take note of the number of cores this system has. (In this example: 12) Also take a look at the 'CAPACITY', but is is not precise down to the MHz (In this example 36.7 GHz)
- When editing the VM, in the disk details, expand the 'Reservation' combobox. There should be a number in exact MHz for the maximum capacity of the system (In this example: 36708)
- Calculate your VM CPU MHz Reservation requirement


- mhz_per_core = total_system_mhz / total_system_cpus (In this example: 3059 = 36708 / 12 )
- vm_reserved_mhz = vm_cpus * mhz_per_core (In this example: 12236 = 3059 * 4 )