Toolpack v2.4:Create a NAP
From TBwiki
(Difference between revisions)
(→To create a network access point (NAP):) |
(→To create a network access point (NAP):) |
||
| Line 24: | Line 24: | ||
[[Image:Web_Portal_v2.4_NAP_SIP.png|700px]] | [[Image:Web_Portal_v2.4_NAP_SIP.png|700px]] | ||
| + | |||
| + | '''The following screen is displayed:''' | ||
| + | |||
| + | [[Image:Web_Portal_v2.4_NAP_SIP_Params.png|700px]] | ||
| + | *Enter a proxy address | ||
| + | *Click "Save" to finalise the configuration | ||
'''6. Associate an ISDN stack with the NAP:''' | '''6. Associate an ISDN stack with the NAP:''' | ||
Revision as of 17:20, 11 December 2009
To create a network access point (NAP):
1. Click "NAP" in the navigation panel:
2. Click "Create New NAP" in the NAP information panel:
3. Configure the new NAP:
- Enter a name for the NAP
- Click "Create" to finalise the configuration
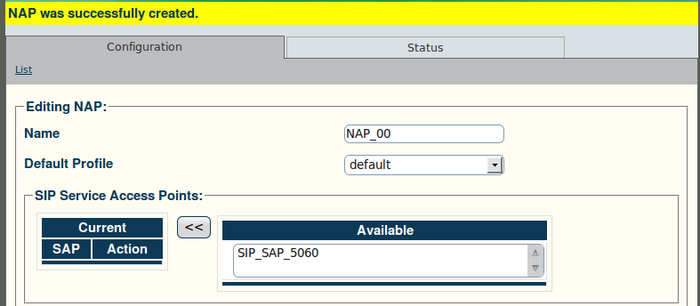
4. Verify that the "NAP was successfully created" message appears:
5. Associate a SIP access point with the NAP:
- Select an access point
- Click the "<<" button to add the access point to the list
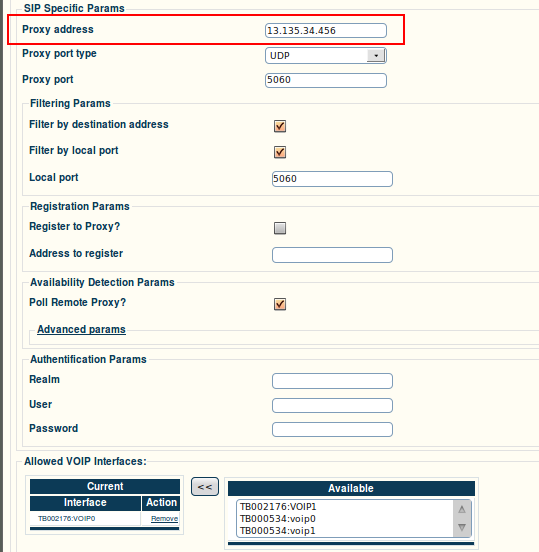
The following screen is displayed:
- Enter a proxy address
- Click "Save" to finalise the configuration
6. Associate an ISDN stack with the NAP:
- Select a stack
- Click the "<<" button to add the stack to the list
7. Associate an ISUP interface with the NAP:
- Select an interface
- Click the "<<" button to add the interface to the list


