Activating tbSnmpAgent A
From TBwiki
(Difference between revisions)
m (moved Activating tbSnmpAgent to Activating tbSnmpAgent A: Adapting to current Web Portal documentation standards) |
|||
| (4 intermediate revisions by one user not shown) | |||
| Line 1: | Line 1: | ||
| − | Before | + | === '''''Applies to version(s): v2.7.''''' === |
| + | {{DISPLAYTITLE:Enabling the SNMP Agent}} | ||
| + | |||
| + | Before you begin, verify that the selinux service is disabled, or else it will prevent the SNMP service from starting. Connect SSH to the unit's management port and follow these instructions: | ||
[http://docs.telcobridges.com/mediawiki/index.php/SELinux_management docs.telcobridges.com/mediawiki/index.php/SELinux_management] | [http://docs.telcobridges.com/mediawiki/index.php/SELinux_management docs.telcobridges.com/mediawiki/index.php/SELinux_management] | ||
| Line 5: | Line 8: | ||
<br> | <br> | ||
| − | Once you are logged | + | Once you are logged on to the Web Portal, follow these steps to activate the tbSnmpAgent application: |
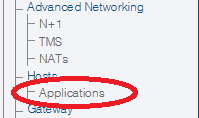
| − | *Click | + | *Click '''Applications''' in the navigation panel. |
| − | [[Image: | + | [[Image:Snmp_click_hosts_applications_0_A.png|border]] <br><br> |
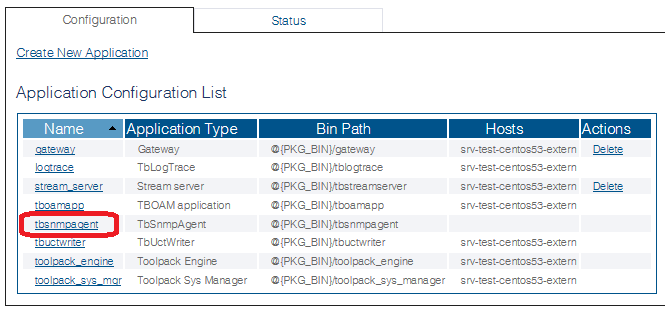
| − | *In the '''Applications''' information window, | + | *In the '''Applications''' information window, select '''tbsnmpagent'''. |
| − | [[Image: | + | [[Image:Snmp_click_hosts_applications_1_A.png|border]] <br><br> |
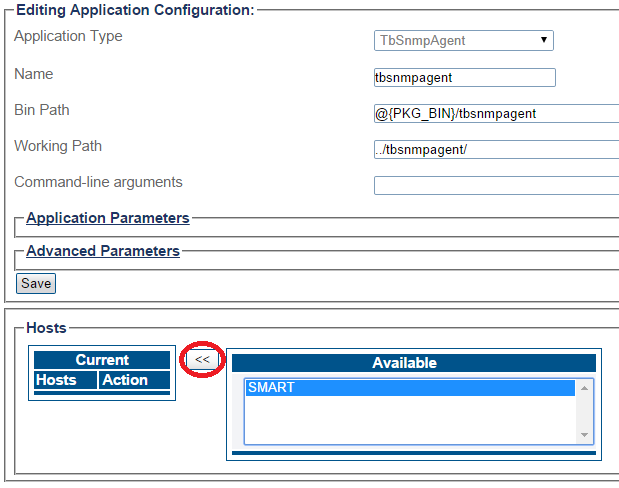
| − | *In the '''Application Configuration''' information window, select the available host. Click | + | *In the '''Application Configuration''' information window, select the available host. Click '''<<''' to move it to the current hosts list. |
[[Image:Snmp_select_available_host.png|border]] <br><br> | [[Image:Snmp_select_available_host.png|border]] <br><br> | ||
| − | * | + | *Returning to the '''Applications Status''' information window. The '''tbsnmpagent''' should now appear in a '''Ready / Run''' state, indicating that it is active. |
[[Image:Snmp_status_run.png|border]] <br><br> | [[Image:Snmp_status_run.png|border]] <br><br> | ||
| − | |||
| − | <br> | + | |
| + | <br> | ||
== Next Step == | == Next Step == | ||
*Now that you have activated the SNMP agent application, you are ready to [[Configuring tbSnmpAgent|configure the application for your needs]]. | *Now that you have activated the SNMP agent application, you are ready to [[Configuring tbSnmpAgent|configure the application for your needs]]. | ||
Latest revision as of 11:53, 11 September 2014
Applies to version(s): v2.7.
Before you begin, verify that the selinux service is disabled, or else it will prevent the SNMP service from starting. Connect SSH to the unit's management port and follow these instructions:
docs.telcobridges.com/mediawiki/index.php/SELinux_management
Once you are logged on to the Web Portal, follow these steps to activate the tbSnmpAgent application:
- Click Applications in the navigation panel.
- In the Applications information window, select tbsnmpagent.
- In the Application Configuration information window, select the available host. Click << to move it to the current hosts list.
- Returning to the Applications Status information window. The tbsnmpagent should now appear in a Ready / Run state, indicating that it is active.
Next Step
- Now that you have activated the SNMP agent application, you are ready to configure the application for your needs.


