FreeSBC:Cloud:OpenStack Installation A
(more of previous) |
|||
| (37 intermediate revisions by 6 users not shown) | |||
| Line 1: | Line 1: | ||
| − | {{DISPLAYTITLE: | + | {{DISPLAYTITLE:SBC:Cloud:OpenStack Installation}} |
== Requirements == | == Requirements == | ||
Minimal Cloud requirements: | Minimal Cloud requirements: | ||
| Line 12: | Line 12: | ||
! width="100" style="background: none repeat scroll 0% 0% rgb(239, 239, 239); -moz-background-inline-policy: continuous;" | CPU | ! width="100" style="background: none repeat scroll 0% 0% rgb(239, 239, 239); -moz-background-inline-policy: continuous;" | CPU | ||
! width="100" style="background: none repeat scroll 0% 0% rgb(239, 239, 239); -moz-background-inline-policy: continuous;" | RAM | ! width="100" style="background: none repeat scroll 0% 0% rgb(239, 239, 239); -moz-background-inline-policy: continuous;" | RAM | ||
| − | ! width="100" style="background: none repeat scroll 0% 0% rgb(239, 239, 239); -moz-background-inline-policy: continuous;" | Disk Space | + | ! width="100" style="background: none repeat scroll 0% 0% rgb(239, 239, 239); -moz-background-inline-policy: continuous;" | Disk Space (SSD) |
! width="200" style="background: none repeat scroll 0% 0% rgb(239, 239, 239); -moz-background-inline-policy: continuous;" | Ethernet ports | ! width="200" style="background: none repeat scroll 0% 0% rgb(239, 239, 239); -moz-background-inline-policy: continuous;" | Ethernet ports | ||
|- | |- | ||
| Line 18: | Line 18: | ||
Up to 5,000 | Up to 5,000 | ||
| valign="top" | | | valign="top" | | ||
| − | 2 | + | 2 to 4 |
| valign="top" | | | valign="top" | | ||
4 Gb | 4 Gb | ||
| Line 29: | Line 29: | ||
5,000-20,000 | 5,000-20,000 | ||
| valign="top" | | | valign="top" | | ||
| − | 4 | + | 4 to 6 |
| valign="top" | | | valign="top" | | ||
8 Gb | 8 Gb | ||
| Line 39: | Line 39: | ||
|- | |- | ||
| valign="top" | | | valign="top" | | ||
| − | 20,000- | + | 20,000-26,000 |
| valign="top" | | | valign="top" | | ||
| − | + | 6 to 8 | |
| valign="top" | | | valign="top" | | ||
16 Gb | 16 Gb | ||
| Line 48: | Line 48: | ||
| valign="top" | | | valign="top" | | ||
1 X 10 Gbps | 1 X 10 Gbps | ||
| − | |||
| − | |||
| − | |||
| − | |||
| − | |||
| − | |||
| − | |||
| − | |||
| − | |||
| − | |||
| − | |||
|} | |} | ||
<nowiki>**</nowiki> The CPU number is based on Intel R630 with Xeon E5-2643. Double the CPUs number if yours are from a earlier generations. | <nowiki>**</nowiki> The CPU number is based on Intel R630 with Xeon E5-2643. Double the CPUs number if yours are from a earlier generations. | ||
| + | More details on HW/CPU/NIC requirements can be found here: [[FreeSBC:RequirementsMatrix|Requirements Matrix]] | ||
| − | For better performance | + | For better performance use: |
* SR-IOV or MacVTap compatible NICs | * SR-IOV or MacVTap compatible NICs | ||
* Overcommit set to 1:1 | * Overcommit set to 1:1 | ||
| Line 70: | Line 60: | ||
== Getting the Image == | == Getting the Image == | ||
| − | Please | + | Please go to our [http://www2.telcobridges.com/ProSBCDownload ProSBC Download site] to get a copy of the latest SBC Image. |
== Installation on OpenStack cloud == | == Installation on OpenStack cloud == | ||
| − | === | + | === SBC OpenStack Minimal Flavor === |
| − | In OpenStack, a flavor defines the compute, memory, and storage capacity of a virtual server, also known as an instance. If you do not | + | In OpenStack, a flavor defines the compute, memory, and storage capacity of a virtual server, also known as an instance. If you do not have a flavor that meets the listed minimal requirements, you will have to create a new one. |
==== Creating a Flavor ==== | ==== Creating a Flavor ==== | ||
| − | #Log in to the Dashboard and select the ''' | + | #Log in to the Dashboard and select the '''Admin''' drop-down list. |
| − | #In the '''Admin''' | + | #In the '''Admin''' drop-doown list, open the '''System''' drop-down list and select the '''Flavors''' category. |
#Click '''Create Flavor'''. | #Click '''Create Flavor'''. | ||
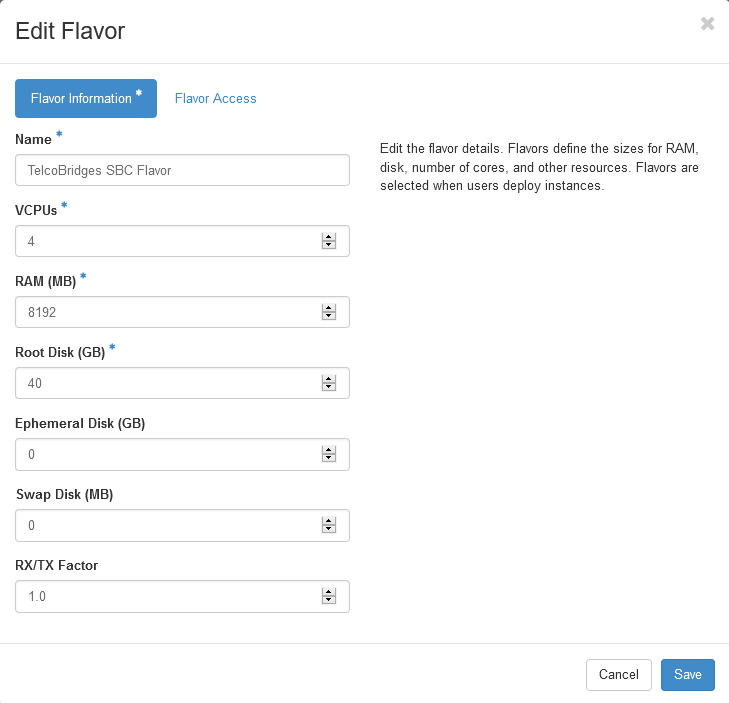
#In the '''Create Flavor''' window, enter or select the parameters for the flavor in the '''Flavor Information''' tab. | #In the '''Create Flavor''' window, enter or select the parameters for the flavor in the '''Flavor Information''' tab. | ||
| − | #* '''Name''' : ''TelcoBridges | + | #* '''Name''' : ''TelcoBridges SBC Flavor'' |
#* '''VCPUs''' : ''4'' | #* '''VCPUs''' : ''4'' | ||
#* '''RAM (MB)''' : ''8192'' | #* '''RAM (MB)''' : ''8192'' | ||
#* '''Root Disk (GB)''' : ''40'' | #* '''Root Disk (GB)''' : ''40'' | ||
| − | #* Other fields are left to their default value<br/>[[File: | + | #* Other fields are left to their default value<br/>[[File:OpenStackMinimalFlavorCreate_V2.png|750px]] |
#In the '''Flavor Access''' tab, you can control access to the flavor by moving projects from the '''All Projects''' column to the '''Selected Projects''' column.<br/>Only projects in the '''Selected Projects''' column can use the flavor. If there are no projects in the right column, all projects can use the flavor. | #In the '''Flavor Access''' tab, you can control access to the flavor by moving projects from the '''All Projects''' column to the '''Selected Projects''' column.<br/>Only projects in the '''Selected Projects''' column can use the flavor. If there are no projects in the right column, all projects can use the flavor. | ||
#Click '''Create Flavor'''. | #Click '''Create Flavor'''. | ||
| Line 97: | Line 87: | ||
A virtual machine image is a single file that contains a virtual disk that has a bootable operating system installed on it. Images are used to create virtual machine instances within the cloud. | A virtual machine image is a single file that contains a virtual disk that has a bootable operating system installed on it. Images are used to create virtual machine instances within the cloud. | ||
| − | You will need to upload the latest | + | You will need to upload the latest SBC image into your OpenStack before you can launch a virtual machine instance running the SBC software. |
==== Upload an Image ==== | ==== Upload an Image ==== | ||
| Line 107: | Line 97: | ||
#The Create An Image dialog box appears. | #The Create An Image dialog box appears. | ||
#Enter the following values: | #Enter the following values: | ||
| − | #*'''Image Name''' : ''TelcoBridges | + | #*'''Image Name''' : ''TelcoBridges SBC xx.yy.zz'' (Where xxx.yy.zz is changed to the version number of the ProSBC image) |
| − | #*'''Image Description''': ''TelcoBridges | + | #*'''Image Description''': ''TelcoBridges SBC version xx.yy.zz'' |
| − | #*'''Image Source''' : ''.qcow2 file | + | #*'''Image Source''' : ''.qcow2 file. |
| − | #*'''Image File''' : Browse for the image file on your file system and add it. | + | #*'''Image File''' : Browse for the image file on your file system and add it. '''Must not be compressed (tar.gz)'''''. |
#*'''Format''': ''QCOW2'' | #*'''Format''': ''QCOW2'' | ||
#*'''Architecture''': ''x86_64'' | #*'''Architecture''': ''x86_64'' | ||
| Line 116: | Line 106: | ||
#*'''Minimum RAM (MB)''': ''8192'' | #*'''Minimum RAM (MB)''': ''8192'' | ||
#*'''Visibility''' : The access permission for the image. ''Public'' or ''Private'', depending on your needs. | #*'''Visibility''' : The access permission for the image. ''Public'' or ''Private'', depending on your needs. | ||
| − | #*'''Protected''': Select this check box to ensure that only users with permissions can delete the image. ''Yes'' or ''No''.<br/>[[File: | + | #*'''Protected''': Select this check box to ensure that only users with permissions can delete the image. ''Yes'' or ''No''.<br/>[[File:OpenStackImageUpload_V2.png|750px]] |
#Image Metadata : Leave empty. | #Image Metadata : Leave empty. | ||
#Click Create Image.<br/>The image is queued to be uploaded. It might take some time before the status changes from Queued to Active. | #Click Create Image.<br/>The image is queued to be uploaded. It might take some time before the status changes from Queued to Active. | ||
| Line 123: | Line 113: | ||
*https://docs.openstack.org/admin-guide/dashboard-manage-images.html | *https://docs.openstack.org/admin-guide/dashboard-manage-images.html | ||
| − | === | + | === SBC OpenStack Instance === |
| − | Instances are virtual machines that run inside OpenStack's cloud. You will need to launch a new instance from the | + | Instances are virtual machines that run inside OpenStack's cloud. You will need to launch a new instance from the SBC Image created in the [[#Upload an Image]] section |
==== Launching an instance ==== | ==== Launching an instance ==== | ||
| Line 135: | Line 125: | ||
#In the Launch Instance dialog box, specify the following values: | #In the Launch Instance dialog box, specify the following values: | ||
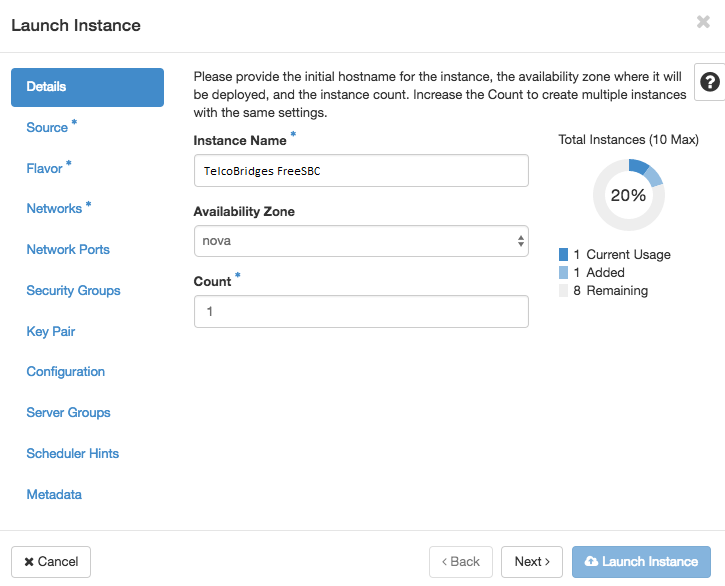
##<big>Details tab</big> | ##<big>Details tab</big> | ||
| − | ##*'''Instance Name''' : Assign a name to the virtual machine. For example: ''TelcoBridges | + | ##*'''Instance Name''' : Assign a name to the virtual machine. For example: ''TelcoBridges SBC''. |
##*'''Availability Zone''' : By default, this value is set to the availability zone given by the cloud provider (for example, us-west or apac-south). For some cases, it could be nova. | ##*'''Availability Zone''' : By default, this value is set to the availability zone given by the cloud provider (for example, us-west or apac-south). For some cases, it could be nova. | ||
| − | ##*'''Count''' : ''1''<br/>[[File: | + | ##*'''Count''' : ''1''<br/>[[File:OpenStackLaunchInstanceDetailsTab_V2.png|750px]] |
##<big>Source tab</big> | ##<big>Source tab</big> | ||
##*'''Instance Boot Source''' : ''Boot from image''. | ##*'''Instance Boot Source''' : ''Boot from image''. | ||
##*'''Create new Volume''' : ''No'' | ##*'''Create new Volume''' : ''No'' | ||
| − | ##*'''Select Image Name''' : Select ''TelcoBridges | + | ##*'''Select Image Name''' : Select ''TelcoBridges SBC xx.yy.zz'' as created in [[#Upload an Image]] section.<br/>[[File:OpenStackLaunchInstanceSourceTab_V2.png|750px]] |
##<big>Flavor tab</big> | ##<big>Flavor tab</big> | ||
| − | ##*'''Flavor''' : Select ''TelcoBridges | + | ##*'''Flavor''' : Select ''TelcoBridges SBC Flavor'' as created in [[#Creating a Flavor]] section. <br/>[[File:OpenStackLaunchInstanceFlavorTab_V2.png|750px]] |
##<big>Networks tab</big> | ##<big>Networks tab</big> | ||
| − | ##*'''Selected Networks''': If you are installing a '''standalone''' SBC, the | + | ##*'''Selected Networks''': If you are installing a '''standalone''' SBC, the SBC will need access to ''WAN'' and ''MGMT'' networks. For transcoding, or HA pair installation, the SBC will also need access to ''CTRL0'', ''CTRL1'', and ''TRANS0'' networks. Please refer to [[TSBC-SW:Networking|ProSBC-SW:Networking]] for details on network requirements. For ProSBC Transcoding and associated network setup please also see [[FreeSBC:Transcoding and Network Setup|ProSBC:Transcoding and Network Setup]]. '''Important''': For optimal performance, it is recommended to use SR-IOV or MacVTap ports to access ''LAN'' and ''WAN'' networks. <br/>[[File:OpenStackLaunchInstanceNetworkTab.png|500px]] |
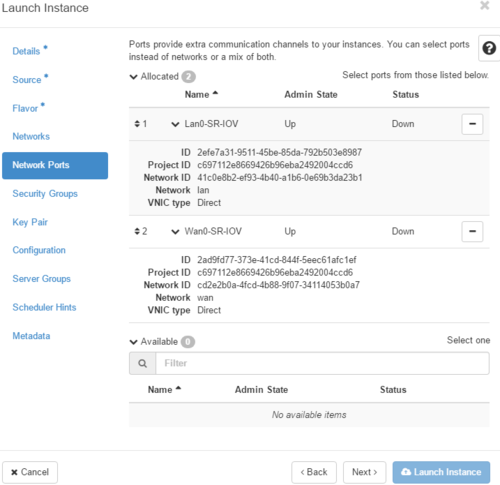
##<big>Network Ports tab</big> | ##<big>Network Ports tab</big> | ||
| − | ##*'''Ports''' : For optimal performances, SR-IOV and MacVTap ports should be used to access ''LAN'' and ''WAN'' networks. If you do choose to use Network Ports to attach to ''LAN'' and ''WAN'' networks, do not attach to them in ''Networks Tabs''. | + | ##*'''Ports''' : For optimal performances, SR-IOV and MacVTap ports should be used to access ''LAN'' and ''WAN'' networks. If you do choose to use Network Ports to attach to ''LAN'' and ''WAN'' networks, do not attach to them in ''Networks Tabs''. <br/>[[File:OpenStackLaunchInstanceNetworkPortsTab.png|500px]] |
##<big>Security Groups tab</big> | ##<big>Security Groups tab</big> | ||
##*'''Security Groups''': Activate the security groups that you want to assign to the instance. Security groups are a kind of cloud firewall that define which incoming network traffic is forwarded to instances. If you have not created any security groups, you can assign only the default security group to the instance. '''Warning''': ''Make sure the selected security group allows ingress traffic''. <br/>[[File:OpenStackLaunchInstanceSecurityGroupTab.png|500px]] | ##*'''Security Groups''': Activate the security groups that you want to assign to the instance. Security groups are a kind of cloud firewall that define which incoming network traffic is forwarded to instances. If you have not created any security groups, you can assign only the default security group to the instance. '''Warning''': ''Make sure the selected security group allows ingress traffic''. <br/>[[File:OpenStackLaunchInstanceSecurityGroupTab.png|500px]] | ||
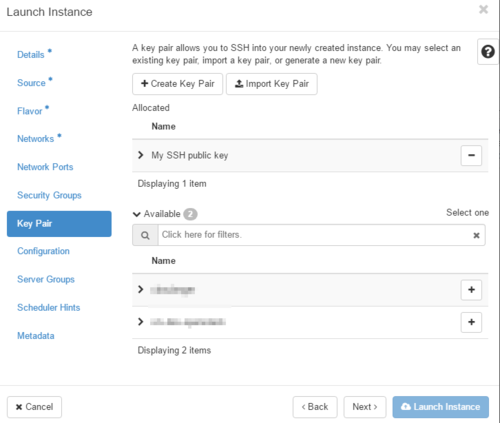
##<big>Key Pair tab</big> | ##<big>Key Pair tab</big> | ||
| − | ##*'''Key Pair''' : SSH access to the | + | ##*'''Key Pair''' : SSH access to the SBC with a password is disabled by default on the SBC. You will need to provide your SSH public key here in order to get SSH access into the SBC.<br/>[[File:OpenStackLaunchInstanceKeyPairTab.png|500px]] |
| − | #Click Launch Instance.<br/>The | + | #Click Launch Instance.<br/>The SBC instance will start in a compute node in your cloud.<br/>When the instance state is changed to Active, you will be able to connect to the SBC using SSH or a web browser as described in the next section.. |
| + | #You may also want to associate a floating IP to your device in order to reach it. Click on Associate Floating IP on the following menu. | ||
| + | <br/>[[File:OpenStackLaunchInstanceAssociateIP.png|1000px]] | ||
==== References ==== | ==== References ==== | ||
*https://docs.openstack.org/user-guide/dashboard-launch-instances.html | *https://docs.openstack.org/user-guide/dashboard-launch-instances.html | ||
| − | === Accessing the | + | === Accessing the SBC Console === |
| − | ==== | + | ==== SBC SSH Access ==== |
| − | There is no root password by default, you will need to SSH onto the | + | There is no root password by default, you will need to SSH onto the SBC using SSH private key matching the public provided in the '''Key Pair tab''' when [[#Launching an instance|Launching]] the SBC instance. Login using ''tbcloud'' as username. |
| − | For example, if | + | For example, if your SBC management IP is 192.168.178.30: |
> ssh tbcloud@192.168.178.30 | > ssh tbcloud@192.168.178.30 | ||
ECDSA key fingerprint is 5d:94:a1:93:0f:a4:7a:5d:41:cc:29:49:79:5a:58:f3. | ECDSA key fingerprint is 5d:94:a1:93:0f:a4:7a:5d:41:cc:29:49:79:5a:58:f3. | ||
| Line 168: | Line 160: | ||
CentOS-7-x86_64-Minimal-1511/112/190195:197392, Fri 7 Apr 17:41:46 EDT 2017 | CentOS-7-x86_64-Minimal-1511/112/190195:197392, Fri 7 Apr 17:41:46 EDT 2017 | ||
| − | [tbcloud@ | + | [tbcloud@freesbc ~]$ |
| − | ==== Accessing the | + | ==== Accessing the SBC Web Portal ==== |
| − | # Open a web browser to the management IP of the | + | # Open a web browser to the management IP of the SBC, on port 12358. For example if your server address is 192.168.178.30, the URL would be: <br/> http://192.168.178.30:12358 |
| − | # You should get to the | + | # You should get to the SBC Configuration Wizard <br/> [[File:TSBC_WebPortal_Configuration_wizard.jpg|350px]] |
| − | From here, you can go to [[TSBC-SW:WebPortal:Initial Configuration|Web Portal Initial Configuration Guide]] to continue the installation | + | From here, you can go to [[TSBC-SW:WebPortal:Initial Configuration|Web Portal Initial Configuration Guide]] to continue the installation. |
== Web Portal Initial Configuration == | == Web Portal Initial Configuration == | ||
Click on the following link to pursue installation from the web portal: | Click on the following link to pursue installation from the web portal: | ||
| − | [[TSBC-SW:WebPortal:Initial Configuration | + | [[TSBC-SW:WebPortal:Initial Configuration|SBC Initial Configuration]] |
| − | + | ||
| − | + | ||
| − | + | ||
| − | + | ||
Latest revision as of 14:15, 13 April 2021
Contents |
Requirements
Minimal Cloud requirements:
- 64 bits infrastructures only
- Virtio NIC interface
- qemu-kvm CPU exposed as 'host' or minimally 'core2duo'
- One Ethernet adapter for management
- One or more Ethernet adapter(s) for data
| Sessions | CPU | RAM | Disk Space (SSD) | Ethernet ports |
|---|---|---|---|---|
|
Up to 5,000 |
2 to 4 |
4 Gb |
40 Gb |
1 Gbps |
|
5,000-20,000 |
4 to 6 |
8 Gb |
60 Gb |
4 X 1 Gbps or 1 X 10 Gbps |
|
20,000-26,000 |
6 to 8 |
16 Gb |
80 Gb |
1 X 10 Gbps |
** The CPU number is based on Intel R630 with Xeon E5-2643. Double the CPUs number if yours are from a earlier generations.
More details on HW/CPU/NIC requirements can be found here: Requirements Matrix
For better performance use:
- SR-IOV or MacVTap compatible NICs
- Overcommit set to 1:1
- No CPU (including hyperthreading) shared between infrastructure and compute section
- Dedicated memory allocation to VM
Getting the Image
Please go to our ProSBC Download site to get a copy of the latest SBC Image.
Installation on OpenStack cloud
SBC OpenStack Minimal Flavor
In OpenStack, a flavor defines the compute, memory, and storage capacity of a virtual server, also known as an instance. If you do not have a flavor that meets the listed minimal requirements, you will have to create a new one.
Creating a Flavor
- Log in to the Dashboard and select the Admin drop-down list.
- In the Admin drop-doown list, open the System drop-down list and select the Flavors category.
- Click Create Flavor.
- In the Create Flavor window, enter or select the parameters for the flavor in the Flavor Information tab.
- In the Flavor Access tab, you can control access to the flavor by moving projects from the All Projects column to the Selected Projects column.
Only projects in the Selected Projects column can use the flavor. If there are no projects in the right column, all projects can use the flavor. - Click Create Flavor.
References
- https://docs.openstack.org/admin-guide/dashboard-manage-flavors.html
- https://docs.openstack.org/admin-guide/compute-flavors.html
TBSC OpenStack Image
A virtual machine image is a single file that contains a virtual disk that has a bootable operating system installed on it. Images are used to create virtual machine instances within the cloud.
You will need to upload the latest SBC image into your OpenStack before you can launch a virtual machine instance running the SBC software.
Upload an Image
Follow this procedure to upload an image to a project:
- Log in to the dashboard.
- Select the appropriate project from the drop down menu at the top left.
- On the Project tab, open the Compute tab and click Images category.
- Click Create Image.
- The Create An Image dialog box appears.
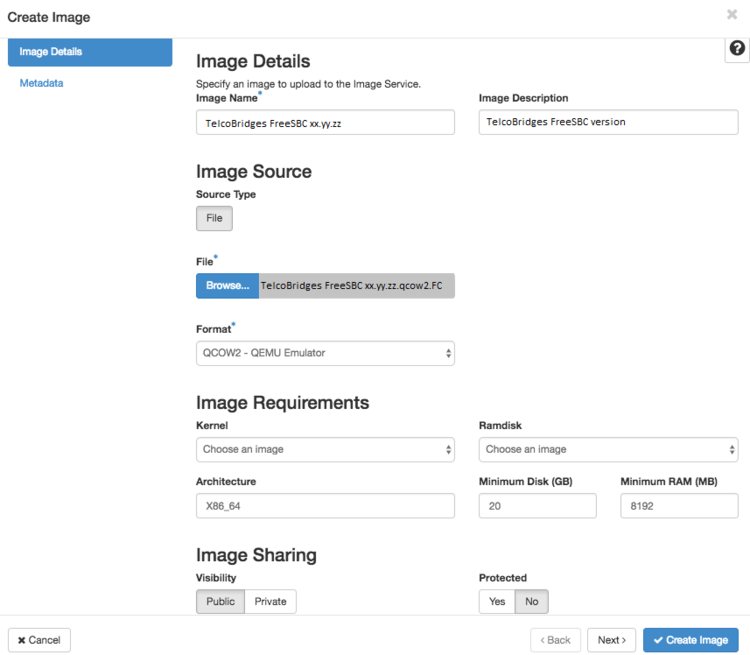
- Enter the following values:
- Image Name : TelcoBridges SBC xx.yy.zz (Where xxx.yy.zz is changed to the version number of the ProSBC image)
- Image Description: TelcoBridges SBC version xx.yy.zz
- Image Source : .qcow2 file.
- Image File : Browse for the image file on your file system and add it. Must not be compressed (tar.gz).
- Format: QCOW2
- Architecture: x86_64
- Minimum Disk (GB) : 20
- Minimum RAM (MB): 8192
- Visibility : The access permission for the image. Public or Private, depending on your needs.
- Protected: Select this check box to ensure that only users with permissions can delete the image. Yes or No.
- Image Metadata : Leave empty.
- Click Create Image.
The image is queued to be uploaded. It might take some time before the status changes from Queued to Active.
References
SBC OpenStack Instance
Instances are virtual machines that run inside OpenStack's cloud. You will need to launch a new instance from the SBC Image created in the #Upload an Image section
Launching an instance
- Log in to the dashboard.
- Select the appropriate project from the drop down menu at the top left.
- On the Project tab, open the Compute tab and click Instances category.
- The dashboard shows the instances with its name, its private and floating IP addresses, size, status, task, power state, and so on.
- Click Launch Instance.
- In the Launch Instance dialog box, specify the following values:
- Details tab
- Source tab
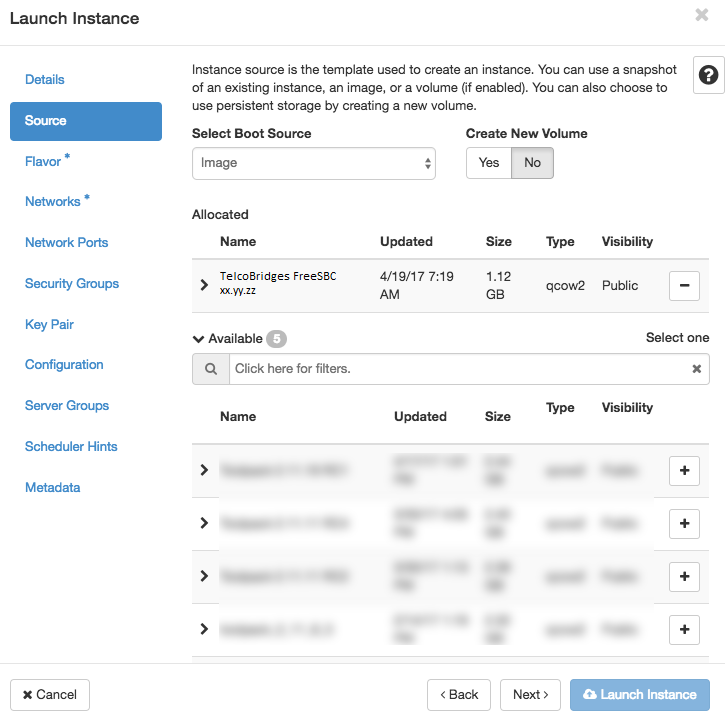
- Instance Boot Source : Boot from image.
- Create new Volume : No
- Select Image Name : Select TelcoBridges SBC xx.yy.zz as created in #Upload an Image section.
- Flavor tab
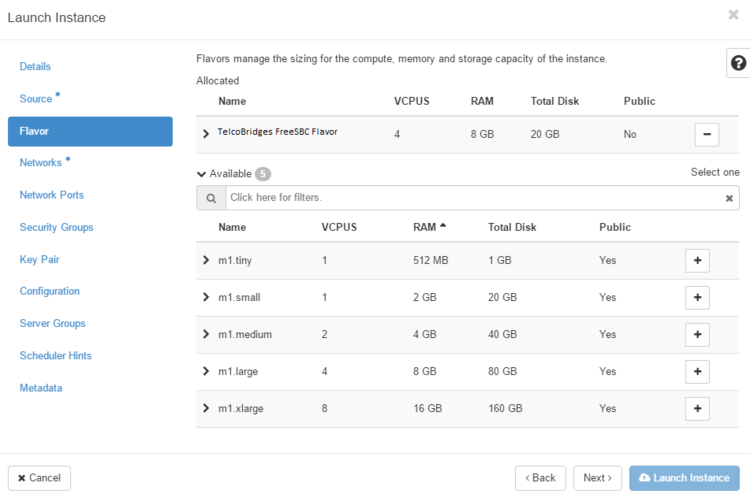
- Flavor : Select TelcoBridges SBC Flavor as created in #Creating a Flavor section.
- Flavor : Select TelcoBridges SBC Flavor as created in #Creating a Flavor section.
- Networks tab
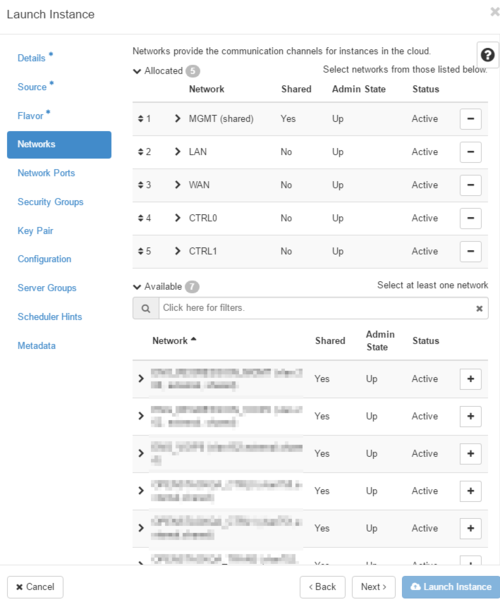
- Selected Networks: If you are installing a standalone SBC, the SBC will need access to WAN and MGMT networks. For transcoding, or HA pair installation, the SBC will also need access to CTRL0, CTRL1, and TRANS0 networks. Please refer to ProSBC-SW:Networking for details on network requirements. For ProSBC Transcoding and associated network setup please also see ProSBC:Transcoding and Network Setup. Important: For optimal performance, it is recommended to use SR-IOV or MacVTap ports to access LAN and WAN networks.
- Selected Networks: If you are installing a standalone SBC, the SBC will need access to WAN and MGMT networks. For transcoding, or HA pair installation, the SBC will also need access to CTRL0, CTRL1, and TRANS0 networks. Please refer to ProSBC-SW:Networking for details on network requirements. For ProSBC Transcoding and associated network setup please also see ProSBC:Transcoding and Network Setup. Important: For optimal performance, it is recommended to use SR-IOV or MacVTap ports to access LAN and WAN networks.
- Network Ports tab
- Security Groups tab
- Security Groups: Activate the security groups that you want to assign to the instance. Security groups are a kind of cloud firewall that define which incoming network traffic is forwarded to instances. If you have not created any security groups, you can assign only the default security group to the instance. Warning: Make sure the selected security group allows ingress traffic.
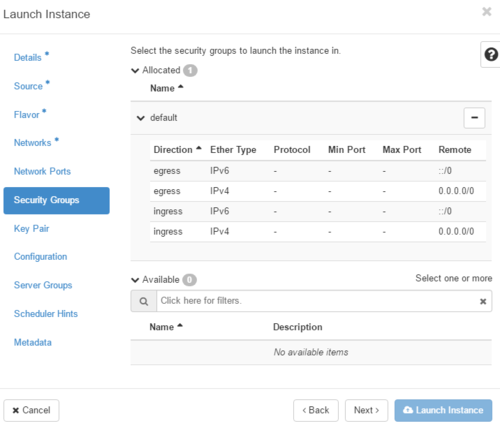
- Security Groups: Activate the security groups that you want to assign to the instance. Security groups are a kind of cloud firewall that define which incoming network traffic is forwarded to instances. If you have not created any security groups, you can assign only the default security group to the instance. Warning: Make sure the selected security group allows ingress traffic.
- Key Pair tab
- Click Launch Instance.
The SBC instance will start in a compute node in your cloud.
When the instance state is changed to Active, you will be able to connect to the SBC using SSH or a web browser as described in the next section.. - You may also want to associate a floating IP to your device in order to reach it. Click on Associate Floating IP on the following menu.
References
Accessing the SBC Console
SBC SSH Access
There is no root password by default, you will need to SSH onto the SBC using SSH private key matching the public provided in the Key Pair tab when Launching the SBC instance. Login using tbcloud as username.
For example, if your SBC management IP is 192.168.178.30:
 > ssh tbcloud@192.168.178.30
   ECDSA key fingerprint is 5d:94:a1:93:0f:a4:7a:5d:41:cc:29:49:79:5a:58:f3.
   Are you sure you want to continue connecting (yes/no)? yes
   Warning: Permanently added '192.168.178.30' (ECDSA) to the list of known hosts.

   CentOS-7-x86_64-Minimal-1511/112/190195:197392, Fri  7 Apr 17:41:46 EDT 2017
   [tbcloud@freesbc ~]$
Accessing the SBC Web Portal
- Open a web browser to the management IP of the SBC, on port 12358. For example if your server address is 192.168.178.30, the URL would be:
http://192.168.178.30:12358 - You should get to the SBC Configuration Wizard
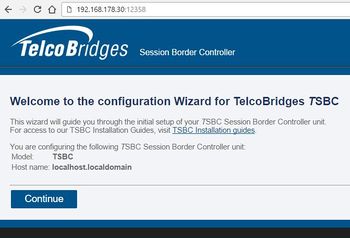
From here, you can go to Web Portal Initial Configuration Guide to continue the installation.
Web Portal Initial Configuration
Click on the following link to pursue installation from the web portal: SBC Initial Configuration
