FreeSBC:Cloud:AWS Installation A
Lucas Joyal (Talk | contribs) (Add region explaination) |
m (Minor) |
||
| (19 intermediate revisions by 4 users not shown) | |||
| Line 1: | Line 1: | ||
| − | {{DISPLAYTITLE: | + | {{DISPLAYTITLE:ProSBC:Cloud:AWS Installation}} |
| − | This page is intended to give assistance to people launching an instance of '' | + | This page is intended to give assistance to people launching an instance of ''ProSBC'' using an Amazon Machine Image (AMI) on Amazon Web Service (AWS). |
| − | == Instantiate a | + | == '''Instantiate a ProSBC''' == |
* After logging in your Amazon account, click on “EC2” in the main AWS console: | * After logging in your Amazon account, click on “EC2” in the main AWS console: | ||
[[File:ConsoleEC2.png| 600px]] | [[File:ConsoleEC2.png| 600px]] | ||
| Line 10: | Line 10: | ||
[[File:AMIs.png| 100px]] | [[File:AMIs.png| 100px]] | ||
| − | * Click on the filter drop list and select “Private image” to locate | + | * Click on the filter drop list and select “Private image” to locate ProSBC AMI: |
[[File:PrivateImages.png| 500px]] | [[File:PrivateImages.png| 500px]] | ||
| − | * Select the region matching the region of the | + | * Select the region matching the region of the ProSBC AMI you want to test. If you don't know it, try "Canada (Central)". |
[[File:RegionAMI.png| 700px]] | [[File:RegionAMI.png| 700px]] | ||
| Line 25: | Line 25: | ||
* Supported instance type are: | * Supported instance type are: | ||
** C3, C4, D2, I2, M4 (excluding m4.16xlarge), and R3 instances ([https://docs.aws.amazon.com/AWSEC2/latest/UserGuide/enhanced-networking.html Supported instances from Amazon documentation]) | ** C3, C4, D2, I2, M4 (excluding m4.16xlarge), and R3 instances ([https://docs.aws.amazon.com/AWSEC2/latest/UserGuide/enhanced-networking.html Supported instances from Amazon documentation]) | ||
| + | *** Note: The Paris region is not supported at this time, since it does not have any of the supported instance types. | ||
| + | * This is the list of approximate performances for different AWS instance types. Results may vary according to configuration. | ||
| + | {| cellpadding="5" border="1" class="wikitable" | ||
| + | |- | ||
| + | ! width="150" style="background: none repeat scroll 0% 0% rgb(239, 239, 239); -moz-background-inline-policy: continuous;" | EC2 Instance | ||
| + | ! width="100" style="background: none repeat scroll 0% 0% rgb(239, 239, 239); -moz-background-inline-policy: continuous;" | AWS CPU cores | ||
| + | ! width="100" style="background: none repeat scroll 0% 0% rgb(239, 239, 239); -moz-background-inline-policy: continuous;" | Sessions per second (call rate) | ||
| + | ! width="100" style="background: none repeat scroll 0% 0% rgb(239, 239, 239); -moz-background-inline-policy: continuous;" | Sessions with RTP anchoring | ||
| + | ! width="200" style="background: none repeat scroll 0% 0% rgb(239, 239, 239); -moz-background-inline-policy: continuous;" | Sessions with Media bypass | ||
| + | |- | ||
| + | | valign="top" | | ||
| + | m4.large | ||
| + | | valign="top" | | ||
| + | 2 | ||
| + | | valign="top" | | ||
| + | 50 | ||
| + | | valign="top" | | ||
| + | 400 | ||
| + | | valign="top" | | ||
| + | 32,000 | ||
| + | |- | ||
| + | | valign="top" | | ||
| + | m4.xlarge | ||
| + | | valign="top" | | ||
| + | 4 | ||
| + | | valign="top" | | ||
| + | 215 | ||
| + | | valign="top" | | ||
| + | 750 | ||
| + | | valign="top" | | ||
| + | 60,000 | ||
| + | |- | ||
| + | | valign="top" | | ||
| + | c4.xlarge | ||
| + | | valign="top" | | ||
| + | 4 | ||
| + | | valign="top" | | ||
| + | 215 | ||
| + | | valign="top" | | ||
| + | 750 | ||
| + | | valign="top" | | ||
| + | 60,000 | ||
| + | |- | ||
| + | | valign="top" | | ||
| + | c4.2xlarge | ||
| + | | valign="top" | | ||
| + | 8 | ||
| + | | valign="top" | | ||
| + | 575 | ||
| + | | valign="top" | | ||
| + | 2,000 | ||
| + | | valign="top" | | ||
| + | 60,000 | ||
| + | |- | ||
| + | | valign="top" | | ||
| + | m4.4xlarge | ||
| + | | valign="top" | | ||
| + | 16 | ||
| + | | valign="top" | | ||
| + | 650 | ||
| + | | valign="top" | | ||
| + | 4,000 | ||
| + | | valign="top" | | ||
| + | 60,000 | ||
| + | |- | ||
| + | | valign="top" | | ||
| + | m4.10xlarge | ||
| + | | valign="top" | | ||
| + | 40 | ||
| + | | valign="top" | | ||
| + | 650 | ||
| + | | valign="top" | | ||
| + | 4,800 | ||
| + | | valign="top" | | ||
| + | 60,000 | ||
| + | |- | ||
| + | |} | ||
| + | |||
| + | |||
[[File:SelectResources.png| 800px]] | [[File:SelectResources.png| 800px]] | ||
| − | |||
| − | |||
* Click “Add Storage” to proceed to the next page: | * Click “Add Storage” to proceed to the next page: | ||
[[File:ChooseSubnet.png| 1000px]] | [[File:ChooseSubnet.png| 1000px]] | ||
| Line 36: | Line 113: | ||
* Change the Volume Size to 40Gb. | * Change the Volume Size to 40Gb. | ||
* Select "Volume Type": gp2 | * Select "Volume Type": gp2 | ||
| + | * Check the box "Delete on Termination" | ||
* Click “Add Tags” to proceed to the next page. | * Click “Add Tags” to proceed to the next page. | ||
[[File:NextTag.png| 800px]] | [[File:NextTag.png| 800px]] | ||
| Line 55: | Line 133: | ||
| − | * Click “Launch”. | + | * Click “Launch”. Be aware: you will be billed by Amazon for the instance resources: |
[[File:Launch.png| 1000px]] | [[File:Launch.png| 1000px]] | ||
| Line 74: | Line 152: | ||
[[File:RenameInstance.png| 800px]] | [[File:RenameInstance.png| 800px]] | ||
| − | + | === Optional: Elastic IP Creation section === | |
| − | * | + | * If you want to use an associate public IP generated by Amazon (called "Elastic IP"). Click on "Elastic IP" on the left, then click on "Allocate new address": |
[[File:ElasticIP.png| 300px]] | [[File:ElasticIP.png| 300px]] | ||
| Line 86: | Line 164: | ||
[[File:NewIP.png| 600px]] | [[File:NewIP.png| 600px]] | ||
| + | === Optional: Elastic IP association section === | ||
| − | * Go to the left pane and click on "Instance". Then select the instance " | + | * Go to the left pane and click on "Instance". Then select the instance "ProSBC" to display its description: |
[[File:IPforInstance.png| 600px]] | [[File:IPforInstance.png| 600px]] | ||
| − | * Find the ''' | + | * Find the '''eth0''' network interface in the instance description: |
[[File:GetTheRightNetworkInterface.png| 1100px]] | [[File:GetTheRightNetworkInterface.png| 1100px]] | ||
| − | * Click on the ''' | + | * Click on the '''eth0''' Network Interface, then click on the "Interface ID" link: |
[[File:InterfaceID.png| 1100px]] | [[File:InterfaceID.png| 1100px]] | ||
| Line 106: | Line 185: | ||
| − | * Click on "Instances" on the left pane and select " | + | * Click on "Instances" on the left pane and select "ProSBC" instance. Check if your instance is associated with a public IP: |
[[File:Ready.png| 1100px]] | [[File:Ready.png| 1100px]] | ||
| + | == Enable SR-IOV enhanced networking == | ||
| + | It is very important to enable "enhanced networking" for tbrouter to have access to the network devices on the VM. | ||
| − | + | This must be done before completing the initial web portal configuration. | |
| − | + | ||
| − | + | There are two types of enhanced networking, we need the second one. | |
| − | + | ||
| − | + | ||
| − | + | ||
| − | + | 1) Elastic Network Adapter (ENA) | |
| − | + | 2) Intel 82599 Virtual Function (VF) interface | |
| − | + | ||
| − | + | ===Install the AWS CLI=== | |
| + | https://aws.amazon.com/cli/ | ||
| − | + | ===Get security credentials for the command line=== | |
| + | On the AWS web portal, click on your account name and choose "My Security Credentials" | ||
| + | |||
| + | Expand the "Access keys" section | ||
| + | |||
| + | Create a new key, you will need the AWSAccessKeyId and AWSSecretKey | ||
| + | |||
| + | ===Open a CLI and execute the aws cli commands=== | ||
| + | aws configure | ||
| + | |||
| + | Paste the access key ID and key that you previously obtained along with your default region. | ||
| + | |||
| + | ===Show if the enhanced networking is enabled=== | ||
| + | Make sure to replace the example instance ID with your own AWS instance ID | ||
| + | |||
| + | aws ec2 describe-instance-attribute --instance-id i-0123456789abcdef1 --attribute sriovNetSupport | ||
| + | |||
| + | Enabled: | ||
| + | { | ||
| + | "InstanceId": "i-0123456789abcdef1", | ||
| + | "SriovNetSupport": { | ||
| + | "Value": "simple" | ||
| + | } | ||
| + | } | ||
| + | |||
| + | Not enabled: | ||
| + | { | ||
| + | "InstanceId": "i-0123456789abcdef1", | ||
| + | "SriovNetSupport": {} | ||
| + | } | ||
| + | |||
| + | ==Enable sriov enhanced networking== | ||
| + | To enable the sriov enhanced networking, first turn off the instance then do: | ||
| + | |||
| + | aws ec2 modify-instance-attribute --instance-id i-0123456789abcdef1 --sriov-net-support simple | ||
| + | |||
| + | == Accessing the TSBC-SW == | ||
| + | === Accessing the TSBC-SW web portal === | ||
| + | * Open a web browser to the management IP of the TSBC, on port 12358. Example if your Instance public IP address is 35.183.126.193, the URL would be: <br/> http://35.183.126.193:12358 | ||
| + | <br/> | ||
| + | :You should get to the TSBC Configuration Wizard <br/> | ||
| + | :[[File:AWS_TSBC_WebPortal_Configuration_wizard.jpg|700px]] | ||
| + | <br/> | ||
| + | |||
| + | Take note that it may take a while for the ProSBC system to make the Web Portal available (around 3-5 minutes). | ||
| + | |||
| + | * From here, you can go to [[TSBC-SW:WebPortal:Initial Configuration|Web Portal Initial Configuration Guide]] to continue the installation. | ||
| + | |||
| + | == Web Portal Initial Configuration == | ||
| + | Click on the following link to pursue installation from the web portal: | ||
| + | [[TSBC-SW:WebPortal:Initial Configuration]] | ||
== Troubleshooting == | == Troubleshooting == | ||
* [[FreeSBC:Cloud:AWS_Installation_Troubleshooting_A|Installation troubleshooting]] | * [[FreeSBC:Cloud:AWS_Installation_Troubleshooting_A|Installation troubleshooting]] | ||
| − | + | * [[FreeSBC:Cloud:Recovering_an_Elastic_IP_address|Recovering an Elastic IP address]] | |
[[Category:Revise on Major]] | [[Category:Revise on Major]] | ||
| + | |||
| + | == External References == | ||
| + | * [https://devops.profitbricks.com/tutorials/use-ssh-keys-with-putty-on-windows/#connect-to-server-with-private-key Accessing device with SSH and private key using putty] | ||
Latest revision as of 07:18, 6 April 2021
This page is intended to give assistance to people launching an instance of ProSBC using an Amazon Machine Image (AMI) on Amazon Web Service (AWS).
Contents |
Instantiate a ProSBC
- After logging in your Amazon account, click on “EC2” in the main AWS console:
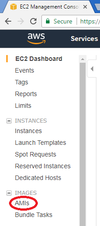
- On the left menu, click on “AMIs”:
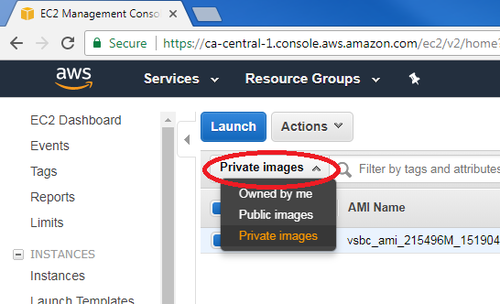
- Click on the filter drop list and select “Private image” to locate ProSBC AMI:
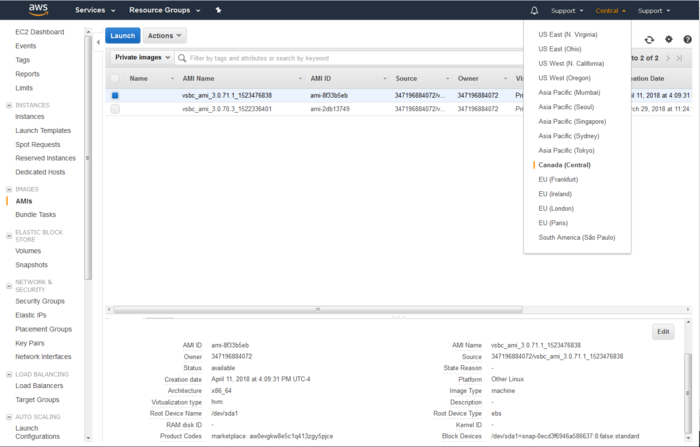
- Select the region matching the region of the ProSBC AMI you want to test. If you don't know it, try "Canada (Central)".
- Select the image and click “Launch”:
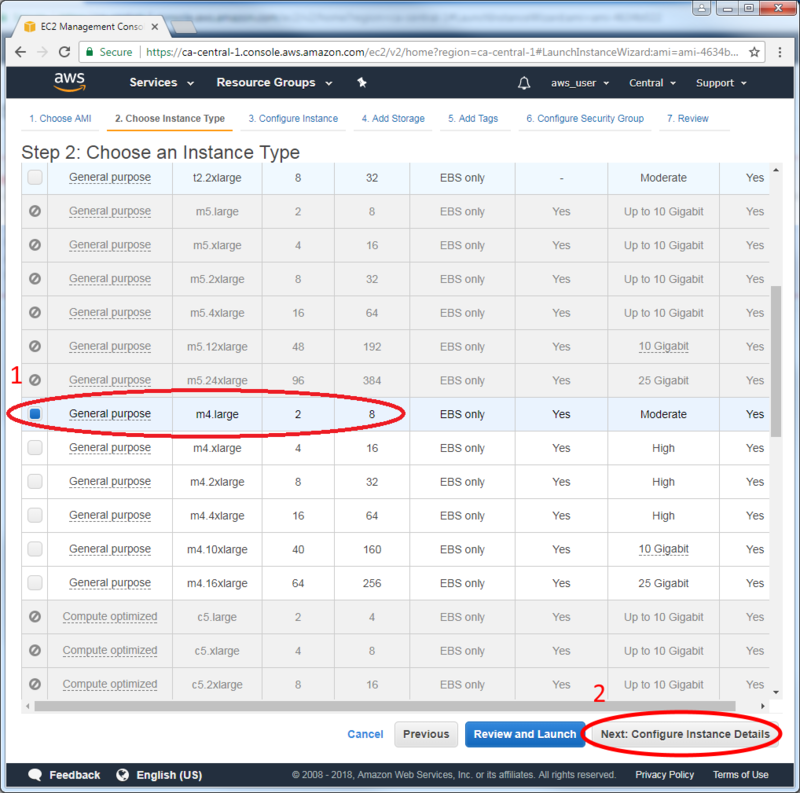
- Select the instance type and its resources. The recommended instance type is:
- m4.large (2 vCPU, 8 GiB)
- Supported instance type are:
- C3, C4, D2, I2, M4 (excluding m4.16xlarge), and R3 instances (Supported instances from Amazon documentation)
- Note: The Paris region is not supported at this time, since it does not have any of the supported instance types.
- C3, C4, D2, I2, M4 (excluding m4.16xlarge), and R3 instances (Supported instances from Amazon documentation)
- This is the list of approximate performances for different AWS instance types. Results may vary according to configuration.
| EC2 Instance | AWS CPU cores | Sessions per second (call rate) | Sessions with RTP anchoring | Sessions with Media bypass |
|---|---|---|---|---|
|
m4.large |
2 |
50 |
400 |
32,000 |
|
m4.xlarge |
4 |
215 |
750 |
60,000 |
|
c4.xlarge |
4 |
215 |
750 |
60,000 |
|
c4.2xlarge |
8 |
575 |
2,000 |
60,000 |
|
m4.4xlarge |
16 |
650 |
4,000 |
60,000 |
|
m4.10xlarge |
40 |
650 |
4,800 |
60,000 |
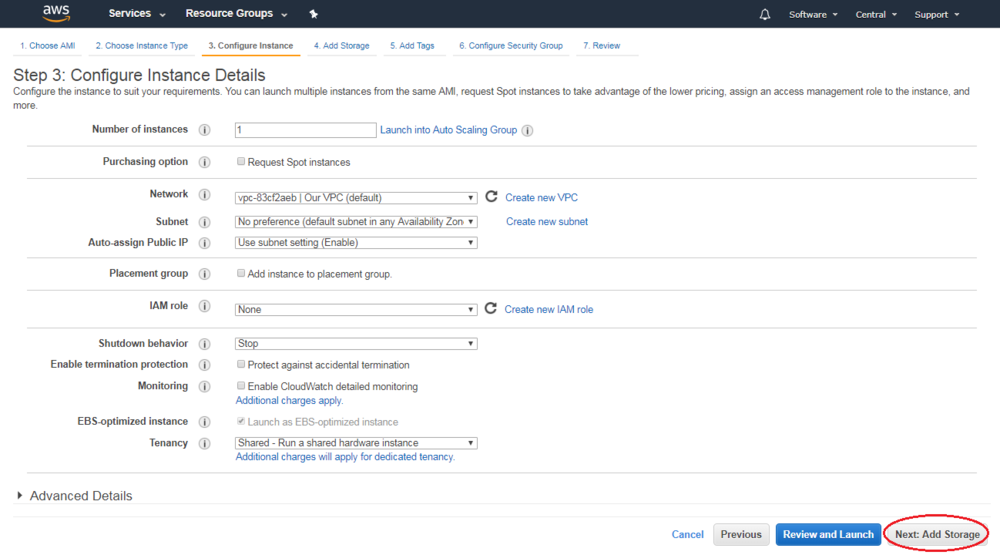
- Click “Add Storage” to proceed to the next page:
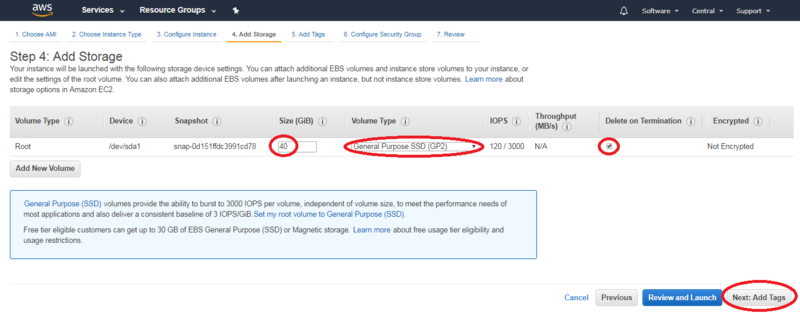
- Change the Volume Size to 40Gb.
- Select "Volume Type": gp2
- Check the box "Delete on Termination"
- Click “Add Tags” to proceed to the next page.
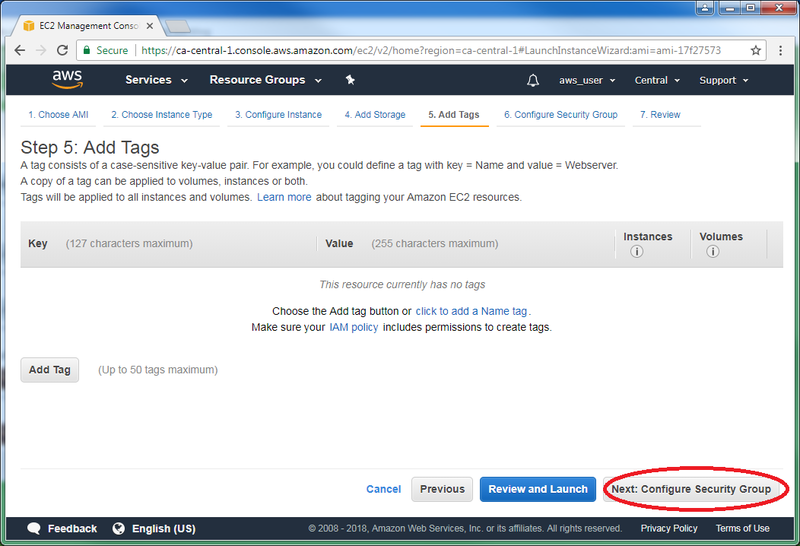
- You can leave the default parameters as they are.
- Click “Configure Security Group” to proceed to the next page:
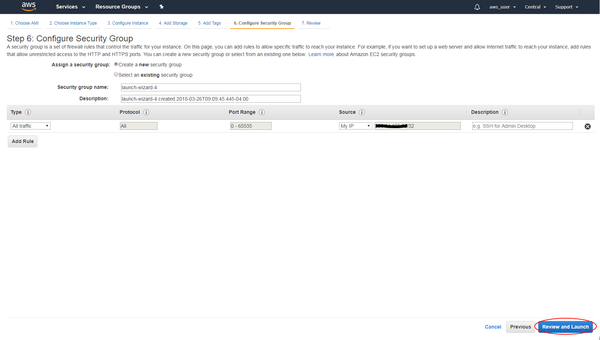
- Select "Create a new security group". We recommend that you simply open all ports on your own IP address, since the SBC contains its own internal firewall:
| Rule | Type | Port Range | Source IP |
|---|---|---|---|
| All traffic | All traffic | 0 - 65535 | (Use your own public IP) |
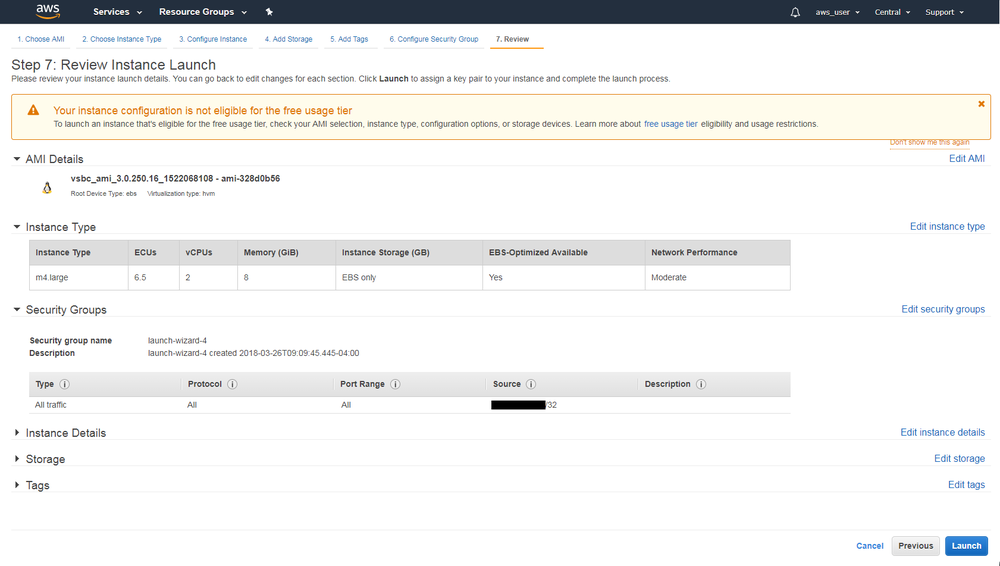
- Click “Launch”. Be aware: you will be billed by Amazon for the instance resources:
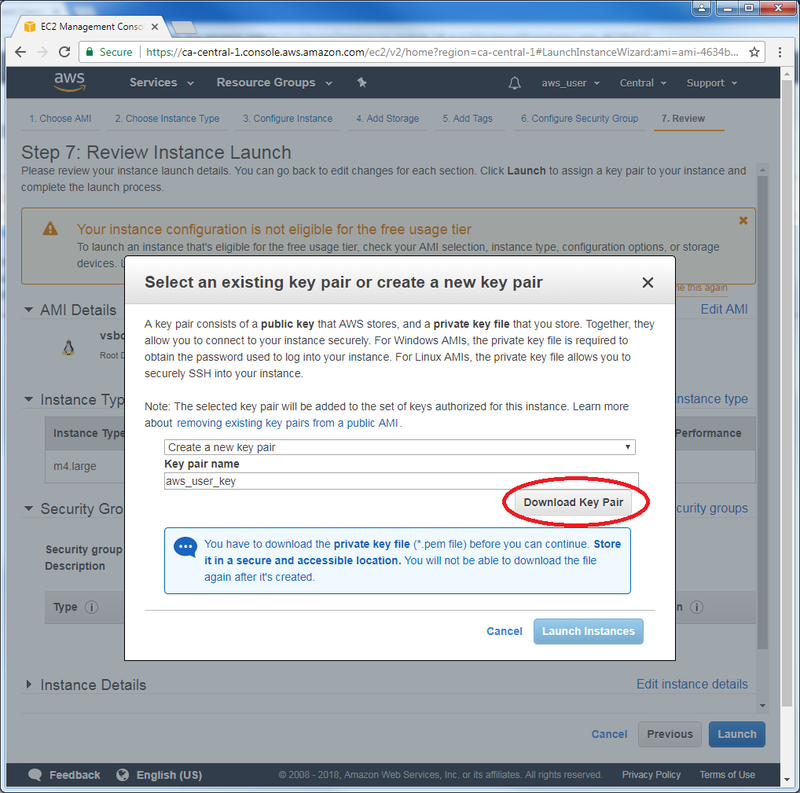
- You will be prompted to create a key pair, allowing you to securely connect to your instance. Select “Create a new key pair” if you do not own one, and give it a name. Then, click on “Download Key Pair” to download a .pem file since it is needed for a SSH connection. (Note: Make sure to not lose it, since you would then lose access the the SSH connection for the instance):
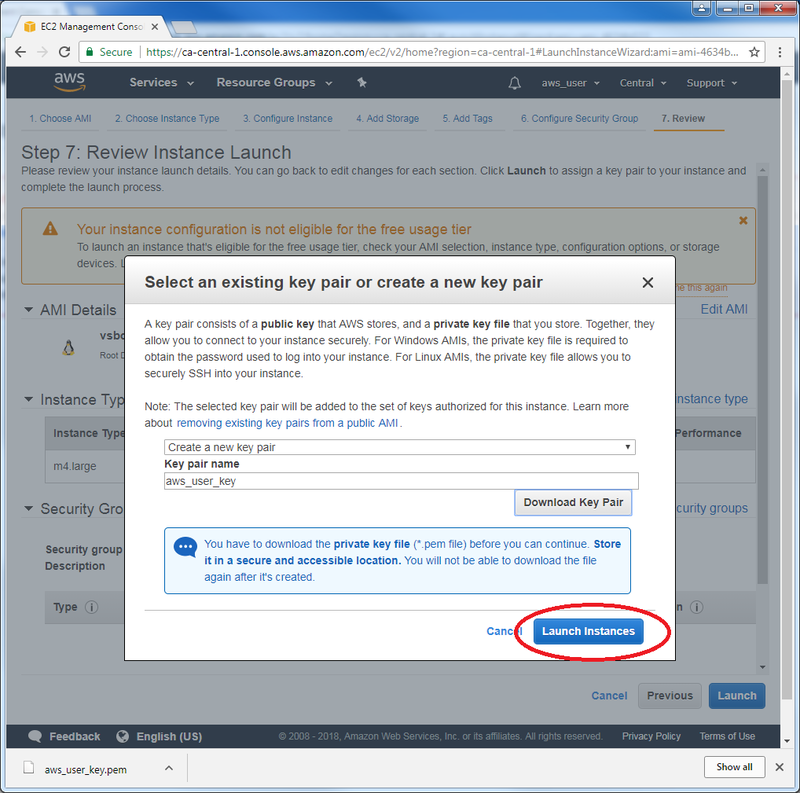
- Click on “Launch Instances”:
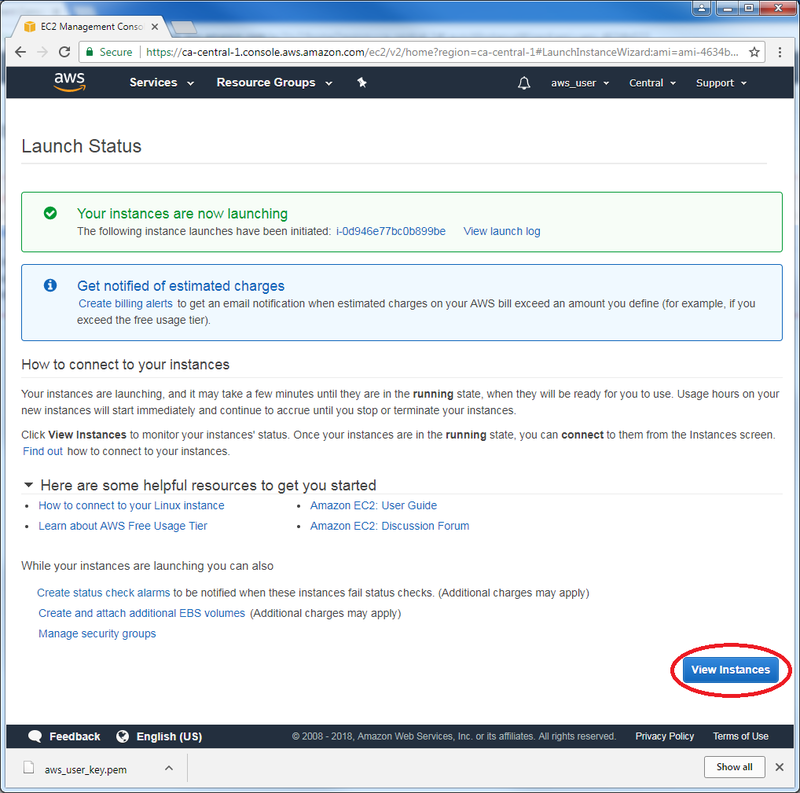
- You can view your instance by clicking on “View Instances”:
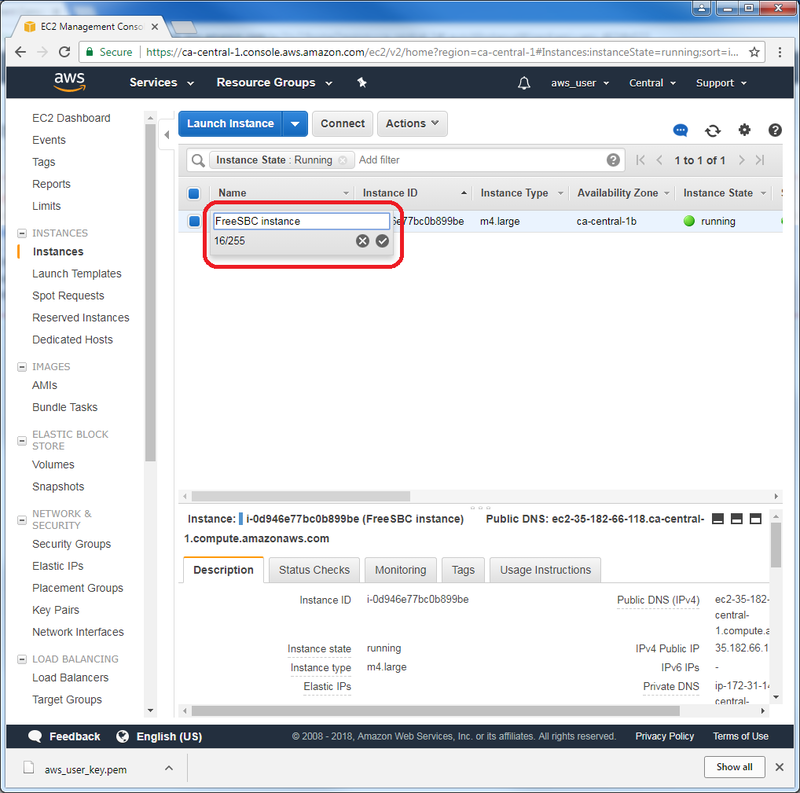
- Select the instance you just created and feel free to give it a name:
Optional: Elastic IP Creation section
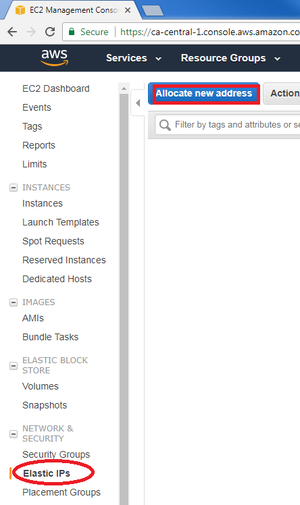
- If you want to use an associate public IP generated by Amazon (called "Elastic IP"). Click on "Elastic IP" on the left, then click on "Allocate new address":
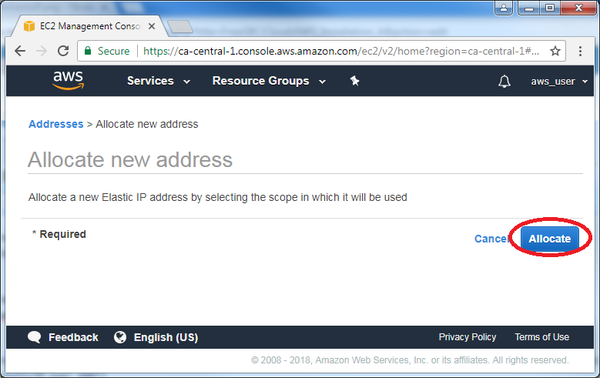
- Click on "Allocate IP". A new public IP will be generated by Amazon:
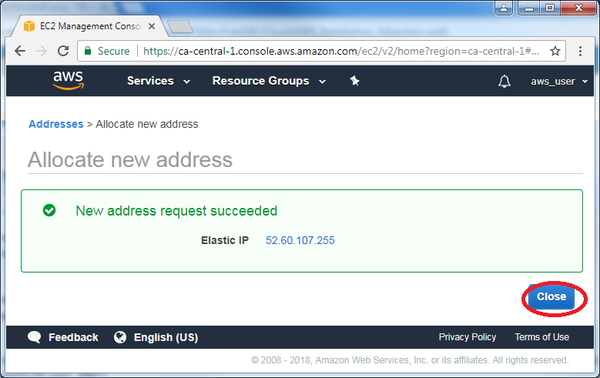
- Click on "Close":
Optional: Elastic IP association section
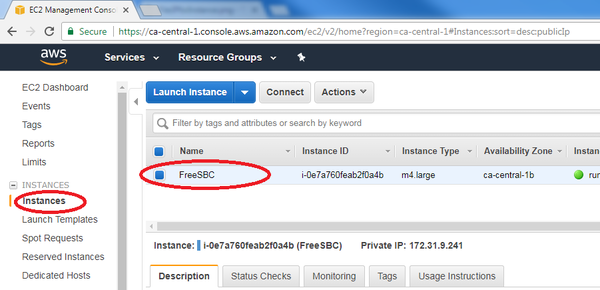
- Go to the left pane and click on "Instance". Then select the instance "ProSBC" to display its description:
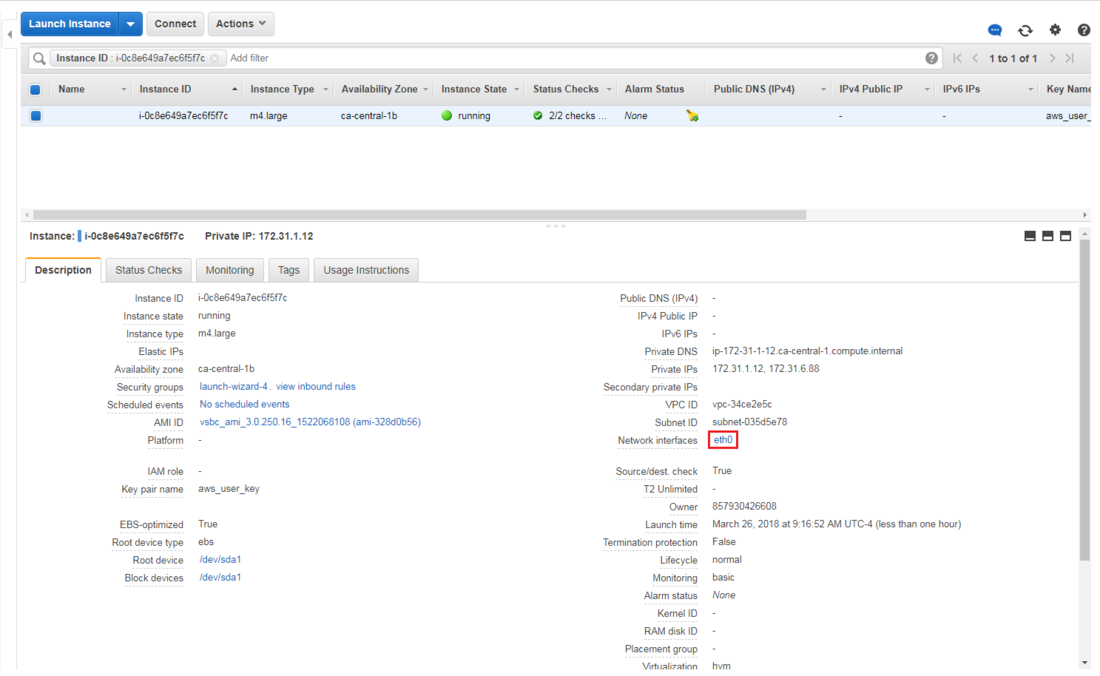
- Find the eth0 network interface in the instance description:
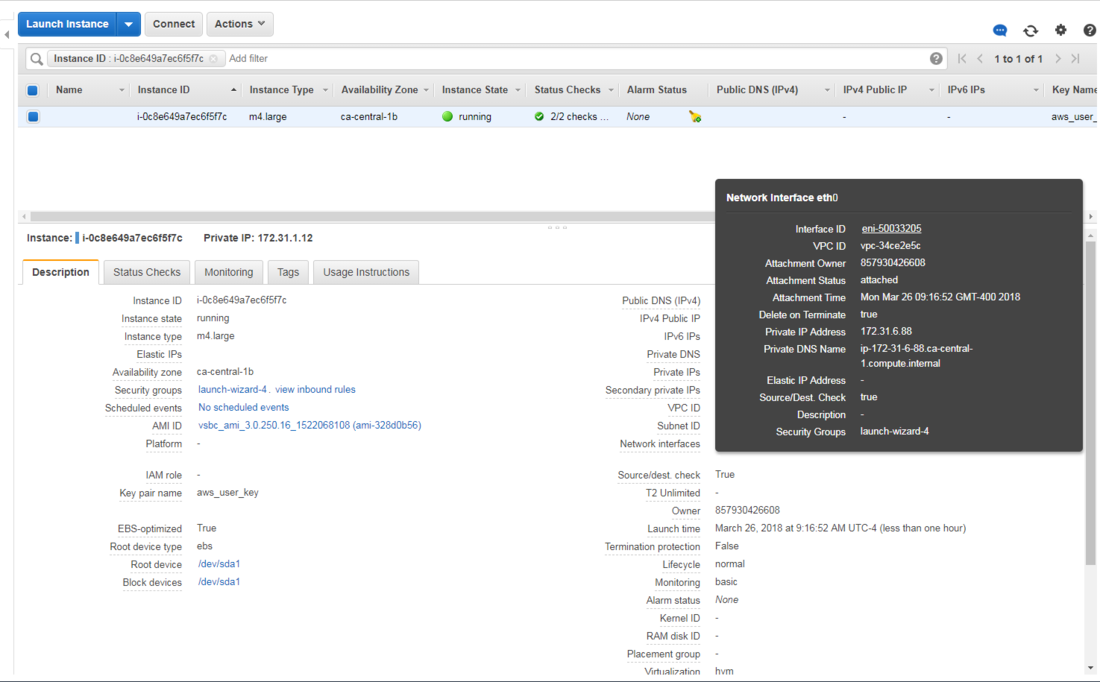
- Click on the eth0 Network Interface, then click on the "Interface ID" link:
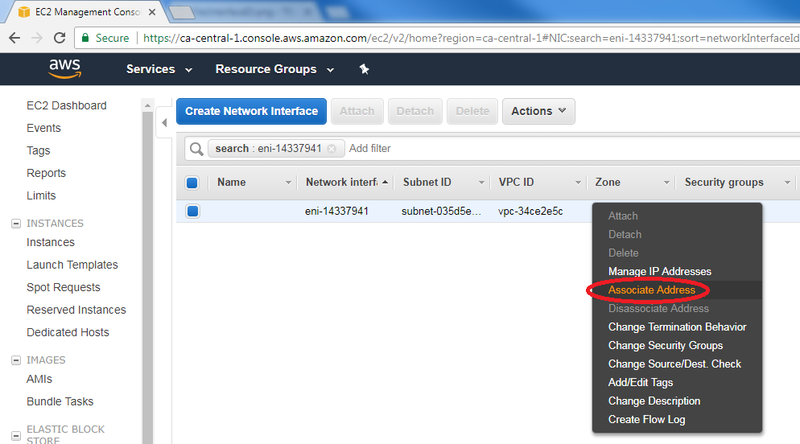
- Right-click on the selected Network Interface, then click "Associate Address":
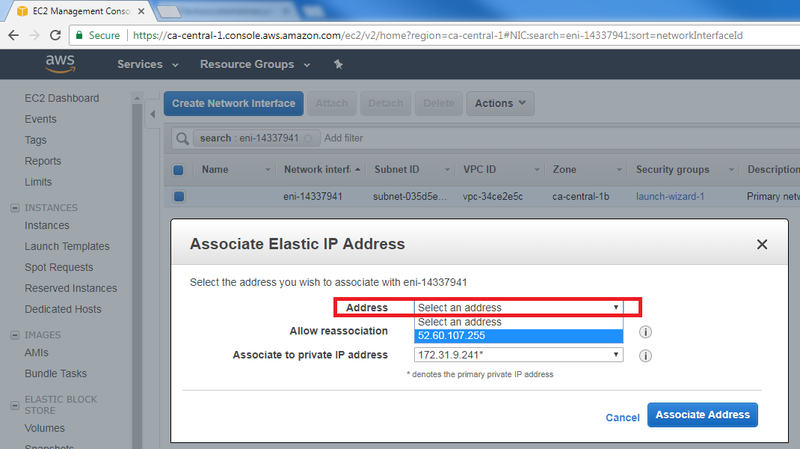
- In the Address list, select the public IP to associate with the main Network Interface. Then, click on "Associate Address":
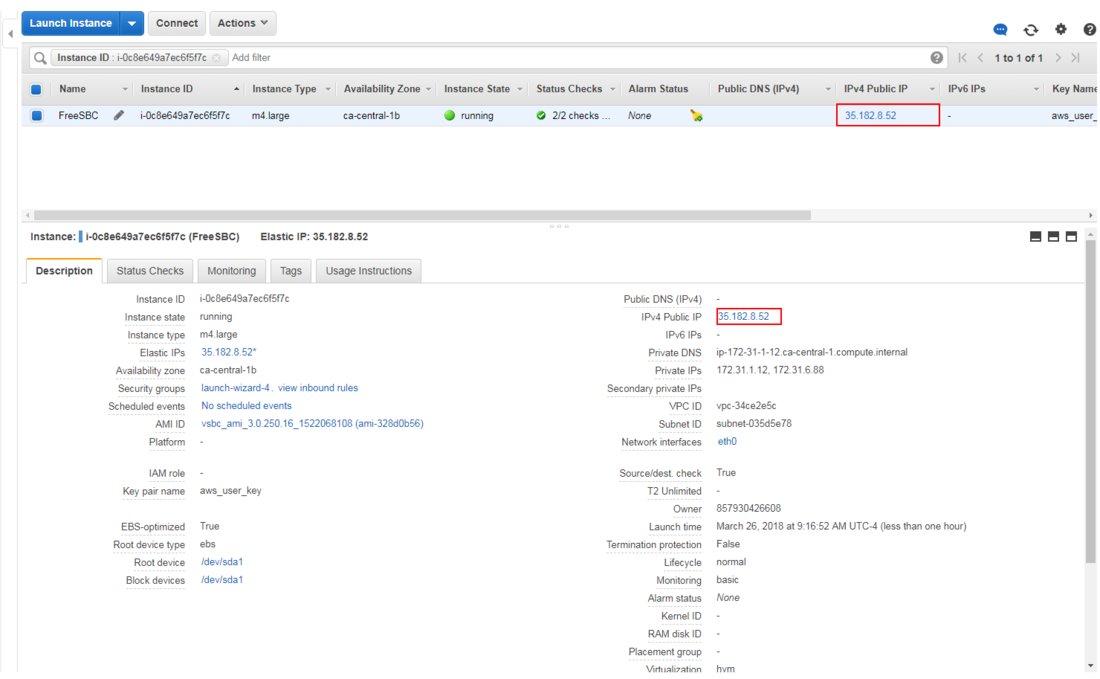
- Click on "Instances" on the left pane and select "ProSBC" instance. Check if your instance is associated with a public IP:
Enable SR-IOV enhanced networking
It is very important to enable "enhanced networking" for tbrouter to have access to the network devices on the VM.
This must be done before completing the initial web portal configuration.
There are two types of enhanced networking, we need the second one.
1) Elastic Network Adapter (ENA)
2) Intel 82599 Virtual Function (VF) interface
Install the AWS CLI
Get security credentials for the command line
On the AWS web portal, click on your account name and choose "My Security Credentials"
Expand the "Access keys" section
Create a new key, you will need the AWSAccessKeyId and AWSSecretKey
Open a CLI and execute the aws cli commands
aws configure
Paste the access key ID and key that you previously obtained along with your default region.
Show if the enhanced networking is enabled
Make sure to replace the example instance ID with your own AWS instance ID
aws ec2 describe-instance-attribute --instance-id i-0123456789abcdef1 --attribute sriovNetSupport
Enabled:
 {
     "InstanceId": "i-0123456789abcdef1",
     "SriovNetSupport": {
         "Value": "simple"
     }
 }
Not enabled:
 {
     "InstanceId": "i-0123456789abcdef1",
     "SriovNetSupport": {}
 }
Enable sriov enhanced networking
To enable the sriov enhanced networking, first turn off the instance then do:
aws ec2 modify-instance-attribute --instance-id i-0123456789abcdef1 --sriov-net-support simple
Accessing the TSBC-SW
Accessing the TSBC-SW web portal
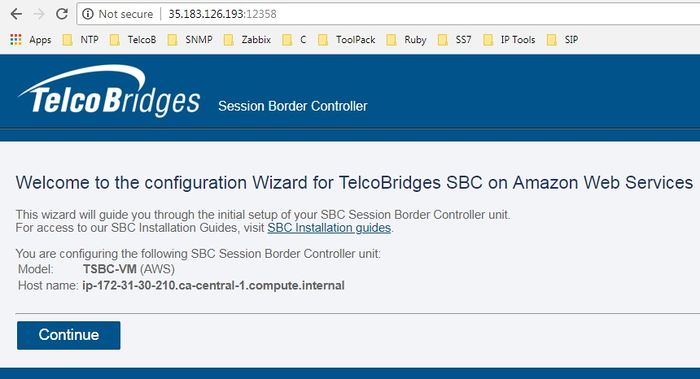
- Open a web browser to the management IP of the TSBC, on port 12358. Example if your Instance public IP address is 35.183.126.193, the URL would be:
http://35.183.126.193:12358
Take note that it may take a while for the ProSBC system to make the Web Portal available (around 3-5 minutes).
- From here, you can go to Web Portal Initial Configuration Guide to continue the installation.
Web Portal Initial Configuration
Click on the following link to pursue installation from the web portal: TSBC-SW:WebPortal:Initial Configuration

