Create A SIP Certificate A
(Changed title) |
|||
| (29 intermediate revisions by 2 users not shown) | |||
| Line 1: | Line 1: | ||
| − | == | + | __notoc__ |
| + | {| class="wikitable" | ||
| + | |- | ||
| + | |rowspan="2"|This article applies to: | ||
| + | |'''Product''' | ||
| + | |'''Version''' | ||
| + | |- | ||
| + | |SBC | ||
| + | |3.1 | ||
| + | |} | ||
{{DISPLAYTITLE:Configuring Certificates}} | {{DISPLAYTITLE:Configuring Certificates}} | ||
Certificates are used to provide secure connections, such as HTTPs (secure connection to the web portal) or [[FreeSBC]] secure SIP calls (SIP over TLS). | Certificates are used to provide secure connections, such as HTTPs (secure connection to the web portal) or [[FreeSBC]] secure SIP calls (SIP over TLS). | ||
| − | This article describes how to import | + | This article describes how to import certificates. These certificates are later grouped into [[Toolpack:Tsbc_TLS_Profiles|TLS Profiles]], which is the first step in configuring secure SIP on [[FreeSBC]]. |
| − | |||
| − | |||
| − | == Upload | + | == Upload Local Certificates == |
| + | Toolpack already contains, by default, a unique self-signed certificate (unique for each Toolpack system, shared for 1+1 hosts). This certificate is used for HTTPs, and can also be used for TLS. | ||
| + | Note:If you want create your own local certificate, [[Toolpack:Certificates|use can use openssl to create a self-signed certificate.]] | ||
| + | |||
| + | In case you want to use a custom local certificate, proceed as follows: | ||
1. Select '''Certificates''' from the navigation panel: | 1. Select '''Certificates''' from the navigation panel: | ||
| Line 19: | Line 30: | ||
[[Image:ConfigureCertificates_1.png|250px]] | [[Image:ConfigureCertificates_1.png|250px]] | ||
| − | 3. | + | 3. Enters (but using "Local" certificate type) to import the local certificate. |
* Provide a name that is meaningful to you. | * Provide a name that is meaningful to you. | ||
| − | * Select " | + | * Select "Local" certificate. |
* Drag-and-drop (or copy-paste) the certificate's text content into the appropriate text box | * Drag-and-drop (or copy-paste) the certificate's text content into the appropriate text box | ||
* Click "Create" | * Click "Create" | ||
| − | [[Image: | + | [[Image:ConfigureCertificates_3.png|500px]] |
| − | + | 4. Make sure to copy the private key in the following directory: | |
| − | + | ||
| − | + | ||
| − | + | ||
| − | + | ||
| − | + | ||
| − | + | ||
| − | + | ||
/lib/tb/toolpack/pkg/ssl_certificate/ | /lib/tb/toolpack/pkg/ssl_certificate/ | ||
| + | You can use ssh (command-line or using a tool like Filezilla) to upload the private key to the unit on the following path. | ||
| + | We recommend to use the same name for the key and certificate (except the extension of course): | ||
Example: | Example: | ||
| + | scp my_local_cert.key root@MyFreeSbcHostName:/lib/tb/toolpack/pkg/ssl_certificate/ | ||
| + | |||
| + | |||
| + | == Upload Trusted Certificate == | ||
| + | |||
| + | 1. Select '''Certificates''' from the navigation panel: | ||
| + | |||
| + | [[Image:ConfigureCertificates_0.png|150px]] | ||
| + | |||
| + | 2. Click ''' Create New Certificate ''' === | ||
| + | |||
| + | [[Image:ConfigureCertificates_1.png|250px]] | ||
| + | |||
| + | 3. Configure the certificate parameters: | ||
| + | * Provide a name that is meaningful to you. | ||
| + | * Select "Trusted" certificate to import a remote party's certificate to trust. | ||
| + | * Drag-and-drop (or copy-paste) the certificate's text content into the appropriate text box | ||
| + | * Click "Create" | ||
| + | |||
| + | [[Image:ConfigureCertificates_2.png|500px]] | ||
| − | |||
| − | |||
| − | |||
== List of Parameters == | == List of Parameters == | ||
Latest revision as of 09:12, 11 November 2020
| This article applies to: | Product | Version |
| SBC | 3.1 |
Certificates are used to provide secure connections, such as HTTPs (secure connection to the web portal) or FreeSBC secure SIP calls (SIP over TLS).
This article describes how to import certificates. These certificates are later grouped into TLS Profiles, which is the first step in configuring secure SIP on FreeSBC.
Upload Local Certificates
Toolpack already contains, by default, a unique self-signed certificate (unique for each Toolpack system, shared for 1+1 hosts). This certificate is used for HTTPs, and can also be used for TLS. Note:If you want create your own local certificate, use can use openssl to create a self-signed certificate.
In case you want to use a custom local certificate, proceed as follows:
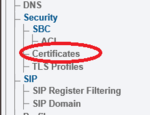
1. Select Certificates from the navigation panel:
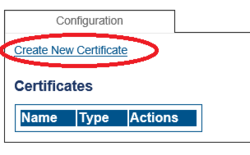
2. Click Create New Certificate ===
3. Enters (but using "Local" certificate type) to import the local certificate.
- Provide a name that is meaningful to you.
- Select "Local" certificate.
- Drag-and-drop (or copy-paste) the certificate's text content into the appropriate text box
- Click "Create"
4. Make sure to copy the private key in the following directory:
/lib/tb/toolpack/pkg/ssl_certificate/
You can use ssh (command-line or using a tool like Filezilla) to upload the private key to the unit on the following path. We recommend to use the same name for the key and certificate (except the extension of course): Example:
scp my_local_cert.key root@MyFreeSbcHostName:/lib/tb/toolpack/pkg/ssl_certificate/
Upload Trusted Certificate
1. Select Certificates from the navigation panel:
2. Click Create New Certificate ===
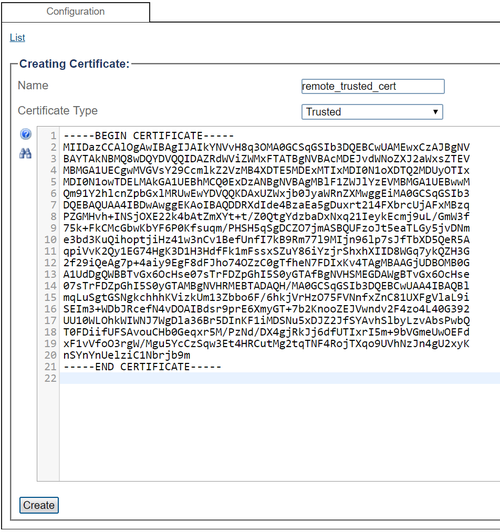
3. Configure the certificate parameters:
- Provide a name that is meaningful to you.
- Select "Trusted" certificate to import a remote party's certificate to trust.
- Drag-and-drop (or copy-paste) the certificate's text content into the appropriate text box
- Click "Create"


