Toolpack:M3UA Use Case A:Configure IP Interface A
From TBwiki
(Difference between revisions)
(Created page with "=== '''''Applies to version(s): v3.0''''' === {{DISPLAYTITLE:Configuring VoIP Interfaces}} The IP interface of the VoIP0 and VoIP1 ports can be configured by setting the foll...") |
(→Applies to version(s): v3.0) |
||
| (3 intermediate revisions by one user not shown) | |||
| Line 2: | Line 2: | ||
{{DISPLAYTITLE:Configuring VoIP Interfaces}} | {{DISPLAYTITLE:Configuring VoIP Interfaces}} | ||
| − | + | In this use case the IP interface of the VoIP0 and VoIP1 ports are configured by setting the following: | |
| − | *IP Address | + | *IP Address: 192.168.0.55 |
| − | *Netmask | + | *Netmask: 255.255.255.0 |
| − | *Gateway | + | *Gateway: 192.168.0.1 |
<br> | <br> | ||
| Line 19: | Line 19: | ||
*Click '''Create New IP Interface''' | *Click '''Create New IP Interface''' | ||
| − | [[Image: | + | [[Image:Voip_Interface_1a_1.png]] |
<br> 3. Configure the IP port: | <br> 3. Configure the IP port: | ||
*Enter a name for the interface | *Enter a name for the interface | ||
| − | *Select one or more services to use for the IP | + | *Select one or more services to use for the IP interface |
*Select a '''Virtual port''' from which IP packets will exit. | *Select a '''Virtual port''' from which IP packets will exit. | ||
*Indicate whether or not to use dynamic IP will be used on this interface. For example DHCP to automatically get an IP address for this port. (selecting this option removes the need to enter and IP address, Netmask, and Gateway) | *Indicate whether or not to use dynamic IP will be used on this interface. For example DHCP to automatically get an IP address for this port. (selecting this option removes the need to enter and IP address, Netmask, and Gateway) | ||
| Line 34: | Line 34: | ||
'''Note:''' The IP addresses of ETH0, ETH1, VOIP0 and VOIP1 must be on different subnets. <br> | '''Note:''' The IP addresses of ETH0, ETH1, VOIP0 and VOIP1 must be on different subnets. <br> | ||
| − | [[Image:Create Voip | + | [[Image:Create Voip Interface_2_1.png]] |
<br> | <br> | ||
| Line 40: | Line 40: | ||
4. The changes are displayed in the IP interfaces information panel: | 4. The changes are displayed in the IP interfaces information panel: | ||
| − | [[Image:Create Voip | + | [[Image:Create Voip Interface_3_1.png]] |
| − | + | ||
| − | + | ||
| − | + | ||
| − | + | ||
| − | + | ||
| − | + | ||
| − | + | ||
| − | + | ||
| − | + | ||
| − | + | ||
| − | + | ||
| − | + | ||
| − | + | ||
| − | + | ||
| − | + | ||
| − | + | ||
| − | + | ||
| − | + | ||
== List of Parameters == | == List of Parameters == | ||
Latest revision as of 08:30, 6 September 2019
Applies to version(s): v3.0
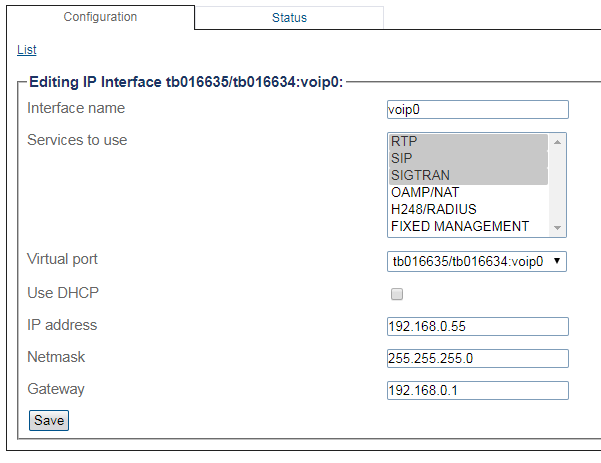
In this use case the IP interface of the VoIP0 and VoIP1 ports are configured by setting the following:
- IP Address: 192.168.0.55
- Netmask: 255.255.255.0
- Gateway: 192.168.0.1
To configure a VoIP0 or VoIP1 port
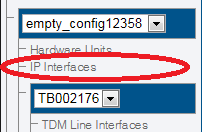
1. Select IP Interfaces from the navigation panel:
2. Click the IP Interfaces tab.
- Click Create New IP Interface
3. Configure the IP port:
- Enter a name for the interface
- Select one or more services to use for the IP interface
- Select a Virtual port from which IP packets will exit.
- Indicate whether or not to use dynamic IP will be used on this interface. For example DHCP to automatically get an IP address for this port. (selecting this option removes the need to enter and IP address, Netmask, and Gateway)
- Enter an IP address
- Enter a Netmask
- Enter a gateway address
- Click Save
Note: The IP addresses of ETH0, ETH1, VOIP0 and VOIP1 must be on different subnets.
4. The changes are displayed in the IP interfaces information panel:


