FreeSBC:Cloud:AWS Additional Interface A
From TBwiki
(Difference between revisions)
(→Adding a new interface to AWS) |
|||
| (16 intermediate revisions by one user not shown) | |||
| Line 3: | Line 3: | ||
This page is intended to give assistance to people to add an additional interface to an existing AWS ProSBC Instance. | This page is intended to give assistance to people to add an additional interface to an existing AWS ProSBC Instance. | ||
| + | == '''Adding a new interface to AWS''' == | ||
* After logging in your Amazon account, click on “EC2” in the main AWS console: | * After logging in your Amazon account, click on “EC2” in the main AWS console: | ||
[[File:ConsoleEC2.png| 600px]] | [[File:ConsoleEC2.png| 600px]] | ||
| − | * Select the instance you want to add additional network interface and note the Availability Zone (AZ) and security group name. | + | * Select the instance you want to add an additional network interface and note the Availability Zone (AZ) and security group name. |
[[File:AWS_Instance_select.png| 800px]] | [[File:AWS_Instance_select.png| 800px]] | ||
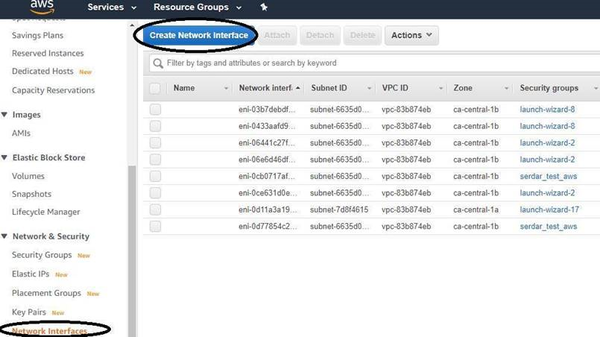
* Go to Network&Security Select Network Interfaces and Click to Create Network Interface Button | * Go to Network&Security Select Network Interfaces and Click to Create Network Interface Button | ||
| − | [[File:AWS_Network_Security.png| | + | [[File:AWS_Network_Security.png| 600px]] |
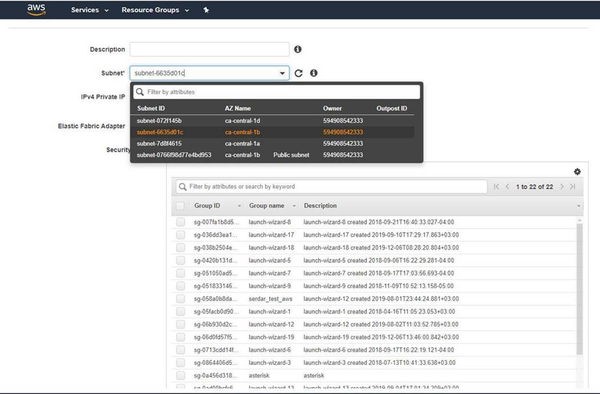
| − | * Give a name, select the subnet and security groups. The subnet must be in the same AZ and the security group can be the same | + | * Give a name, select the subnet and security groups. The subnet must be in the same AZ and the security group can be the same as the existing PROSBC security group. |
| − | [[File:AWS_Create_Interface.png| | + | [[File:AWS_Create_Interface.png| 600px]] |
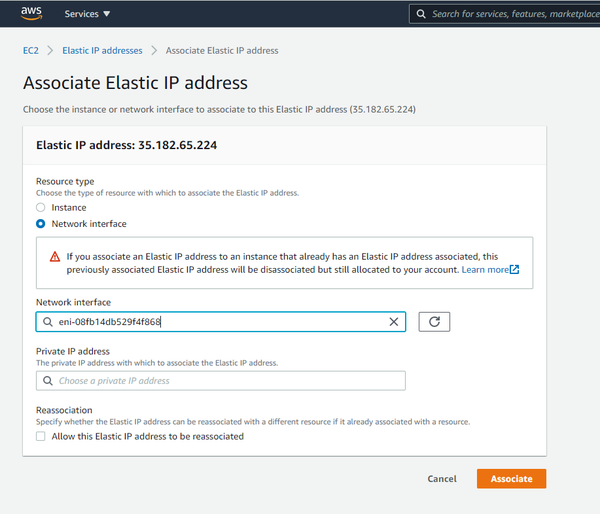
| − | * | + | * Assign a new Elastic IP address or associate existing IP address to your new network interface |
| − | + | [[File:Elastic_IP_Asso.png| 600px]] | |
| − | + | ||
| + | == '''Adding a new interface to PROSBC INstance''' == | ||
| + | * Stop the instance | ||
| + | * Select the Instance Actions -> Networking -> Attach Network Device | ||
| + | [[File:AWS_Attach_Network_Device.png| 600px]] | ||
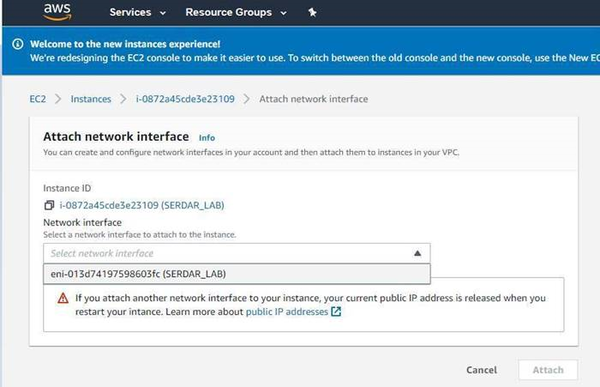
| + | * Select the newly created interface from the drop-down menu and Click to Attach Button | ||
| + | [[File:AWS_Attach_Network_Device_1.png| 600px]] | ||
| + | * When you run the instance it will take you to the initial configuration steps again to configure the new interface | ||
| + | |||
| + | == Web Portal Initial Configuration == | ||
| + | Click on the following link to pursue installation from the web portal: | ||
| + | [[TSBC-SW:WebPortal:Initial Configuration]] | ||
| + | |||
| + | The Following table provides maximum supported network interfaces by instance type: | ||
| + | {| cellpadding="2" border="1" class="wikitable" | ||
| + | |- | ||
| + | ! width="150" style="background: none repeat scroll 0% 0% rgb(239, 239, 239); -moz-background-inline-policy: continuous;" | Instance type | ||
| + | ! width="150" style="background: none repeat scroll 0% 0% rgb(239, 239, 239); -moz-background-inline-policy: continuous;" | Maximum network interfaces | ||
| + | |- | ||
| + | | valign="top" | | ||
| + | m4.large | ||
| + | | valign="top" | | ||
| + | 2 | ||
| + | |- | ||
| + | | valign="top" | | ||
| + | m4.xlarge | ||
| + | | valign="top" | | ||
| + | 4 | ||
| + | |- | ||
| + | | valign="top" | | ||
| + | m4.2xlarge | ||
| + | | valign="top" | | ||
| + | 4 | ||
| + | |- | ||
| + | | valign="top" | | ||
| + | m4.4xlarge | ||
| + | | valign="top" | | ||
| + | 8 | ||
| + | |- | ||
| + | | valign="top" | | ||
| + | c3.large | ||
| + | | valign="top" | | ||
| + | 3 | ||
| + | |- | ||
| + | | valign="top" | | ||
| + | c3.xlarge | ||
| + | | valign="top" | | ||
| + | 4 | ||
| + | |- | ||
| + | | valign="top" | | ||
| + | c3.2xlarge | ||
| + | | valign="top" | | ||
| + | 4 | ||
| + | |- | ||
| + | | valign="top" | | ||
| + | c3.4xlarge | ||
| + | | valign="top" | | ||
| + | 8 | ||
| + | |- | ||
| + | | valign="top" | | ||
| + | c3.8xlarge | ||
| + | | valign="top" | | ||
| + | 8 | ||
| + | |- | ||
| + | | valign="top" | | ||
| + | c4.large | ||
| + | | valign="top" | | ||
| + | 3 | ||
| + | |- | ||
| + | | valign="top" | | ||
| + | c4.xlarge | ||
| + | | valign="top" | | ||
| + | 4 | ||
| + | |- | ||
| + | | valign="top" | | ||
| + | c4.2xlarge | ||
| + | | valign="top" | | ||
| + | 4 | ||
| + | |- | ||
| + | | valign="top" | | ||
| + | c4.4xlarge | ||
| + | | valign="top" | | ||
| + | 8 | ||
| + | |- | ||
| + | | valign="top" | | ||
| + | c4.8xlarge | ||
| + | | valign="top" | | ||
| + | 8 | ||
| + | |- | ||
| + | | valign="top" | | ||
| + | d2.xlarge | ||
| + | | valign="top" | | ||
| + | 4 | ||
| + | |- | ||
| + | | valign="top" | | ||
| + | d2.2xlarge | ||
| + | | valign="top" | | ||
| + | 4 | ||
| + | |- | ||
| + | | valign="top" | | ||
| + | d2.4xlarge | ||
| + | | valign="top" | | ||
| + | 8 | ||
| + | |- | ||
| + | | valign="top" | | ||
| + | d2.8xlarge | ||
| + | | valign="top" | | ||
| + | 8 | ||
| + | |- | ||
| + | | valign="top" | | ||
| + | i2.xlarge | ||
| + | | valign="top" | | ||
| + | 4 | ||
| + | |- | ||
| + | | valign="top" | | ||
| + | i2.2xlarge | ||
| + | | valign="top" | | ||
| + | 4 | ||
| + | |- | ||
| + | | valign="top" | | ||
| + | i2.4xlarge | ||
| + | | valign="top" | | ||
| + | 8 | ||
| + | |- | ||
| + | | valign="top" | | ||
| + | i2.8xlarge | ||
| + | | valign="top" | | ||
| + | 8 | ||
| + | |} | ||
| + | * For additional information on supported network interfaces by instance type, visit [https://docs.aws.amazon.com/AWSEC2/latest/UserGuide/using-eni.html#AvailableIpPerENI/ AWS offical web site]. | ||
Latest revision as of 01:57, 23 December 2020
This page is intended to give assistance to people to add an additional interface to an existing AWS ProSBC Instance.
Adding a new interface to AWS
- After logging in your Amazon account, click on “EC2” in the main AWS console:
- Select the instance you want to add an additional network interface and note the Availability Zone (AZ) and security group name.
- Go to Network&Security Select Network Interfaces and Click to Create Network Interface Button
- Give a name, select the subnet and security groups. The subnet must be in the same AZ and the security group can be the same as the existing PROSBC security group.
- Assign a new Elastic IP address or associate existing IP address to your new network interface
Adding a new interface to PROSBC INstance
- Stop the instance
- Select the Instance Actions -> Networking -> Attach Network Device
- Select the newly created interface from the drop-down menu and Click to Attach Button
- When you run the instance it will take you to the initial configuration steps again to configure the new interface
Web Portal Initial Configuration
Click on the following link to pursue installation from the web portal: TSBC-SW:WebPortal:Initial Configuration
The Following table provides maximum supported network interfaces by instance type:
| Instance type | Maximum network interfaces |
|---|---|
|
m4.large |
2 |
|
m4.xlarge |
4 |
|
m4.2xlarge |
4 |
|
m4.4xlarge |
8 |
|
c3.large |
3 |
|
c3.xlarge |
4 |
|
c3.2xlarge |
4 |
|
c3.4xlarge |
8 |
|
c3.8xlarge |
8 |
|
c4.large |
3 |
|
c4.xlarge |
4 |
|
c4.2xlarge |
4 |
|
c4.4xlarge |
8 |
|
c4.8xlarge |
8 |
|
d2.xlarge |
4 |
|
d2.2xlarge |
4 |
|
d2.4xlarge |
8 |
|
d2.8xlarge |
8 |
|
i2.xlarge |
4 |
|
i2.2xlarge |
4 |
|
i2.4xlarge |
8 |
|
i2.8xlarge |
8 |
- For additional information on supported network interfaces by instance type, visit AWS offical web site.


