Toolpack v2.3:Creating a NAP
(→To create a Network Access Point) |
(Uniformize CAS R2 naming) |
||
| (8 intermediate revisions by 3 users not shown) | |||
| Line 3: | Line 3: | ||
In the example that follows, a [[NAP|Network Access Point]] is set for an ISP and another NAP is set for circuit-switched voice. | In the example that follows, a [[NAP|Network Access Point]] is set for an ISP and another NAP is set for circuit-switched voice. | ||
| − | == To create a Network Access Point == | + | == To create a Network Access Point == |
| − | '''1. Select 'NAP' from the navigation panel.''' | + | '''1. Select 'NAP' from the navigation panel.''' |
| + | <br> [[Image:Navigation Panel v2.3 NAP.png]] | ||
| − | + | <br> '''2. Click 'Create New NAP' to access the NAP configuration window.''' | |
| + | <br> [[Image:Web Portal v2.3 Create NAP.png|700px]] | ||
| − | ''' | + | <br> '''3. Provide a name for the NAP.''' |
| − | |||
| − | |||
| − | |||
| − | |||
| − | |||
*Click 'Create' to initialize the NAP. | *Click 'Create' to initialize the NAP. | ||
| + | <br> [[Image:Web Portal v2.3 Creating NAP.png|700px]] | ||
| − | + | <br> '''4. Verify that the 'NAP was successfully created' message appears.''' | |
| + | <br> [[Image:Web Portal v2.3 NAP Created.png|700px]] | ||
| − | ''' | + | <br> '''5. Use the << button to associate either a SAP, ISDN stack, or ISUP interface with the NAP.''' |
| + | <br> [[Image:Web Portal v2.3 NAP Associate.png|700px]] | ||
| − | + | <br> '''6. Click 'Save' to store the changes.''' | |
| + | <br> [[Image:Web Portal v2.3 NAP Associate 2.png|700px]] | ||
| − | ''' | + | <br> '''7. Verify that the newly created NAP is listed in the NAP list.''' |
| + | *Click 'Create New NAP' to add an additional NAP to the NAP list | ||
| − | [[Image: | + | <br> [[Image:Web Portal v2.3 NAP Associated.png|700px]] |
| + | <br> '''8. Enter name for the new NAP.''' | ||
| − | + | *Use the << button to associate either a SAP, ISDN stack, or ISUP interface with the NAP. In this example, an ISDN signaling stack is selected for a circuit-switched service. | |
| − | + | ||
| − | + | ||
| − | + | ||
| − | + | ||
| − | + | ||
| − | + | ||
| − | + | ||
| − | + | ||
| − | [[Image: | + | <br> [[Image:Web Portal v2.3 Creating NAP 2.png|700px]] |
| + | <br> '''9. Click 'Save' to store the settings.''' | ||
| − | + | <br> For ISDN and SS7 NAPs, you also need to select channel usage (trunk group hunting method) | |
| − | + | ||
| + | *Lowest/Highest timeslot: Start from lowest (highest) timeslot of every trunk and will reuse them | ||
| + | *Lowest/Highest CIC (SS7 only): Start from lowest (highest) CIC and will reuse them | ||
| + | *Round-robin: Traverse, in order, all timeslots of the NAP from first timeslot of first trunk to last timeslot of last trunk | ||
| − | |||
| − | + | For SIP NAPs, you need to specify IP address of destination and other parameters | |
| + | *'''Default Profile''': Allows customization of this SIP Network Access Point [Add link to "Create a profile"] | ||
| + | *In this NAP, the '''Proxy Address''' is the IP address that will be used to send the calls. This IP address will be put in the "route" SIP header field. On incoming calls, the Proxy Address will be compared with the "from" field and if it matches, this call will be tagged as coming from this NAP (tagged with the NAP "Name") | ||
| + | *The '''Local Port''' is the UDP port being used for outgoing SIP requests (default is 5060). Do not confuse with the incoming UDP port which is defined with the SIP Service Access Point. | ||
| + | *'''Filtering Params''' is used to verify the incoming IP address and UDP port and make sure calls comes from allowed SIP endpoints. Calls that do not match these parameters will be dropped. | ||
| + | *SIP registration is possible with the '''Registration Params'''. For example, the address to register can look like this:<br> | ||
| + | <pre>sip:John@Doe.com | ||
| + | </pre> | ||
| + | Authentification parameters can be added if needed. Authentification and registration parameters should be given by the remote proxy on which they want to authenticate/register.<br> | ||
| − | + | *'''Poll remote proxy''' is used to verify if the remote SIP endpoint is available. This uses the SIP OPTIONS method to send periodic requests to this SIP endpoint. If the remote SIP endpoint answers with a valid message (or any message if "Map any response to available status" is selected), this NAP is marked as "available". This status can be used in the Routing Scripts.<br><br> | |
| + | For all types of NAPs with signaling protocols (SIP, SS7, ISDN, CAS R2) you can also provide call rate or simultaneous calls limitations for this NAP by entering appropriate values in the "Call rate limiting" section. | ||
| − | + | <br> [[Image:Web Portal v2.3 Creating NAP 3.png|700px]] | |
| + | <br> '''10. Verify that the newly created NAPs appear in the NAP listing.''' | ||
| − | [[Image: | + | <br> [[Image:Web Portal v2.3 NAP Created 2.png|700px]] |
== Verifying Status == | == Verifying Status == | ||
To verify the status of the NAP configuration, either select Status from the Navigation panel or select the Status tab in the Information panel. | To verify the status of the NAP configuration, either select Status from the Navigation panel or select the Status tab in the Information panel. | ||
Latest revision as of 10:47, 13 December 2011
The Network Access Point (NAP) allows for SAPs, ISDN stacks, and SS7 ISUP interfaces to be associated as a combined resource for one type of access. A NAP is used to represent a collection of voice endpoints, for example: a group of SS7 CICs, ISDN controlled timeslots, SIP outgoing proxy to a specific provider, and more. (SAPs are, later in the configuration process, used to define how calls are routed out of the Tmedia system.)
In the example that follows, a Network Access Point is set for an ISP and another NAP is set for circuit-switched voice.
To create a Network Access Point
1. Select 'NAP' from the navigation panel.
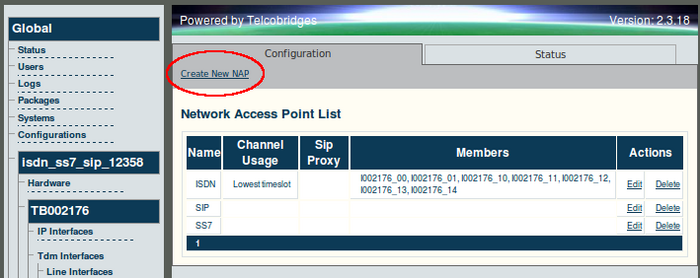
2. Click 'Create New NAP' to access the NAP configuration window.
3. Provide a name for the NAP.
- Click 'Create' to initialize the NAP.
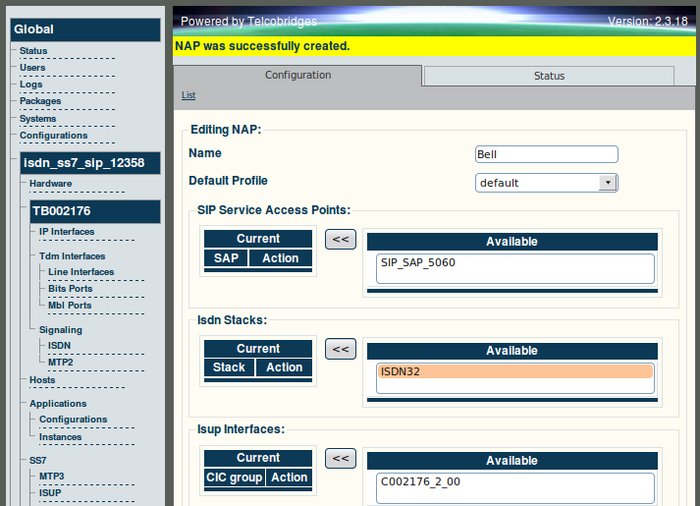
4. Verify that the 'NAP was successfully created' message appears.
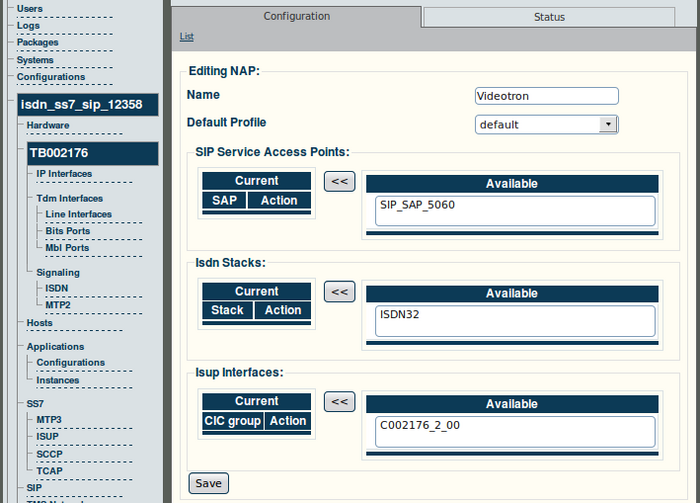
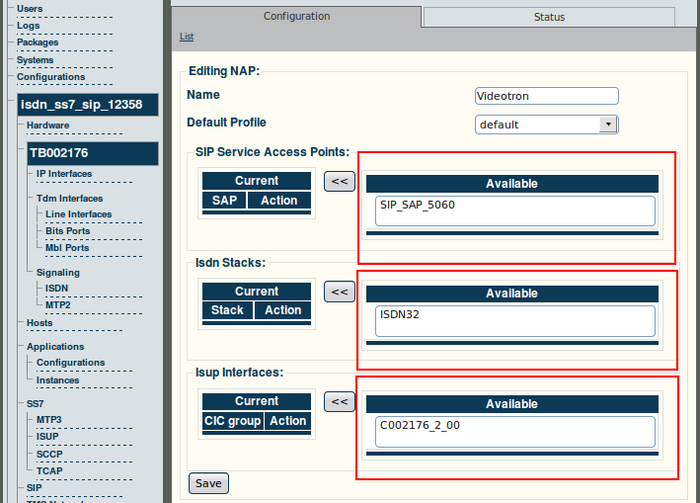
5. Use the << button to associate either a SAP, ISDN stack, or ISUP interface with the NAP.
6. Click 'Save' to store the changes.
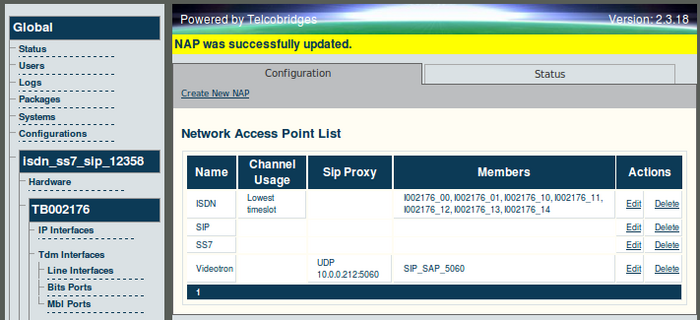
7. Verify that the newly created NAP is listed in the NAP list.
- Click 'Create New NAP' to add an additional NAP to the NAP list
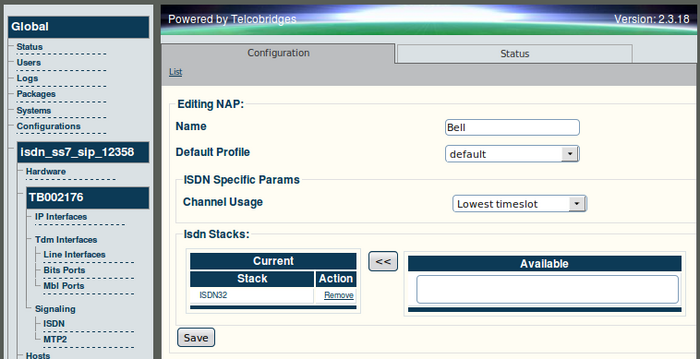
8. Enter name for the new NAP.
- Use the << button to associate either a SAP, ISDN stack, or ISUP interface with the NAP. In this example, an ISDN signaling stack is selected for a circuit-switched service.
9. Click 'Save' to store the settings.
For ISDN and SS7 NAPs, you also need to select channel usage (trunk group hunting method)
- Lowest/Highest timeslot: Start from lowest (highest) timeslot of every trunk and will reuse them
- Lowest/Highest CIC (SS7 only): Start from lowest (highest) CIC and will reuse them
- Round-robin: Traverse, in order, all timeslots of the NAP from first timeslot of first trunk to last timeslot of last trunk
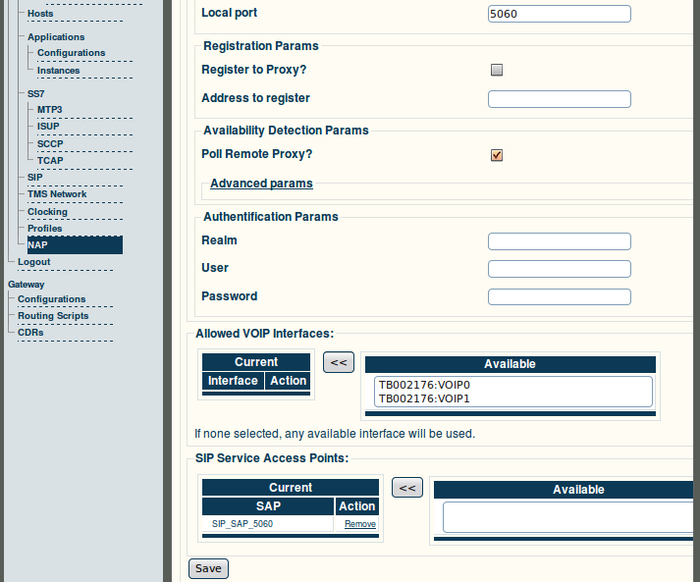
For SIP NAPs, you need to specify IP address of destination and other parameters
- Default Profile: Allows customization of this SIP Network Access Point [Add link to "Create a profile"]
- In this NAP, the Proxy Address is the IP address that will be used to send the calls. This IP address will be put in the "route" SIP header field. On incoming calls, the Proxy Address will be compared with the "from" field and if it matches, this call will be tagged as coming from this NAP (tagged with the NAP "Name")
- The Local Port is the UDP port being used for outgoing SIP requests (default is 5060). Do not confuse with the incoming UDP port which is defined with the SIP Service Access Point.
- Filtering Params is used to verify the incoming IP address and UDP port and make sure calls comes from allowed SIP endpoints. Calls that do not match these parameters will be dropped.
- SIP registration is possible with the Registration Params. For example, the address to register can look like this:
sip:John@Doe.com
Authentification parameters can be added if needed. Authentification and registration parameters should be given by the remote proxy on which they want to authenticate/register.
- Poll remote proxy is used to verify if the remote SIP endpoint is available. This uses the SIP OPTIONS method to send periodic requests to this SIP endpoint. If the remote SIP endpoint answers with a valid message (or any message if "Map any response to available status" is selected), this NAP is marked as "available". This status can be used in the Routing Scripts.
For all types of NAPs with signaling protocols (SIP, SS7, ISDN, CAS R2) you can also provide call rate or simultaneous calls limitations for this NAP by entering appropriate values in the "Call rate limiting" section.
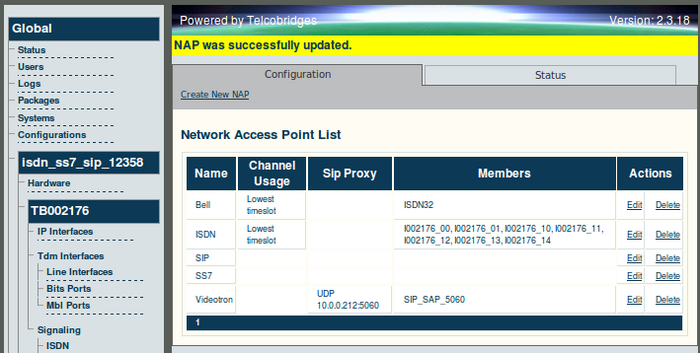
10. Verify that the newly created NAPs appear in the NAP listing.
Verifying Status
To verify the status of the NAP configuration, either select Status from the Navigation panel or select the Status tab in the Information panel.

