Signaling Ports
(→Steps) |
(change RJ45 to RJ48) |
||
| Line 5: | Line 5: | ||
== Prerequisites == | == Prerequisites == | ||
| − | This feature only works with DS-3 or STM-1 expansion boards for the Tdev [[TMP6400]] or Tmedia [[TMG3200]] devices. If you do not have one of these expansion boards, you do not have any ports to configure. The BITS ports can be connected via any standard E1/T1 cable using a | + | This feature only works with DS-3 or STM-1 expansion boards for the Tdev [[TMP6400]] or Tmedia [[TMG3200]] devices. If you do not have one of these expansion boards, you do not have any ports to configure. The BITS ports can be connected via any standard E1/T1 cable using a RJ48 interface. |
== Steps == | == Steps == | ||
Latest revision as of 14:40, 18 August 2009
This release of Toolpack, when used with a Tdev or Tmedia device equipped with DS3/STM-1 connections, enables you to convert the BITS ports on the Tmedia or Tdev DS3/STM-1 expansion boards in to E1/T1/J1 signaling ports, allowing you to make even greater use of your DS-3/STM-1 communications capacity. Once configured as such, the BITS port behaves just like any other signaling trunk or line interface. Therefore you can use the full capacity of the DS3 or STM-1 links for calls while signaling is handled via the former BITS ports.
It is important to note that the two BITS ports can be used either for BITS interfaces or for normal T1/E1/J1 trunks; one cannot have one port in signaling mode and the other in BITS mode. This enhancement enables you to forgo the use a multiplexer (MUX) device in front of the TelcoBridges hardware to separate the signaling links from the DS-3/STM-1 interface. Configuration and monitoring of this new feature is performed through Toolpack Web Portal.'
Prerequisites
This feature only works with DS-3 or STM-1 expansion boards for the Tdev TMP6400 or Tmedia TMG3200 devices. If you do not have one of these expansion boards, you do not have any ports to configure. The BITS ports can be connected via any standard E1/T1 cable using a RJ48 interface.
Steps
You access the Signaling ports function via the Toolpack web portal. After logging into the Toolpack web portal with your web browser, do the following steps to convert both BITS ports for signaling purposes.'
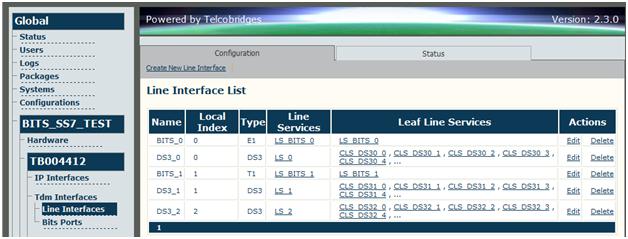
- The first step is to configure the new trunks as signaling ports. To do this, go to Global > Configurations > Hardware > TDM Interfaces > Line Interfaces. See figure 3 for a sample.
- Select Create New Line Interface.
- Select type as E1/T1 (not DS3 or STM-1)
- Select Local Index 0 (for port 1) or 1 (for port 2)
Figure 3: Line interfaces (sample)
- The next step is to configure SS7 (MTP2) signaling just as you would do for any interface. Go to Global > Configurations > Hardware > Signaling > MTP2. There you can add the MTP2 link to the MTP3 configuration and so on.
- Finally, you need to configure and validate the clocking on those two new trunks. Clocking can be set on any line service, be it the signaling ports or the trunks on the DS3 / STM-1 link. You configure this via Global > Configurations > Hardware > Clocking.
