Toolpack:Creating a NAP (ISUP) A
From TBwiki
(Difference between revisions)
| (9 intermediate revisions by 3 users not shown) | |||
| Line 1: | Line 1: | ||
| − | Now that you have created an ISUP CIC group, you must create a network access point, in order to finish configuring your system. | + | === '''''Applies to version(s): v2.5, v2.6.''''' === |
| − | A Network Access Point (NAP) represents the entry point to another network or destination peer. | + | {{DISPLAYTITLE:Creating a NAP (ISUP)}} |
| + | Now that you have created an ISUP CIC group, you must create a network access point, in order to finish configuring your system. A Network Access Point (NAP) represents the entry point to another network or destination peer. | ||
| − | To create a network access point (NAP): | + | To create a network access point (NAP): |
| − | 1- Click '''NAP''' in the navigation panel | + | <br> 1- Click '''NAP''' in the navigation panel |
| − | [[Image: | + | [[Image:Toolpack v2.5 Navigation Panel NAP.png]] |
| − | 2- Click '''Create New NAP''' | + | 2- Click '''Create New NAP''' |
| − | [[Image: | + | [[Image:Toolpack v2.5 Create NAP.png]] |
| − | 3- Configure the new NAP: | + | 3- Configure the new NAP: |
| − | * Enter a '''name''' for the NAP | + | *Enter a '''name''' for the NAP |
| − | * Select a '''user-created profile''', if not, select '''default''' | + | *Select a '''user-created profile''', if not, select '''default''' |
| − | * Click '''Create''' | + | *Click '''Create''' |
| − | [[Image: | + | [[Image:Toolpack v2.5 Creating NAP SIGTRAN.png]] |
| − | 4- Verify that the '''NAP was successfully created''' message appears | + | 4- Verify that the '''NAP was successfully created''' message appears |
| − | [[Image: | + | [[Image:Toolpack v2.5 NAP Created.png]] |
| + | <br> 5- Associate an ISUP interface with the NAP: | ||
| + | *Select an '''interface''' (the newly-created '''ISUP CIC group''') | ||
| + | *Click the '''"<<"''' button to add the interface to the list | ||
| − | 5 | + | [[Image:Toolpack v2.5 NAP ISUP.png]] |
| − | + | <br> '''The following screen is displayed:''' | |
| − | + | ||
| − | [[Image: | + | [[Image:Toolpack v2.5 NAP ISUP Params.png]] |
| + | *Select a value for [[Parameter:_Channel_Usage|'''Channel Usage''']], to avoid call collision | ||
| + | *Click '''Save''' | ||
| − | ''' | + | <br> 6- Verify that the '''"NAP was successfully updated"''' message appears |
| − | [[Image: | + | [[Image:Toolpack v2.5 NAP ISUP Created.png]] |
| − | + | <br> | |
| − | + | ||
| + | == List of Parameters == | ||
| − | + | *[[Parameter: Name|Name]] | |
| − | + | *[[Parameter: Default Profile|Default Profile]] | |
| − | [[ | + | *[[Parameter: Channel Usage|Channel Usage]] |
Latest revision as of 09:38, 15 July 2013
Applies to version(s): v2.5, v2.6.
Now that you have created an ISUP CIC group, you must create a network access point, in order to finish configuring your system. A Network Access Point (NAP) represents the entry point to another network or destination peer.
To create a network access point (NAP):
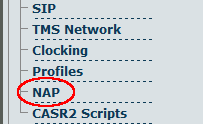
1- Click NAP in the navigation panel
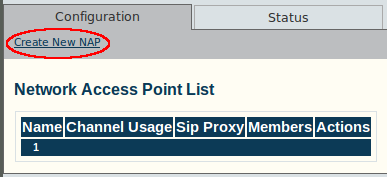
2- Click Create New NAP
3- Configure the new NAP:
- Enter a name for the NAP
- Select a user-created profile, if not, select default
- Click Create
4- Verify that the NAP was successfully created message appears
5- Associate an ISUP interface with the NAP:
- Select an interface (the newly-created ISUP CIC group)
- Click the "<<" button to add the interface to the list
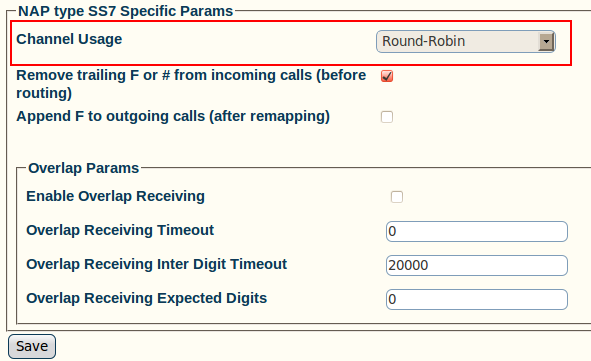
The following screen is displayed:
- Select a value for Channel Usage, to avoid call collision
- Click Save
6- Verify that the "NAP was successfully updated" message appears


