Toolpack:Creating an ISUP User Part A
(→List of Parameters) |
(add v2.7 version) |
||
| (3 intermediate revisions by one user not shown) | |||
| Line 1: | Line 1: | ||
| + | === '''''Applies to version(s): v2.5, v2.6, v2.7.''''' === | ||
| + | {{DISPLAYTITLE:Creating an ISUP User Part}} | ||
Now that you have created your ISUP network, you must create a new ISUP user part. | Now that you have created your ISUP network, you must create a new ISUP user part. | ||
Latest revision as of 14:31, 17 December 2012
Applies to version(s): v2.5, v2.6, v2.7.
Now that you have created your ISUP network, you must create a new ISUP user part.
The user part is the container for the multiple ISUP interfaces. One user part is required for each protocol variant.
Multiple ISUP user parts can be instantiated within a single ISUP protocol layer. This allows a user application to interface with multiple SS7 ISUP protocol variants at the same time. Only one ISUP user part is required for a specific variant as it can be assigned to multiple ISUP networks.
A user part can easily be seen as a protocol variant that a host application wants to use on the SS7 network.
To create an ISUP user part:
1- Click Create New Isup Userpart in the ISUP stack configuration window:
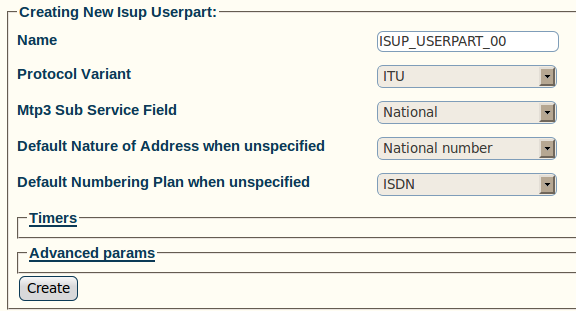
2- Configure the new ISUP user part:
- Enter a name for the user part
- Select a protocol variant (depending on location)
- Select an MTP3 sub service field (the same that was previously set for MTP3)
- Select an address indicator type
- Select a Numbering Plan
- Click Create
3- Verify that the "IsupUserpart was successfully created" message appears

