Toolpack:Configuring DNS Parameters A
From TBwiki
(Difference between revisions)
Cboulanger (Talk | contribs) (Created page with "{{DISPLAYTITLE:Configuring DNS Parameters}} Applies to version(s): v2.7 == To configure the DNS parameters == '''1. Enable Advanced Transport Server Configuration in the SIP...") |
Cboulanger (Talk | contribs) (Create new page for 2.7 DNS configuration. Special steps required from previous releases. Updated pictures.) |
||
| Line 8: | Line 8: | ||
* Click Save to store your setting | * Click Save to store your setting | ||
| − | [[Image: | + | [[Image:Web_Portal_SIP_DNS_Params_A_1.png|700px]] |
'''2. Create a new dedicated transport server (not part of any SAP).''' | '''2. Create a new dedicated transport server (not part of any SAP).''' | ||
| Line 14: | Line 14: | ||
* Click Create to confirm the operation | * Click Create to confirm the operation | ||
| − | [[Image: | + | [[Image:Web_Portal_SIP_DNS_Params_A_2.png.png|700px]] |
'''3. Click DNS Params in the SIP configuration window.''' | '''3. Click DNS Params in the SIP configuration window.''' | ||
| − | + | *Enable the DNS, cache and ENUM support (if required) | |
| − | + | ||
| − | + | ||
| − | + | ||
| − | *Enable the DNS | + | |
*Enter the IP address of the DNS server | *Enter the IP address of the DNS server | ||
*Select the transport server | *Select the transport server | ||
*Click Save to store your settings | *Click Save to store your settings | ||
| − | [[Image: | + | [[Image:Web_Portal_SIP_DNS_Params_A_3.png|700px]] |
*Verify that the 'SipCfg was successfully updated' message is displayed. | *Verify that the 'SipCfg was successfully updated' message is displayed. | ||
| − | [[Image: | + | [[Image:Web_Portal_SIP_DNS_Params_A_4.png|700px]] |
Revision as of 14:09, 5 August 2013
Applies to version(s): v2.7
To configure the DNS parameters
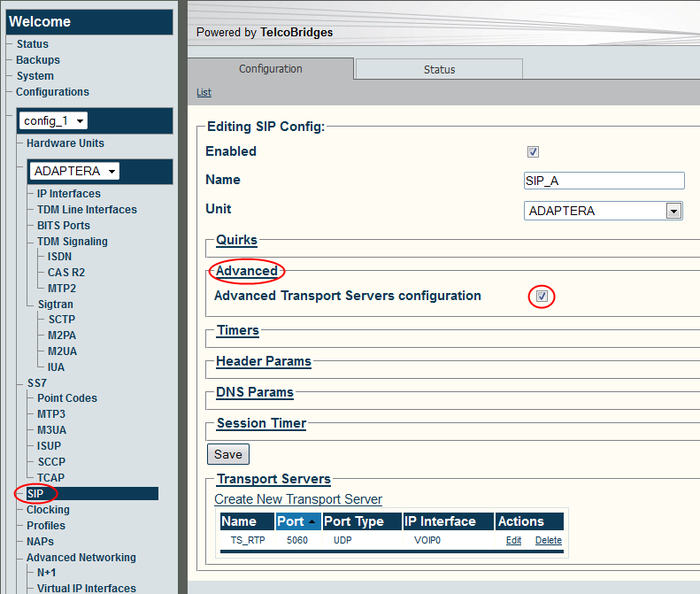
1. Enable Advanced Transport Server Configuration in the SIP configuration window.
- Make sure the checkbox is selected
- Click Save to store your setting
2. Create a new dedicated transport server (not part of any SAP).
- Select from which interface and port the DNS request will be sent
- Click Create to confirm the operation
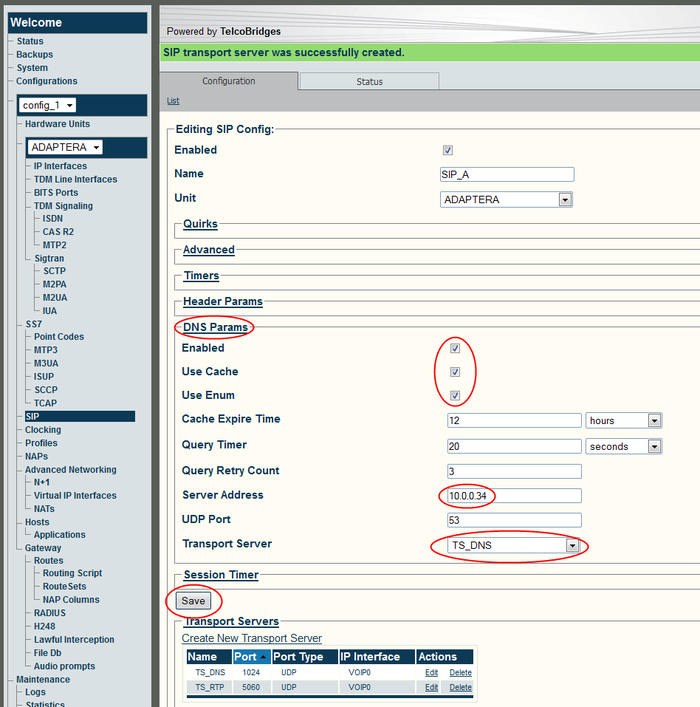
3. Click DNS Params in the SIP configuration window.
- Enable the DNS, cache and ENUM support (if required)
- Enter the IP address of the DNS server
- Select the transport server
- Click Save to store your settings
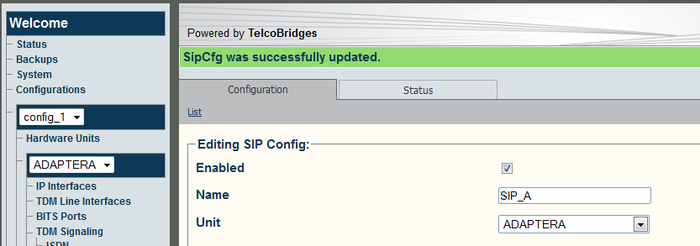
- Verify that the 'SipCfg was successfully updated' message is displayed.


