Activating tbSnmpAgent A
From TBwiki
(Difference between revisions)
(Adde link to intructions for disabling selinux) |
|||
| Line 1: | Line 1: | ||
| − | Once you are logged into the Web Portal, follow these steps to activate the tbSnmpAgent application: | + | Before starting, make sur the selinux service is disabled, or else it will prevent the SNMP service from starting. Connect SSH to the unit's management port and follow these instructions: |
| + | |||
| + | [http://docs.telcobridges.com/mediawiki/index.php/SELinux_management docs.telcobridges.com/mediawiki/index.php/SELinux_management] | ||
| + | |||
| + | <br> | ||
| + | |||
| + | Once you are logged into the Web Portal, follow these steps to activate the tbSnmpAgent application: | ||
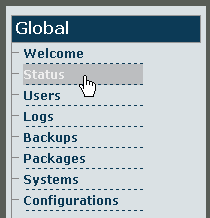
*Click the '''Status''' tab in the navigation panel. | *Click the '''Status''' tab in the navigation panel. | ||
| − | [[ | + | |
| − | <br | + | [[Image:Snmp click status.gif|border]] <br><br> |
| + | |||
*In the '''status''' information window, click the '''Applications''' tab. | *In the '''status''' information window, click the '''Applications''' tab. | ||
| − | [[ | + | |
| − | <br | + | [[Image:Snmp click applications.gif|border]] <br><br> |
| + | |||
*In the '''Applications''' information window, '''tbsnmpagent''' should appear in the '''Not running list'''. Click '''tbsnmpagent'''. | *In the '''Applications''' information window, '''tbsnmpagent''' should appear in the '''Not running list'''. Click '''tbsnmpagent'''. | ||
| − | [[ | + | |
| − | <br | + | [[Image:Snmp click tbSnmpAgent.gif|border]] <br><br> |
| + | |||
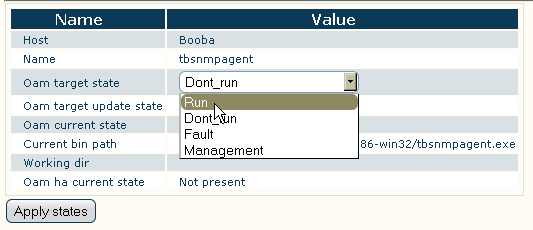
*In the '''Application instance status''' window for tbSnmpAgent, click the '''Oam target state''' dropdown box and select '''Run'''. Click '''Apply states'''. | *In the '''Application instance status''' window for tbSnmpAgent, click the '''Oam target state''' dropdown box and select '''Run'''. Click '''Apply states'''. | ||
| − | [[ | + | |
| − | <br | + | [[Image:Snmp tbSnmpAgent run.gif|border]] <br><br> |
| + | |||
*Return to the '''Applications''' information window. '''tbsnmpagent''' should now appear in the '''Ready list'''. | *Return to the '''Applications''' information window. '''tbsnmpagent''' should now appear in the '''Ready list'''. | ||
| − | [[ | + | |
| − | <br | + | [[Image:Snmp tbSnmpAgent active.gif|border]] <br><br> |
| + | |||
*'''The tbSnmpAgent application has now been activated'''. | *'''The tbSnmpAgent application has now been activated'''. | ||
| − | <br | + | |
| − | ==Next Step== | + | <br> |
| + | |||
| + | == Next Step == | ||
| + | |||
*Now that you have activated the SNMP agent application, you are ready to [[Configuring tbSnmpAgent|configure the application for your needs]]. | *Now that you have activated the SNMP agent application, you are ready to [[Configuring tbSnmpAgent|configure the application for your needs]]. | ||
Revision as of 07:47, 22 July 2011
Before starting, make sur the selinux service is disabled, or else it will prevent the SNMP service from starting. Connect SSH to the unit's management port and follow these instructions:
docs.telcobridges.com/mediawiki/index.php/SELinux_management
Once you are logged into the Web Portal, follow these steps to activate the tbSnmpAgent application:
- Click the Status tab in the navigation panel.
- In the status information window, click the Applications tab.
- In the Applications information window, tbsnmpagent should appear in the Not running list. Click tbsnmpagent.
- In the Application instance status window for tbSnmpAgent, click the Oam target state dropdown box and select Run. Click Apply states.
- Return to the Applications information window. tbsnmpagent should now appear in the Ready list.
- The tbSnmpAgent application has now been activated.
Next Step
- Now that you have activated the SNMP agent application, you are ready to configure the application for your needs.


