Toolpack:Creating a SIP Transport Server B
From TBwiki
(Difference between revisions)
(Created page with "=== '''''Applies to version(s): v2.7.''''' === {{DISPLAYTITLE:Creating a SIP Stack}} Session Initiation Protocol, more commonly known as SIP, is a signaling protocol for p...") |
|||
| Line 1: | Line 1: | ||
=== '''''Applies to version(s): v2.7.''''' === | === '''''Applies to version(s): v2.7.''''' === | ||
| − | {{DISPLAYTITLE:Creating a SIP | + | {{DISPLAYTITLE:Creating a SIP Transport Server}} |
| − | + | Now that you have created a SIP stack, you must must create a new SIP transport server for your configuration. | |
| − | + | ||
| + | '''Note:''' In order to employ SIP transport servers, the protocol that they will use to transport the SIP signaling traffic must be defined. | ||
| + | |||
To do so: | To do so: | ||
| Line 11: | Line 13: | ||
| − | 2- Click ''' | + | 2- Click '''Edit''' next to the SIP stack for which you wish to create a transport server |
| − | [[Image: | + | [[Image:Toolpack_v2.5_Edit_SIP.png]] |
| − | 3- Create the | + | 3- Click '''Create New Transport Server''' under the '''Transport Servers''' list |
| − | + | [[Image:Toolpack_v2.5_Create_SIP_Server.png]] | |
| − | * | + | |
| − | * Select | + | |
| + | 4- Create the new SIP transport server: | ||
| + | |||
| + | * Enter a '''name''' for the server | ||
| + | * Select an appropriate '''port type''' | ||
| + | * Select an appropriate '''IP interface''' | ||
* Click '''Create''' | * Click '''Create''' | ||
| − | [[Image: | + | [[Image:Toolpack v2.6 Creating SIP Server.png]] |
| + | |||
| + | |||
| + | 5- Verify that the '''"SIP transport server was successfully created"''' message appears, and that the new server is listed in the '''Transport Servers''' list | ||
| − | + | [[Image:Toolpack_v2.5_SIP_Server_Created.png|left|frame|Confirmation message.]] | |
| − | [[Image:Toolpack_v2. | + | [[Image:Toolpack_v2.6_SIP_Server_Created.png|left|frame|Server appears in list.]] |
| + | <br><br><br><br><br><br><br><br><br><br><br><br><br> | ||
==List of Parameters== | ==List of Parameters== | ||
| − | |||
* [[Parameter: Name|Name]] | * [[Parameter: Name|Name]] | ||
| − | * [[Parameter: | + | * [[Parameter: Port Type|Port Type]] |
| + | * [[Parameter: IP Interface|IP Interface]] | ||
Latest revision as of 13:29, 12 July 2013
Applies to version(s): v2.7.
Now that you have created a SIP stack, you must must create a new SIP transport server for your configuration.
Note: In order to employ SIP transport servers, the protocol that they will use to transport the SIP signaling traffic must be defined.
To do so:
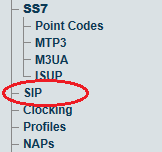
1- Click SIP in the navigation panel
2- Click Edit next to the SIP stack for which you wish to create a transport server
3- Click Create New Transport Server under the Transport Servers list
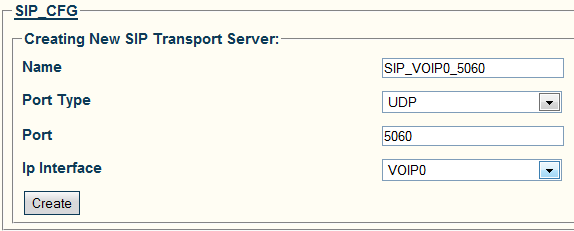
4- Create the new SIP transport server:
- Enter a name for the server
- Select an appropriate port type
- Select an appropriate IP interface
- Click Create
5- Verify that the "SIP transport server was successfully created" message appears, and that the new server is listed in the Transport Servers list


