ProSBC:Cisco SIP Trunk Configuration:Cisco UCM Trunk
| Line 10: | Line 10: | ||
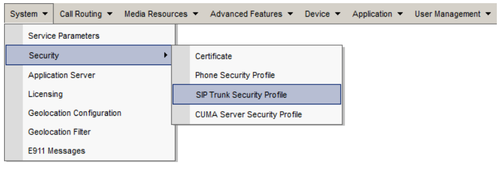
1. First of all it is necessary to specify a SIP Trunk Security Profile which has to be applied to the ProSBC SIP trunk. The '''SIP Trunk Security Profile''' can be created or changed through the '''Security''' submenu of the '''System''' tab | 1. First of all it is necessary to specify a SIP Trunk Security Profile which has to be applied to the ProSBC SIP trunk. The '''SIP Trunk Security Profile''' can be created or changed through the '''Security''' submenu of the '''System''' tab | ||
| − | [[Image:security_profile.png|500px|]] | + | <br><br> [[Image:security_profile.png|500px|]]<br><br> |
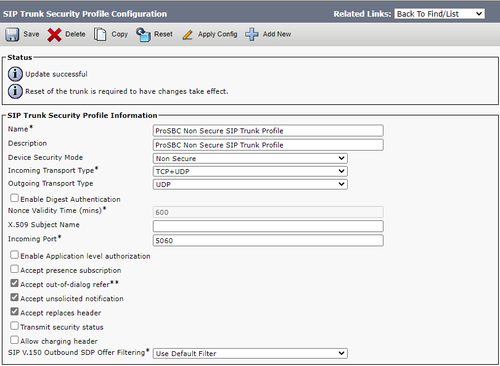
2. The '''Security Profile Settings''' shown below | 2. The '''Security Profile Settings''' shown below | ||
| − | [[Image:security_profile_details.png|500px|]] | + | <br><br> [[Image:security_profile_details.png|500px|]]<br><br> |
* '''Name''' Give a name to this profile | * '''Name''' Give a name to this profile | ||
| Line 23: | Line 23: | ||
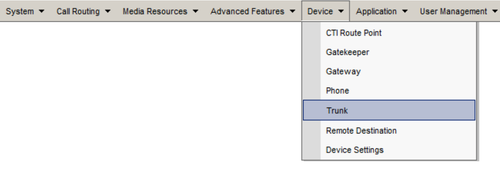
3. A new SIP trunk can be created by selecting the '''Trunk''' entry through the Cisco Unified Communications Manager '''Device''' menu. | 3. A new SIP trunk can be created by selecting the '''Trunk''' entry through the Cisco Unified Communications Manager '''Device''' menu. | ||
| − | [[Image:cisco_trunk.png|500px|]] | + | <br><br> [[Image:cisco_trunk.png|500px|]]<br><br> |
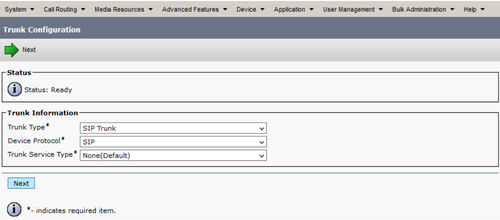
4. According to the selected protocol and the ProSBC, the '''Trunk Type''' must be assigned to '''SIP'''. The '''Device Protocol''' parameter will be automatically set to '''SIP''' and the '''Trunk Service Type''' is used with '''None (Default)'''. | 4. According to the selected protocol and the ProSBC, the '''Trunk Type''' must be assigned to '''SIP'''. The '''Device Protocol''' parameter will be automatically set to '''SIP''' and the '''Trunk Service Type''' is used with '''None (Default)'''. | ||
| − | [[Image:cisco_sip_trunking_1.png|500px|]] | + | <br><br> [[Image:cisco_sip_trunking_1.png|500px|]]<br><br> |
5. The shown '''Trunk Configuration''' is basically used with the system given defaults. The '''Device Name''' identifier as well as the '''Description''' is set to prosbc.telcobridges.com, the hostname of the ProSBC assigned Ethernet interface IP address. | 5. The shown '''Trunk Configuration''' is basically used with the system given defaults. The '''Device Name''' identifier as well as the '''Description''' is set to prosbc.telcobridges.com, the hostname of the ProSBC assigned Ethernet interface IP address. | ||
| − | [[Image:cisco_sip_trunking_2.png|500px|]] | + | <br><br> [[Image:cisco_sip_trunking_2.png|500px|]]<br><br> |
6. For the '''Call Routing Information (Inbound and Outbound Call)''' the parameter '''Redirecting Diversion Header Delivery''' has to be set. This enables the delivery of the origin and redirecting number through SIP. All other parameters are used with their defaults. | 6. For the '''Call Routing Information (Inbound and Outbound Call)''' the parameter '''Redirecting Diversion Header Delivery''' has to be set. This enables the delivery of the origin and redirecting number through SIP. All other parameters are used with their defaults. | ||
| − | [[Image:cisco_sip_trunking_3.png|500px|]] | + | <br><br> [[Image:cisco_sip_trunking_3.png|500px|]]<br><br> |
7. In this example the '''Destination Address''' is set to the hostname prosbc.telcobridges.com. The SIP Trunk Security Profile is set to ProSBC Non Secure SIP Trunk Profile. The DTMF Signaling Method is used with RFC 2833. | 7. In this example the '''Destination Address''' is set to the hostname prosbc.telcobridges.com. The SIP Trunk Security Profile is set to ProSBC Non Secure SIP Trunk Profile. The DTMF Signaling Method is used with RFC 2833. | ||
| − | [[Image:cisco_sip_trunking_4.png|500px|]] | + | <br><br> [[Image:cisco_sip_trunking_4.png|500px|]]<br><br> |
8. Define ProSBC’s SIP trunk required '''Route Pattern''' through the '''Call Routing''' menu. | 8. Define ProSBC’s SIP trunk required '''Route Pattern''' through the '''Call Routing''' menu. | ||
| − | [[Image:cisco_route_pattern.png|500px|]] | + | <br><br> [[Image:cisco_route_pattern.png|500px|]]<br><br> |
9. In this example the route pattern '''80.!''' is used for ProSBC’s SIP trunk '''prosbc.telcobridges.com'''. | 9. In this example the route pattern '''80.!''' is used for ProSBC’s SIP trunk '''prosbc.telcobridges.com'''. | ||
| − | [[Image:cisco_route_pattern_details.png|500px|]] | + | <br><br> [[Image:cisco_route_pattern_details.png|500px|]]<br><br> |
10. A SIP profile can be configured through Cisco’s '''Device''' '''Device Settings''' menu. You can specify a set of SIP attributes (timings, ports etc.) to the appropriate SIP trunks and SIP | 10. A SIP profile can be configured through Cisco’s '''Device''' '''Device Settings''' menu. You can specify a set of SIP attributes (timings, ports etc.) to the appropriate SIP trunks and SIP | ||
endpoints. | endpoints. | ||
| − | [[Image:cisco_sip_profile.png|500px|]] | + | <br><br> [[Image:cisco_sip_profile.png|500px|]]<br><br> |
11. In this example the '''Standard SIP Profile''' is used and assigned to ProSBC’s SIP trunk | 11. In this example the '''Standard SIP Profile''' is used and assigned to ProSBC’s SIP trunk | ||
| − | [[Image:cisco_sip_profile_Details.png|500px|]] | + | <br><br> [[Image:cisco_sip_profile_Details.png|500px|]]<br><br> |
Latest revision as of 04:28, 23 March 2021
Introduction
This document provides instructions on how to add a SIP Trunk to Cisco UCM 12 to work with the ProSBC. Please visit the following link for more details Cisco Support.
Cisco UCM 12 SIP Trunk Configuration
In order to establish the communication between the Cisco Unified Communications Manager and the created ProSBC NAP, a SIP trunk must be created. This enables ProSBC to be recognized as a device handler for the Cisco environment. After creating the SIP trunk, a Route Pattern must be created for proper call-legs and call routings. The SIP trunk must be related to some SIP and SIP Security Profiles. Some examples will be described in the following sections.
1. First of all it is necessary to specify a SIP Trunk Security Profile which has to be applied to the ProSBC SIP trunk. The SIP Trunk Security Profile can be created or changed through the Security submenu of the System tab
2. The Security Profile Settings shown below
- Name Give a name to this profile
- Device Security Mode mus be selected as Non Secure
- Outgoing Transport Type in this example we use as UDP, you can select TCP too
- Incoming Port Set the incoming SIP port
3. A new SIP trunk can be created by selecting the Trunk entry through the Cisco Unified Communications Manager Device menu.
4. According to the selected protocol and the ProSBC, the Trunk Type must be assigned to SIP. The Device Protocol parameter will be automatically set to SIP and the Trunk Service Type is used with None (Default).
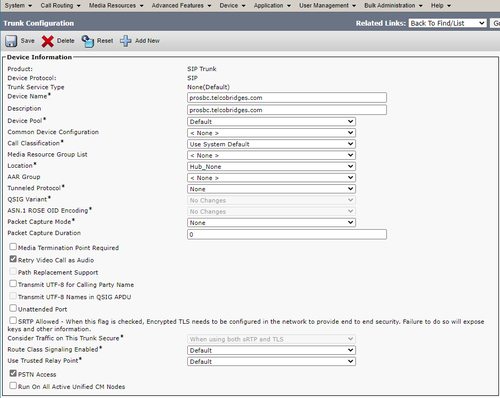
5. The shown Trunk Configuration is basically used with the system given defaults. The Device Name identifier as well as the Description is set to prosbc.telcobridges.com, the hostname of the ProSBC assigned Ethernet interface IP address.
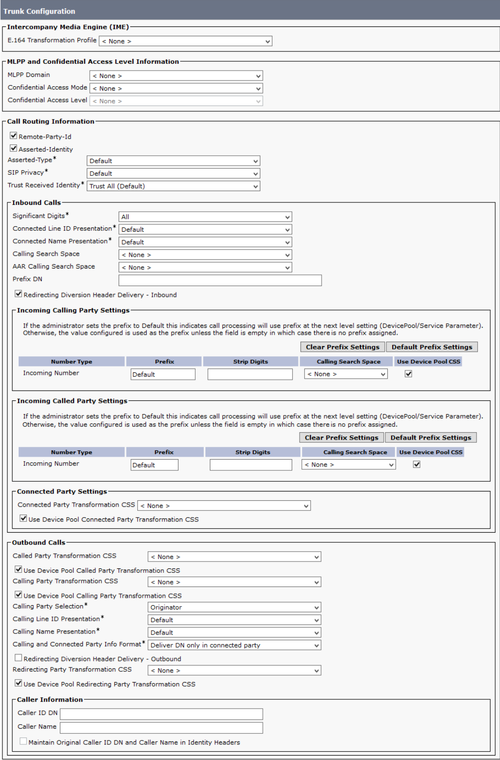
6. For the Call Routing Information (Inbound and Outbound Call) the parameter Redirecting Diversion Header Delivery has to be set. This enables the delivery of the origin and redirecting number through SIP. All other parameters are used with their defaults.
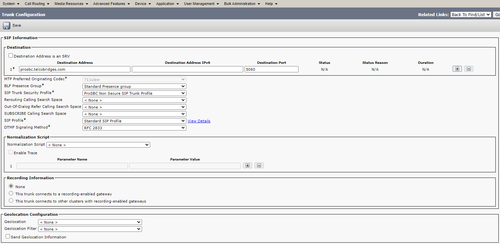
7. In this example the Destination Address is set to the hostname prosbc.telcobridges.com. The SIP Trunk Security Profile is set to ProSBC Non Secure SIP Trunk Profile. The DTMF Signaling Method is used with RFC 2833.
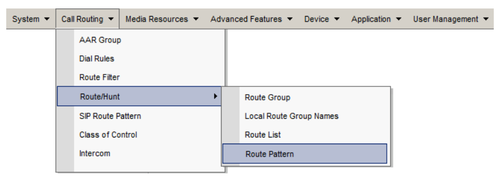
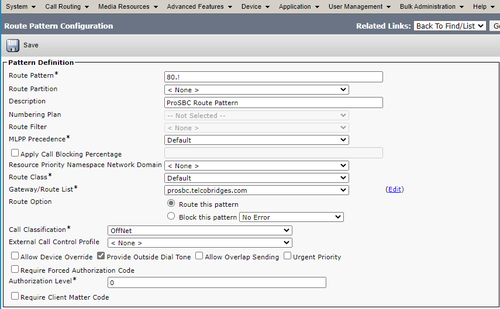
8. Define ProSBC’s SIP trunk required Route Pattern through the Call Routing menu.
9. In this example the route pattern 80.! is used for ProSBC’s SIP trunk prosbc.telcobridges.com.
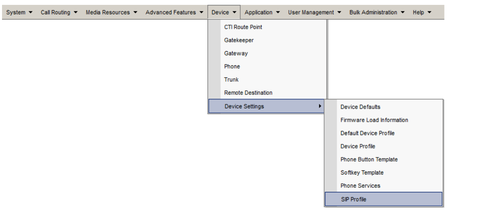
10. A SIP profile can be configured through Cisco’s Device Device Settings menu. You can specify a set of SIP attributes (timings, ports etc.) to the appropriate SIP trunks and SIP endpoints.
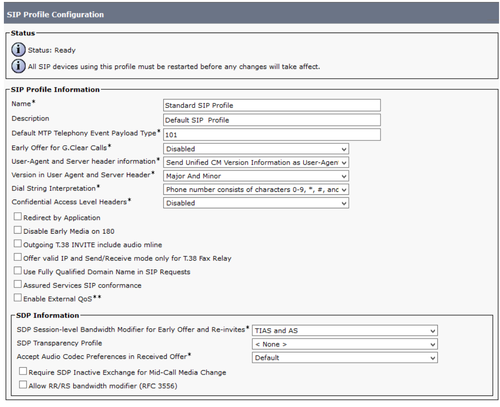
11. In this example the Standard SIP Profile is used and assigned to ProSBC’s SIP trunk
