Toolpack:Creating an M3UA Configuration (IPSP) A
From TBwiki
(Difference between revisions)
| Line 1: | Line 1: | ||
| + | To set up your M3UA system on an IP server process (IPSP), you must first create a new M3UA configuration. | ||
| + | In this configuration the SS7 MTP2 and MTP3 layers are replaced entirely by the SIGTRAN M3UA layer. This system is typically set up on two IP signaling points. | ||
| + | |||
To create an M3UA configuration on IPSP: | To create an M3UA configuration on IPSP: | ||
| + | |||
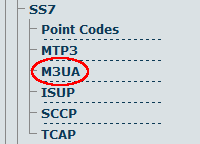
1- Click '''M3UA''' in the navigation panel: | 1- Click '''M3UA''' in the navigation panel: | ||
| Line 13: | Line 17: | ||
[[Image:Toolpack_v2.5_Creating_M3UA_IPSP_Configuration.png]] | [[Image:Toolpack_v2.5_Creating_M3UA_IPSP_Configuration.png]] | ||
| − | 3- Verify that the '''M3ua Cfg was successfully created''' message appears | + | 3- Verify that the '''"M3ua Cfg was successfully created"''' message appears |
[[Image:Toolpack_v2.5_M3UA_IPSP_Configuration_Created.png]] | [[Image:Toolpack_v2.5_M3UA_IPSP_Configuration_Created.png]] | ||
Revision as of 12:15, 15 July 2010
To set up your M3UA system on an IP server process (IPSP), you must first create a new M3UA configuration. In this configuration the SS7 MTP2 and MTP3 layers are replaced entirely by the SIGTRAN M3UA layer. This system is typically set up on two IP signaling points.
To create an M3UA configuration on IPSP:
1- Click M3UA in the navigation panel:
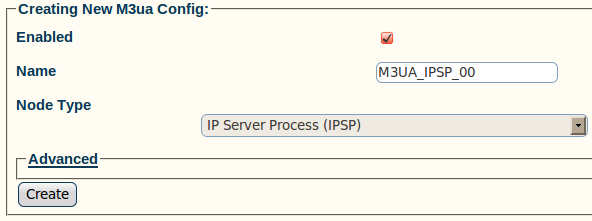
2- Configure the M3UA service for IPSP:
- Enter a name for the configuration
- Select IP Server Process (IPSP) as the node type
- Click Create
3- Verify that the "M3ua Cfg was successfully created" message appears

