Toolpack:Configuring lawful interception A
Lawful Intercept configuration in Toolpack Web Portal is made with the following steps:
- Configuring a Law Enforcement Agency and it's parameters
- Creating of a NAP connected to the Law Enforcement Agency
- Providing a list of targets to intercept (through a coma-separate-values .csv file)
- Enabling the Lawful Intercept routing script filter
- Exchanging SSH public/private keys with server to allow password-less SFTP
Here is how these steps are performed using Toolpack Web Portal.
Configuring a Law Enforcement Agency and it's parameters
- Log into the Web Portal
- Go to the left menu of the Web Portal
- Click the "Lawful Intercept" section, under "Gateway"
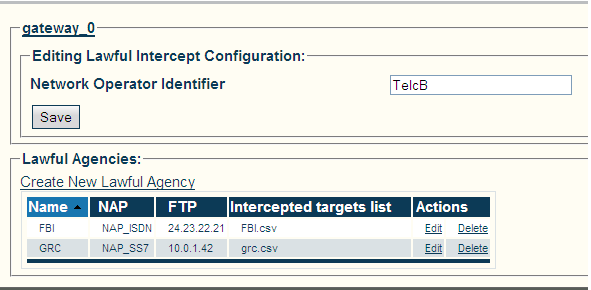
This page contains global Lawful Intercept parameters, and a list of Law Enforcement Agencies.
Available parameter are:
- NWO (Network Operator) Identifier: An internationally unique identifier that represents the network operator, access provider or service provider using the Tmedia equipment
Law Enforcement Agency parameters
Multiple Law Enforcement Agencies can be created in Toolpack. Each act in an independent manner from the others, and can intercept the same calls, or different calls.
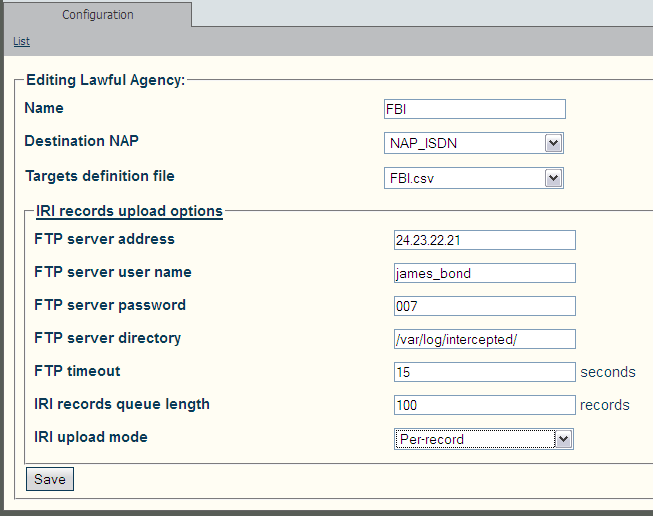
Each Law Enforcement Agency has the following parameters:
- Name
- .csv file that contains the list of targets to intercept
- NAP to use for making outgoing calls to Law Enforcement Agency, carrying audio for intercepted call legs
- Configuration of FTP/SFTP client for uploading IRI records to Law Enforcement Agency's FTP or SFTP server:
- IP address or domain name of the FTP/SFTP server
- User name to use for FTP/SFTP server login
- Password to use for FTP/SFTP server login
- Remote directory to store IRI records into
- FTP/SFTP connection timeout
- Maximum number of IRI entries in the upload queue
- Maximum time a IRI entry can remain in the upload queue
Creating of a NAP connected to the Law Enforcement Agency
Create a NAP, like would normally be done with Toolpack. The ETSI specifications refer to ISDN NAP, but other type of NAPs are also supported by TelcoBridges. This NAP must be connected to the Law Enforcement Agency that will receive the intercepted calls.
Documentation on NAPs creation can be found here: Creating a NAP
Providing a list of targets to intercept (through a coma-separate-values .csv file)
Uploading/modifying Lawful Intercept Targets configuration files (.csv)
The list of targets to intercept is provided as a .csv file. Each configured Law Enforcement Agency points to it's own .csv file.
The .csv file is uploaded from the Web Portal:
- Log into the Web Portal
- Go to the left menu of the Web Portal
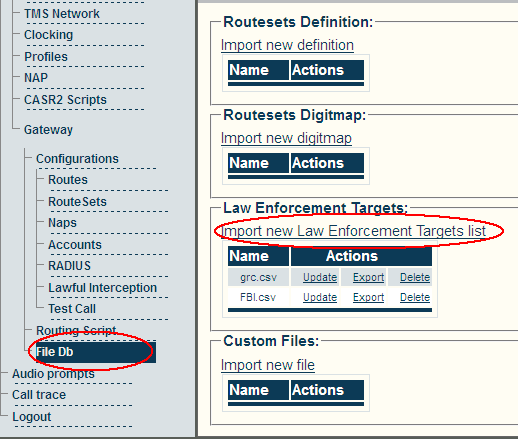
- Click the "File Db" section, under "Gateway"
- Edit one of the listed File Db, or click "Create New File Db" to create a new one
- Under section "Lawful Intercept Targets", click "import" (to create new file) or "update" one of the existing files
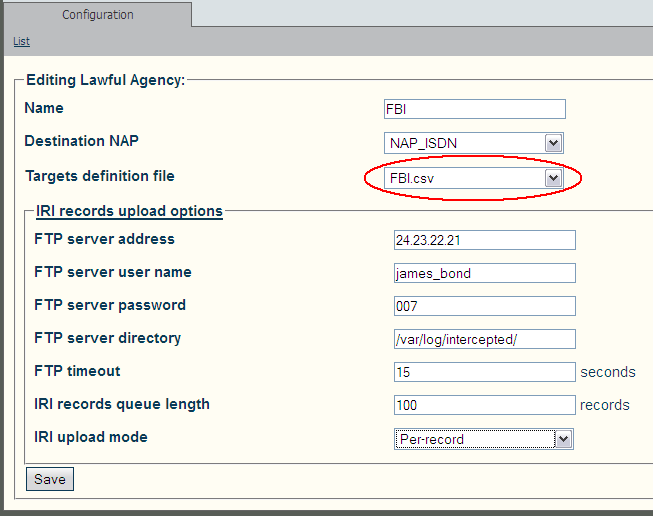
To activate a .csv file, go to the Law Enforcement Agency configuration page (left menu, "Lawful Intercept" under "Gateway), and select the .csv file in the appropriate Law Enforcement Agency's configuration page.
Format Lawful Intercept Targets configuration files (.csv)
The Lawful Intercept Targets configuration files must be formatted in .csv (coma-separated values) format. The following columns must be present:
- LIID: Text string that uniquely identifies the target to intercept. This ID will be provided with each outgoing call on interception NAP to the Law Enforcement Agency, and in each IRI record uploaded to the FTP/SFTP server.
- Phone number: The phone number of the target to intercept. Any call with this number as the calling, or the called number, will be intercepted.
- Start time: Starting date/time from which the interception can take place. Calls made before that date from/to the target won't be intercepted.
- End time: End date/time where this target interception ends. Calls made after that date from/to the target won't be intercepted.
Example:
 LIID,number,start,end
 John Smith,555-0001,2012-10-24T00:00:00-05:00,2012-10-24T23:59:59-05:00
 James Bond,333-3007,2012-01-01T00:00:00-05:00,2012-12-31T23:59:59-05:00
Enabling the Lawful Intercept routing script filter
Interpretation of the Lawful Intercept Targets configuration files (.csv) is done by a routing script filter, that can easily be added to any existing routing script used by the Toolpack system.
Documentation on routing script can be found here: Scriptable Routing Engine
The Lawful Intercept filter is activated by:
- Including the 'Lawful intercept' module in your routing script
- Include the LawfulIntercept class
- Add the Lawful Intercept "after_filter" to your script
Here is an example "simple routing" script that enables Lawful Intercept:
require 'base_routing'
require 'lawful_intercept'

class SimpleRouting < BaseRouting
  include LawfulIntercept

  route_match :call_field_name => :called
  route_match :call_field_name => :calling
  route_match :call_field_name => :nap
  route_remap :call_field_name => :called, :route_field_name => :remapped_called
  route_remap :call_field_name => :calling, :route_field_name => :remapped_calling
  route_remap :call_field_name => :nap, :route_field_name => :remapped_nap

  after_filter :method => :enable_lawful_intercept
end

@@routing = SimpleRouting.new

def init_routes( routes )
  @@routing.init routes
end

def route( call, nap_list )
  @@routing.route call, nap_list
end
Exchanging SSH public/private keys with server to allow password-less SFTP
Toolpack can use the secure FTP (SFTP) protocol to upload IRI records to a remote server.
Toolpack requires SFTP to be used in password-less mode, where servers have been pre-configured for password-less authentication through exchange of private/public SSH keys.
Here is the procedure to create and exchange SSH authentication keys.
General principles
SFTP can be used in a password-less mode, where authentication is used between client and server.
When password-less mode is configured, a given user on a given client server can connect through SSH to a given server without explicitly providing the password, because server has a way (through private/public key) to authenticate the client (validate that "you are who you say you are").
How private/public keys work
- Public/private key pairs work like this: data encrypted with one of these keys can only be decrypted with the other (and vice versa)
- Client host encrypts data to send with it's private key
- Server host decrypts using public key, which authenticates the identity of the client(someone without the private key cannot have encrypted that data)
- Double
Using private/public keys with SSH
- A private/public key pair is generated on the client host
- The private key is kept secret (with great care) on the that client host
- The public key is sent to the server host
- When SSH session is established, the private key is used on the client side, server thus know the sender is trusted, and allows login
How to setup SSH private/public keys for Lawful Interception SFTP upload
- Create the private/public key pair:
- Open a SSH shell on the Toolpack host
- Generate the private/public key pair: ssh-keygen -t dsa
- Upload the public key to the server:
- todo
Note: Repeat the steps above for the secondary Toolpack host, if redundant hosts are used.


