Sippy SIP Trunk Creation
Introduction
This document provides instructions on how to add a SIP Trunk to Sippy Server to work with the ProSBC. Please visit the following link for more details about Creating a SIP Trunk in Sippy Server
Sippy SIP Trunk Configuration
1. Login into the administration portal via the IP address of the machine that is running Sippy.
2. Select the Vendors -> My Vendors -> Vendors.
3. Click to Add button under the Add Vendor section
4. You will be required to fill in the following fields in order to create a new vendor
- Vendor Name: Give a name to this vendor. We used Telcobridges.
5. You can fill in other pieces of information too and click on Save&Close button 6. Find the newly created vendor in the Vendors list and click on Open Connections link
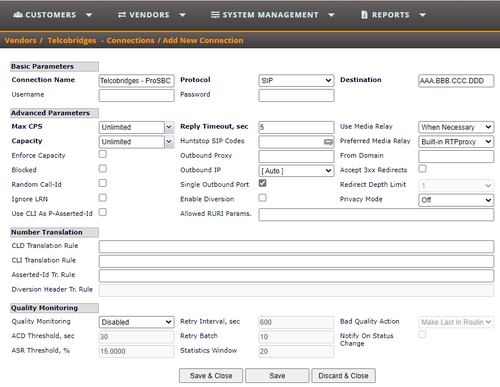
7. Click to Add button under the Add Connection section
8. You will be required to fill in the following fields in order to create a new connection
- Connection Name Give a name to this connection. We used Telcobridges - ProSBC
- Protocol Select the protocol for this connection. ProSBC only use SIP protocol
- Destination Destination of this connection. It can be IP address or FQDN of the ProSBC
- You can also fill other parts as your requirements


