Creating an SNMP Trap Destination
From TBwiki
(Redirected from Creating an SNMP Trap Destination)
Applies to version(s): v2.7.
SNMP traps are automatically generated on TMedia platforms by the NetSNMP installation, which monitors hardware and software interfaces registered with the ifTable of the IF-MIB module. When the operation status of an interface changes, a trap is generated by NetSNMP, and sent to a destination address for processing. In order for this mechanic to function, an SNMP trap destination must be defined in the Web Portal.
To create an SNMP trap destination, carry out the following steps:
NOTE: The procedure is slightly different, dependng on whether you are creating a trap destination for SNMPv1/v2, or for SNMPv3.
- Click Create New SNMP Trap Destination (under the SNMP Trap Destinations heading)
Creating an SNMPv1/v2 Trap Destination
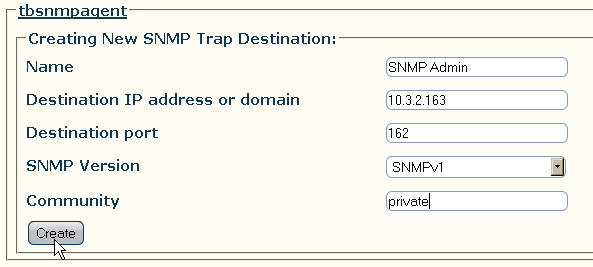
- In the trap destination configuration panel, set the following parameters if you are creating a trap destination for SNMPv1/v2:
- Enter a name to identify the trap destination
- Enter a destination IP Address for sending generated traps
- Enter a destination port number, on which to send generated traps (standard default value is 162)
- Click on the SNMP Version drop-down box and select version 1 or 2
- Enter the name of the SNMPv1/v2 community to use (configured previously)
- Click Create
Creating an SNMPv3 Trap Destination
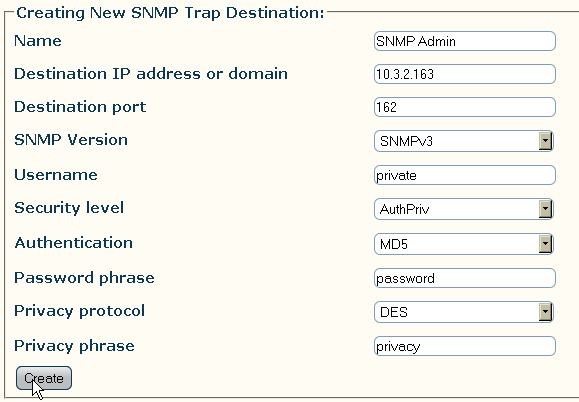
- In the trap destination configuration panel, set the following parameters if you are creating a trap destination for SNMPv3:
- Enter a name to identify the trap destination
- Enter a destination IP Address for sending generated traps
- Enter a destination port number, on which to send generated traps (standard default value is 162)
- Click on the SNMP Version drop-down box and select version 3
- Enter the name of the SNMPv3 user to use (configured previously)
- Click on the security level drop-down box, and select the appropriate security level for the user
- Click on the authentication drop-down box, and select the appropriate authentication algorithm for the user
- Enter the appropriate authentication pass phrase for the user
- Click on the privacy protocol drop-down box, and select the appropriate privacy standard for the user
- Enter the appropriate authentication privacy phrase for the user
- Click Create
- Verify that the "SNMP Trap Destination was Successfully Created" message appears at the top of the following window
- The new SNMP trap destination should appear under the SNMP Trap Destinations heading


