Toolpack installer 2-3
Candy Chan (Talk | contribs) (→Installation Complete) |
|||
| (36 intermediate revisions by 7 users not shown) | |||
| Line 1: | Line 1: | ||
| − | === Toolpack installation options | + | == Get installation package == |
| + | |||
| + | *You need to obtain the new version of the Toolpack software from the designated location. Please contact the [mailto:support@telcobridges.com TelcoBridges support team] to know which version to use. The package name starts with TBToolPack. | ||
| + | *Upload this package to the server running Toolpack with scp or a SFTP tool like [http://filezilla-project.org/ FileZilla] | ||
| + | |||
| + | == Toolpack installation options == | ||
{| class="wikitable" border="1" | {| class="wikitable" border="1" | ||
| Line 13: | Line 18: | ||
| dbdriver || Toolpack database ODBC driver | | dbdriver || Toolpack database ODBC driver | ||
|- | |- | ||
| − | | | + | | [[System_Id|systemid]] || Toolpack System Id (previously know as [[Gateway_Port|tbxgwport]]) |
|- | |- | ||
| − | | | + | | primip || IP address of primary ethernet interface of the localhost. Also known as [[Gateway_Address|tbxgwaddr0]] |
|- | |- | ||
| − | | | + | | redip || IP address of the redundant ethernet interface of the localhost. Also known as [[Gateway_Address|tbxgwaddr1]] |
|- | |- | ||
| − | | | + | | <del>webuser</del> || <del>Lighttpd User credentials (*nix machines)</del> |
|- | |- | ||
| − | | tbxgwaddr1 || Toolpack Tbx Gw Addr 1 | + | | <del>webgrp</del> || <del>Lighttpd Group credentials (*nix machines)</del> |
| + | |- | ||
| + | | <del>[[Gateway_Address|tbxgwaddr0]]</del> || <del>Toolpack Tbx Gw Addr 0 </del> | ||
| + | |- | ||
| + | | <del>[[Gateway_Address|tbxgwaddr1]]</del> ||<del>Toolpack Tbx Gw Addr 1 </del> | ||
| + | |- | ||
| + | | <del>[[Gateway_Port|tbxgwport]]</del> || <del>Toolpack Tbx Gw Port</del> | ||
|} | |} | ||
| Line 29: | Line 40: | ||
TBToolPack-2.3.1-Linux-centos5-x86_64-Install | TBToolPack-2.3.1-Linux-centos5-x86_64-Install | ||
| + | |||
| + | ==== TMG3200 ==== | ||
| + | |||
| + | For the TMG3200 you need to use the right installer. | ||
| + | |||
| + | <span style="color:#DC143C; background:#F0E68C"> | ||
| + | WARNING: Failure to use the correct installer for the TMG3200 will damage your system. | ||
| + | </span> | ||
| + | |||
| + | Follow this link for the [[TBLinux:How_to_select_the_proper_installer|TMG3200 installer selection procedure]] | ||
TMG3200 usage example, installing release 2-3-1: | TMG3200 usage example, installing release 2-3-1: | ||
| − | + | '''Warning''': For TMG3200 setting --[[Gateway_Address|primip]] and --[[Gateway_Address|redip]] is mandatory and needs to be set to --[[Gateway_Address|primip]] 172.31.1.2 --[[Gateway_Address|redip]] 172.31.1.2. | |
| + | TBToolPack-2.3.21-Linux-tbrel-1-28-ppc-Install --[[Gateway_Address|primip]] 172.31.1.2 --[[Gateway_Address|redip]] 172.31.1.2 | ||
=== Toolpack Multi system support === | === Toolpack Multi system support === | ||
| Line 48: | Line 70: | ||
Each setup is installed as a service of the Operating System, under the following name: | Each setup is installed as a service of the Operating System, under the following name: | ||
| − | tbtoolpack_${ | + | tbtoolpack_${[[System_Id|SystemId]]} -> ie: tbtoolpack_12358 |
Each service instance can be managed individually using "tbtoolpack" command. | Each service instance can be managed individually using "tbtoolpack" command. | ||
| Line 54: | Line 76: | ||
tbtoolpack stop 12390 | tbtoolpack stop 12390 | ||
| − | '''Note:''' If no | + | '''Note:''' If no [[System_Id|SystemId]] is given, the tbtoolpack will prompt the user to select one among the installed one. |
| − | + | ||
== Toolpack Graphical Installation == | == Toolpack Graphical Installation == | ||
| − | ===== Welcome screen ===== | + | ===== Welcome screen Pane ===== |
[[Image:Toolpack_welcome_screen_2-3.jpg|||Toolpack Welcome Screen Release 2-3]] | [[Image:Toolpack_welcome_screen_2-3.jpg|||Toolpack Welcome Screen Release 2-3]] | ||
| Line 71: | Line 92: | ||
| − | ===== Basic parameters | + | ===== Basic parameters Pane ===== |
Fields with <span style="color:Red">*</span> are advanced parameters not show in typical setup. | Fields with <span style="color:Red">*</span> are advanced parameters not show in typical setup. | ||
| Line 77: | Line 98: | ||
[[Image:Toolpack_basic_param_screen_2-3.jpg|||Toolpack Basic Parameter Pane Screen Release 2-3]] | [[Image:Toolpack_basic_param_screen_2-3.jpg|||Toolpack Basic Parameter Pane Screen Release 2-3]] | ||
| − | * ''' | + | * [[System_Id|'''System Id''']]: This is the unique id of the system and will install '''tbtoolpack_${SystemId}''' OS service. |
* '''Multi-Host System''': Tells if the system wil be composed of more than one host. (Must be true for DBHA) | * '''Multi-Host System''': Tells if the system wil be composed of more than one host. (Must be true for DBHA) | ||
| − | * ''' | + | * '''Service Start Type''': "Auto Start" is use to start the Toolpack service at host boot up, "Demand Start" requires manual start. |
| − | * ''' | + | * [[Gateway_Address|'''Primary local IP''']]: For TMG3200, it must always be set to 172.31.1.2. For TMP6400, this value should be set if the host has multiple network interfaces. |
| + | * [[Gateway_Address|'''Redundant local IP''']]: For TMG3200, it must always be set to 172.31.1.2. For TMP6400, this value should be set if the host has multiple network interfaces. | ||
| − | + | ===== Multi-Host parameters Pane ===== | |
| − | ===== Multi-Host parameters | + | |
[[Image:Toolpack_multi_host_screen_2-3.jpg|||Toolpack Multi-Host Pane Screen Release 2-3]] | [[Image:Toolpack_multi_host_screen_2-3.jpg|||Toolpack Multi-Host Pane Screen Release 2-3]] | ||
| Line 123: | Line 144: | ||
[[Image:Toolpack_license_screen_2-3.jpg|||Toolpack License Pane Screen Release 2-3]] | [[Image:Toolpack_license_screen_2-3.jpg|||Toolpack License Pane Screen Release 2-3]] | ||
| + | '''Note''': If you want to add a new license after the installation, simply copy it in the pkg/licenses/ of your toolpack installation. | ||
===== Installation Review Pane ===== | ===== Installation Review Pane ===== | ||
| Line 136: | Line 158: | ||
===== Installation Complete Pane ===== | ===== Installation Complete Pane ===== | ||
| − | After having clicked '''Finish'''. Type <span style="color:Blue">tbtoolpack start</span> at a shell prompt to start the service, or simply launch | + | After having clicked '''Finish'''. Type <span style="color:Blue">tbtoolpack start</span> at a shell prompt to start the service, or simply launch the service |
| − | + | ||
| + | For 2.2.X Release: <span style="color:Blue">${INSTALLDIR}/toolpack/service/tbtoolpack_service</span> | ||
| + | with <span style="color:Green">administrator</span> rights. | ||
| + | |||
| + | For 2.3.X Release and up:<span style="color:Blue">${INSTALLDIR}/toolpack/setup/{[[System_Id|SystemId]]}/service/tbtoolpack_service</span> | ||
| + | with <span style="color:Green">administrator</span> rights. | ||
| + | |||
| + | |||
| + | [[Image:Toolpack_complete_screen_2-3.jpg|||Toolpack complete Screen Release 2-3]] | ||
== Toolpack Text-mode Installation == | == Toolpack Text-mode Installation == | ||
| + | |||
| + | If your host has more than one network interface. It is recommended to set --[[Gateway_Address|primip]] and --[[Gateway_Address|redip]] parameters. | ||
| + | |||
| + | ==== TMG3200/TMG800 ==== | ||
| + | |||
| + | TMG3200/TMG800 usage example, installing release 2-4-34: | ||
| + | |||
| + | '''Warning''': For TMG3200 setting --[[Gateway Address|primip]] and --[[Gateway Address|redip]] is mandatory and needs to be set to --[[Gateway Address|primip]] 172.31.1.2 --[[Gateway Address|redip]] 172.31.1.2. | ||
| + | |||
| + | TBToolPack-2.4.34-Linux-tbrel-1-28-ppc-Install --primip 172.31.1.2 --redip 172.31.1.2 | ||
| + | |||
| + | <br> The next example shows the installation of Toolpack on the TB Linux | ||
| + | |||
| + | # ./TBToolPack-2.4.34-Linux-tbrel-1-28-ppc-Install --primip 172.31.1.2 --redip 172.31.1.2 | ||
| + | |||
| + | 1.8.6 >= 1.8.5 | ||
| + | 0.9.4 >= 0.9.0 | ||
| + | |||
| + | This will configure TBToolPack version 2.4.34 on your computer. Continue? [n/Y]Y | ||
| + | |||
| + | <br> <br> | ||
| + | |||
| + | ===== Basic parameters ===== | ||
| + | |||
| + | [[System Id|System Id]] [12358] | ||
| + | |||
| + | |||
| + | Service Start Type ("Auto Start" "Demand Start") [Auto Start] | ||
| + | |||
| + | *[[System Id|'''System Id''']]: This is the tbx gateway port and will install '''tbtoolpack_${[[System Id|SystemId]]}''' OS service. | ||
| + | *'''Service Start Type''': "Auto Start" is use to start the Toolpack service at host boot up, "Demand Start" requires manual start. | ||
| + | |||
| + | ===== <br> ===== | ||
| + | |||
| + | ===== Multi-Host parameters ===== | ||
| + | |||
| + | Multi-Host System [y/N] N | ||
| + | |||
| + | *'''Multi-Host System''': Tells if the system wil be composed of more than one host. For TMG users, only choose "N". | ||
| + | |||
| + | ===== <br> ===== | ||
| + | |||
| + | ===== Primary Database Connection ===== | ||
| + | |||
| + | OdbcDriver (MySQL) [MySQL] | ||
| + | |||
| + | |||
| + | Primary Database Hostname [TB005996] 172.31.1.2 | ||
| + | |||
| + | |||
| + | Primary Database Redundant IP [] | ||
| + | |||
| + | |||
| + | Primary Database Username [tbdb] | ||
| + | |||
| + | |||
| + | Primary Database Password [tbdbpw] | ||
| + | |||
| + | |||
| + | Primary Database Port [3306] | ||
| + | |||
| + | * '''HostName''': localhost and 127.0.0.1 are not allowed. | ||
| + | |||
| + | ===== <br> ===== | ||
| + | |||
| + | ===== ''Optional'' License Installation ===== | ||
| + | |||
| + | Note: If you want to add a new license after the installation, simply copy it in the pkg/licenses/ of your toolpack installation. | ||
| + | |||
| + | License Location (*.zip/*.dat) | ||
| + | |||
| + | ===== <br> ===== | ||
| + | |||
| + | ===== Installation Progress ===== | ||
| + | |||
| + | Installing TBToolPack... | ||
| + | Copying | ||
| + | Copying /lib/tb/toolpack/setup/12358/2.4/apps/toolpack_sys_manager/toolpack_sys_manager | ||
| + | Copying /lib/tb/toolpack/tbtoolpack | ||
| + | |||
| + | ===== <br> ===== | ||
| + | |||
| + | ===== Installation Complete ===== | ||
| + | |||
| + | Installation of TBToolPack complete. | ||
| + | |||
| + | To start tbtoolpack service, type the following command at a shell prompt: | ||
| + | tbtoolpack start | ||
| + | |||
| + | For more options: | ||
| + | tbtoolpack help | ||
| + | # | ||
| + | |||
| + | Note: It is not necessary for you to start tbtoolpack again if you didn't stop it before. If you are not sure, always start tbtoolpack at this point. | ||
| + | |||
| + | ===== Go back ===== | ||
| + | |||
| + | There may be other steps in order to complete the procedure. | ||
| + | |||
| + | Go back to the previous page using the back button of your web browser. | ||
Latest revision as of 00:51, 17 September 2010
Get installation package
- You need to obtain the new version of the Toolpack software from the designated location. Please contact the TelcoBridges support team to know which version to use. The package name starts with TBToolPack.
- Upload this package to the server running Toolpack with scp or a SFTP tool like FileZilla
Toolpack installation options
| Option | Description |
|---|---|
| dbhost | Toolpack database hostname |
| dbpass | Toolpack database password |
| dbuser | Toolpack database user |
| dbdriver | Toolpack database ODBC driver |
| systemid | Toolpack System Id (previously know as tbxgwport) |
| primip | IP address of primary ethernet interface of the localhost. Also known as tbxgwaddr0 |
| redip | IP address of the redundant ethernet interface of the localhost. Also known as tbxgwaddr1 |
| |
|
| |
|
| |
|
| |
|
| |
|
Usage examples
TMP6400 usage example installing release 2-3-1 on a CentOS 5 64 bits host:
TBToolPack-2.3.1-Linux-centos5-x86_64-Install
TMG3200
For the TMG3200 you need to use the right installer.
WARNING: Failure to use the correct installer for the TMG3200 will damage your system.
Follow this link for the TMG3200 installer selection procedure
TMG3200 usage example, installing release 2-3-1:
Warning: For TMG3200 setting --primip and --redip is mandatory and needs to be set to --primip 172.31.1.2 --redip 172.31.1.2.
TBToolPack-2.3.21-Linux-tbrel-1-28-ppc-Install --primip 172.31.1.2 --redip 172.31.1.2
Toolpack Multi system support
Toolpack installer now allows to have more than one setup being configured on the same host.
To enable this feature, the directory tree changed a little, here's what it looks like now:
 /lib/tb/toolpack/setup/12358/service
 /lib/tb/toolpack/setup/12358/2.3/apps
 /lib/tb/toolpack/setup/12358/2.3/licenses
 /lib/tb/toolpack/setup/12358/2.3
Note: 12358 was added in the setup path.
Each setup is installed as a service of the Operating System, under the following name:
tbtoolpack_${SystemId} -> ie: tbtoolpack_12358
Each service instance can be managed individually using "tbtoolpack" command.
 tbtoolpack start 12358
 tbtoolpack stop 12390
Note: If no SystemId is given, the tbtoolpack will prompt the user to select one among the installed one.
Toolpack Graphical Installation
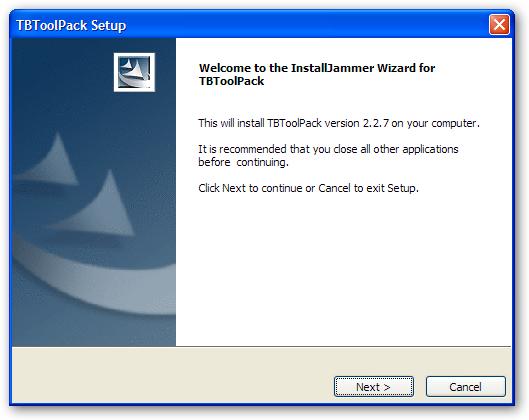
Welcome screen Pane
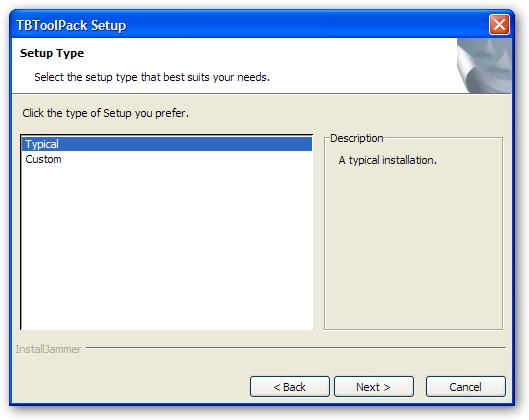
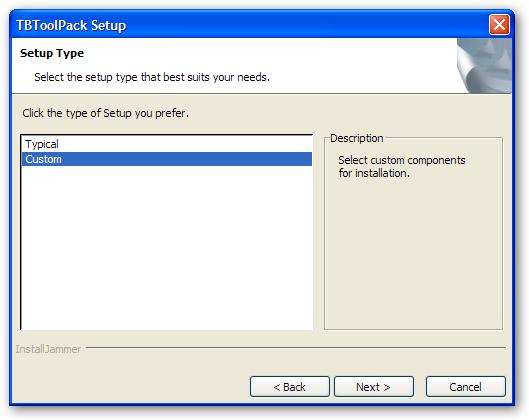
Installation Type Pane
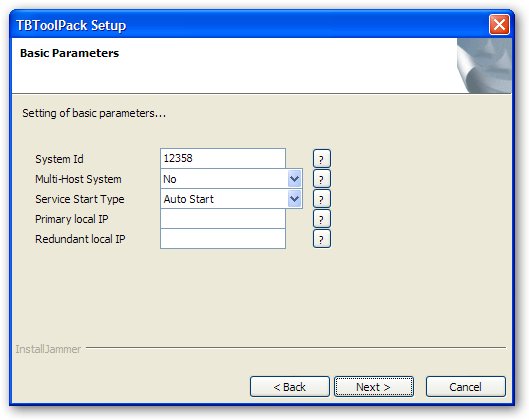
Basic parameters Pane
Fields with * are advanced parameters not show in typical setup.
- System Id: This is the unique id of the system and will install tbtoolpack_${SystemId} OS service.
- Multi-Host System: Tells if the system wil be composed of more than one host. (Must be true for DBHA)
- Service Start Type: "Auto Start" is use to start the Toolpack service at host boot up, "Demand Start" requires manual start.
- Primary local IP: For TMG3200, it must always be set to 172.31.1.2. For TMP6400, this value should be set if the host has multiple network interfaces.
- Redundant local IP: For TMG3200, it must always be set to 172.31.1.2. For TMP6400, this value should be set if the host has multiple network interfaces.
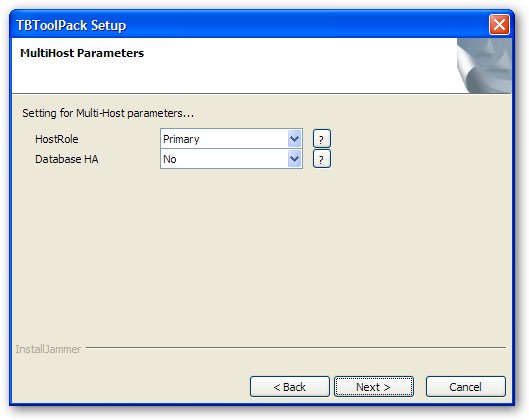
Multi-Host parameters Pane
- HostRole: Set to Primary on host responsible for File replication and/or the HA database configuration.
- Database HA: Yes to use two databases in HA mode.
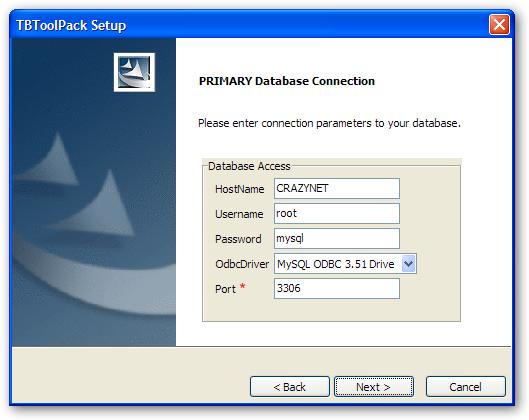
Primary Database Connection Pane
Toolpack requires access to a MySQL database through ODBC. Provide required connection parameters.
Fields with * are advanced parameters not show in typical setup.
- HostName: localhost and 127.0.0.1 are not allowed.
- OdbcDriver: Name of the ODBC driver to use.
Note: MySQL® Connector/ODBC (aka MyODBC) version 3.51 needs to be installed on all platforms prior to toolpack installation. On Unix machines, unixODBC must also be installed and properly configured (ie: must have an entry [MySql] in /etc/odbcinst.ini). See Toolpack prerequisite for details.
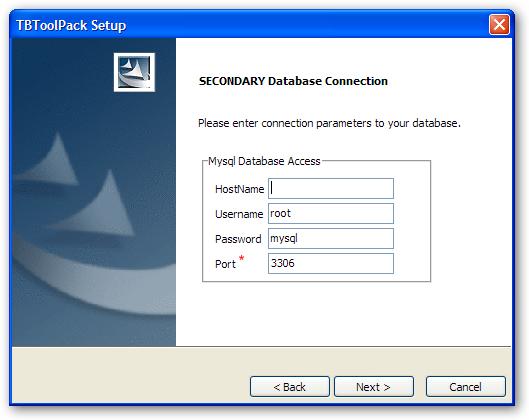
Secondary Database Connection Pane
Toolpack requires access to a MySQL database through ODBC. Provide required connection parameters. Fields with * are advanced parameters not show in typical setup.
- HostName: localhost and 127.0.0.1 are not allowed.
Note: Hostname for the Secondary database must differ from the Primary database hostname.
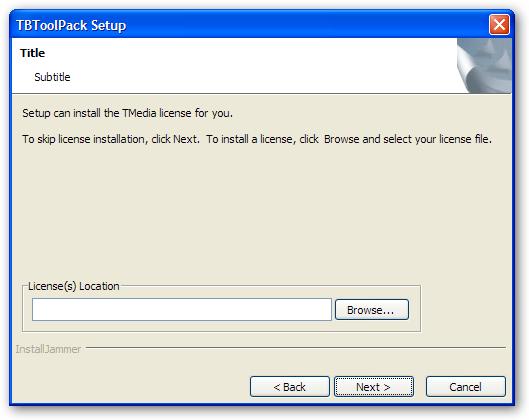
Optional License Installation Pane
Installer can optionally install license(s) for the Tmedia products. License file can be either a single license (*.dat), or a group of licenses (*.zip). To skip license installation , press Next button.
Note: If you want to add a new license after the installation, simply copy it in the pkg/licenses/ of your toolpack installation.
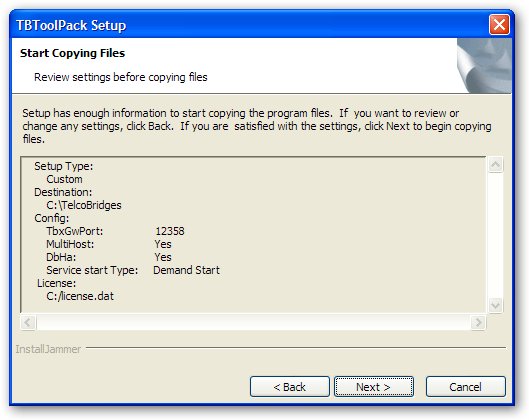
Installation Review Pane
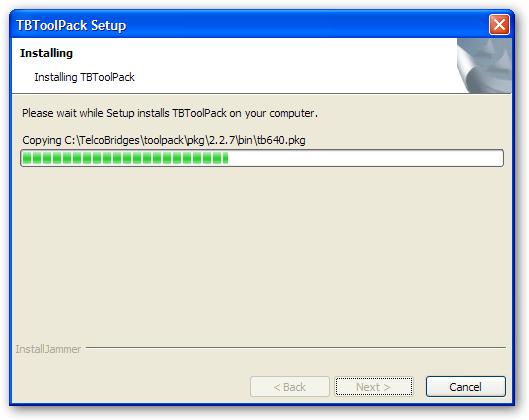
Installation Progress Pane
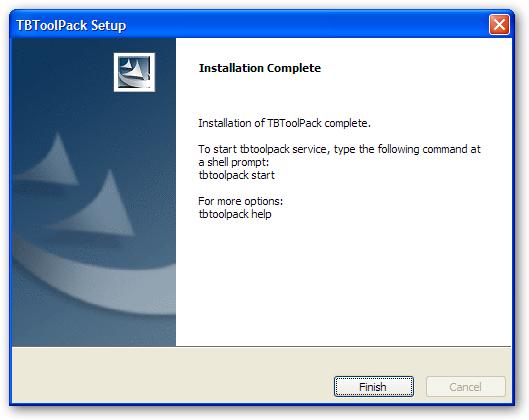
Installation Complete Pane
After having clicked Finish. Type tbtoolpack start at a shell prompt to start the service, or simply launch the service
For 2.2.X Release: ${INSTALLDIR}/toolpack/service/tbtoolpack_service with administrator rights.
For 2.3.X Release and up:${INSTALLDIR}/toolpack/setup/{SystemId}/service/tbtoolpack_service with administrator rights.
Toolpack Text-mode Installation
If your host has more than one network interface. It is recommended to set --primip and --redip parameters.
TMG3200/TMG800
TMG3200/TMG800 usage example, installing release 2-4-34:
Warning: For TMG3200 setting --primip and --redip is mandatory and needs to be set to --primip 172.31.1.2 --redip 172.31.1.2.
TBToolPack-2.4.34-Linux-tbrel-1-28-ppc-Install --primip 172.31.1.2 --redip 172.31.1.2
The next example shows the installation of Toolpack on the TB Linux
 # ./TBToolPack-2.4.34-Linux-tbrel-1-28-ppc-Install --primip 172.31.1.2 --redip 172.31.1.2

 1.8.6 >= 1.8.5
 0.9.4 >= 0.9.0
This will configure TBToolPack version 2.4.34 on your computer. Continue? [n/Y]Y
Basic parameters
 System Id [12358]


 Service Start Type ("Auto Start" "Demand Start") [Auto Start]
- System Id: This is the tbx gateway port and will install tbtoolpack_${SystemId} OS service.
- Service Start Type: "Auto Start" is use to start the Toolpack service at host boot up, "Demand Start" requires manual start.
Multi-Host parameters
Multi-Host System [y/N] N
- Multi-Host System: Tells if the system wil be composed of more than one host. For TMG users, only choose "N".
Primary Database Connection
 OdbcDriver (MySQL) [MySQL]


 Primary Database Hostname [TB005996] 172.31.1.2


 Primary Database Redundant IP []


 Primary Database Username [tbdb]


 Primary Database Password [tbdbpw]


 Primary Database Port [3306]
- HostName: localhost and 127.0.0.1 are not allowed.
Optional License Installation
Note: If you want to add a new license after the installation, simply copy it in the pkg/licenses/ of your toolpack installation.
License Location (*.zip/*.dat)
Installation Progress
 Installing TBToolPack...
 Copying
 Copying /lib/tb/toolpack/setup/12358/2.4/apps/toolpack_sys_manager/toolpack_sys_manager
 Copying /lib/tb/toolpack/tbtoolpack
Installation Complete
 Installation of TBToolPack complete.

 To start tbtoolpack service, type the following command at a shell prompt:
 tbtoolpack start

 For more options:
 tbtoolpack help
 #
Note: It is not necessary for you to start tbtoolpack again if you didn't stop it before. If you are not sure, always start tbtoolpack at this point.
Go back
There may be other steps in order to complete the procedure.
Go back to the previous page using the back button of your web browser.
