Create A DNS Group A
(New DNS Group Artticle) |
|||
| (11 intermediate revisions by 2 users not shown) | |||
| Line 1: | Line 1: | ||
| − | |||
{{DISPLAYTITLE:Creating a DNS Group}} | {{DISPLAYTITLE:Creating a DNS Group}} | ||
| − | You can create one or more DNS Groups to manage the DNS Server traffic of Fully Qualified Domain Names. | + | |
| + | {| class="wikitable" | ||
| + | |- | ||
| + | |rowspan="2"|This article applies to: | ||
| + | |'''Product''' | ||
| + | |'''Version''' | ||
| + | |- | ||
| + | |SBC | ||
| + | |3.1 | ||
| + | |} | ||
| + | |||
| + | '''Note: ''' This article describes how to configure a DNS Group, which is not the same as creating a [[Toolpack:set_DNS_A|DNS server group for the Linux host]]. | ||
| + | |||
| + | |||
| + | You can create one or more DNS Groups to manage the DNS Server traffic of Fully Qualified Domain Names (FQDN). | ||
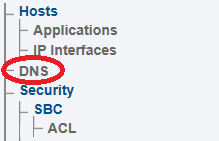
1- Click '''DNS''' in the navigation panel | 1- Click '''DNS''' in the navigation panel | ||
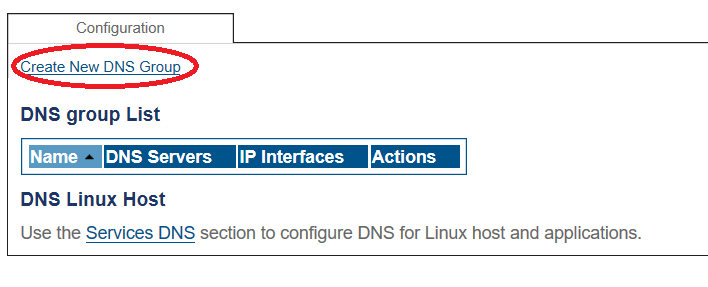
| Line 11: | Line 24: | ||
[[Image:dns_group_1.png]]<br><br> | [[Image:dns_group_1.png]]<br><br> | ||
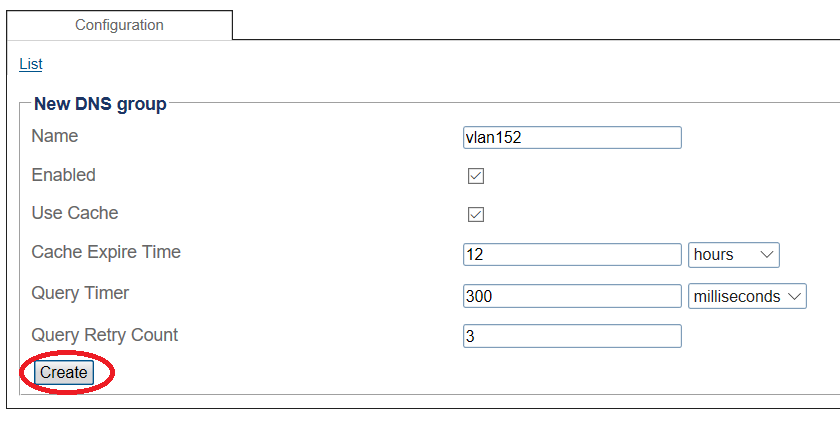
| − | 3- | + | 3- Enter a name for the DNS Group. |
| − | + | ||
| − | + | ||
| − | + | ||
* Click '''Create''' | * Click '''Create''' | ||
| − | [[Image: | + | [[Image:dns_group_2.png]]<br><br> |
| + | 4- Verify that the '''"DNS group was successfully created"''' message appears | ||
| − | + | [[Image:dns_group_3.png]]<br><br> | |
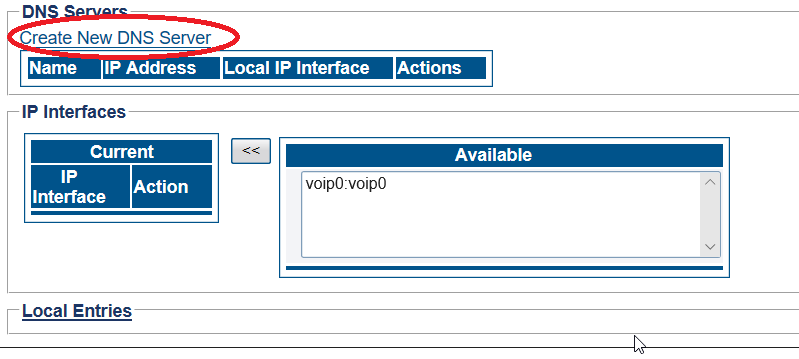
| − | [[Image: | + | 5- Create a DNS Server for the DNS Group. |
| + | *Click '''Create New DNS Server'''. | ||
| + | |||
| + | [[Image:dns_group_4.png]]<br><br> | ||
| + | |||
| + | 6- Configure the DNS Server. | ||
| + | *Enter a name for the DNS server. | ||
| + | *Enter an IP address for the server. | ||
| + | *Select a Local IP interface. This is the interface through which the DNS requests will be transmitted. | ||
| + | |||
| + | *Click '''Create'''. | ||
| + | |||
| + | [[Image:dns_group_5.png]]<br><br> | ||
| + | |||
| + | 7- Verify that the '''"DNS server was successfully created"''' message appears | ||
| + | |||
| + | [[Image:dns_group_6.png]]<br><br> | ||
| + | |||
| + | 8- Select an IP interface from the list of available interfaces. The interfaces that are added will have | ||
| + | their FQDN requests resolved by this DNS group. | ||
| + | |||
| + | *Click [[Image:dns_group_8.png]] to move the available interface over to the '''Current''' list. | ||
| + | |||
| + | [[Image:dns_group_7.png]]<br><br> | ||
| + | |||
| + | *Click '''Create'''. | ||
| + | |||
| + | The DNS Group with the new DNS Server and DNS Local entries are displayed. | ||
| + | |||
| + | [[Image:dns_group_d.png]]<br><br> | ||
==List of Parameters== | ==List of Parameters== | ||
| − | * | + | * [[Parameter: Name|Name]] |
| − | * | + | * [[Parameter: Enables|Enabled]] |
| + | * [[Parameter: Use Cache|Use Cache]] | ||
| + | * [[Parameter: Cache Expire Time|Cache Expire Time]] | ||
| + | * [[Parameter: Query Timer|Query Timer]] | ||
| + | * [[Parameter: Query Retry Count|Query Retry Count]] | ||
| + | <br> | ||
| + | |||
| + | <div class="mw-collapsible mw-collapsed" data-collapsetext="DNS Server" data-expandtext="DNS Server" style="width: 400px;"> | ||
| + | {| class="wikitable" | ||
| + | |- | ||
| + | * [[Parameter: Name|Name]] | ||
| + | * [[Parameter: Enabled|Enabled]] | ||
| + | * [[Parameter: Server Address|Server Address]] | ||
| + | * [[Parameter: Local IP Interface|Local IP Interface]] | ||
| + | |||
| + | '''Advanced Parameters''' | ||
| + | * [[Parameter: Server DNS Port|Server DNS Port]] | ||
| + | * [[Parameter: TOS to use in IP header|TOS to use in IP header]] | ||
| + | * [[Parameter: Protocol|Protocol]] | ||
| + | * [[Parameter: Local Port|Local Port]] | ||
| + | |} | ||
| + | </div> | ||
| + | |||
| + | |||
| + | <div class="mw-collapsible mw-collapsed" data-collapsetext="IP Interface" data-expandtext="IP Interface" style="width: 400px;"> | ||
| + | {| class="wikitable" | ||
| + | |- | ||
| + | * [[Parameter: Interface name|Interface name]] | ||
| + | * [[Parameter: Services to use|Services to use]] | ||
| + | * [[Parameter: Host VLAN|Host VLAN]] | ||
| + | * [[Parameter: Use DHCP|Use DHCP]] | ||
| + | |} | ||
| + | </div> | ||
Latest revision as of 08:26, 15 December 2020
| This article applies to: | Product | Version |
| SBC | 3.1 |
Note: This article describes how to configure a DNS Group, which is not the same as creating a DNS server group for the Linux host.
You can create one or more DNS Groups to manage the DNS Server traffic of Fully Qualified Domain Names (FQDN).
1- Click DNS in the navigation panel
2- Click Create New DNS Group
3- Enter a name for the DNS Group.
- Click Create
4- Verify that the "DNS group was successfully created" message appears
5- Create a DNS Server for the DNS Group.
- Click Create New DNS Server.
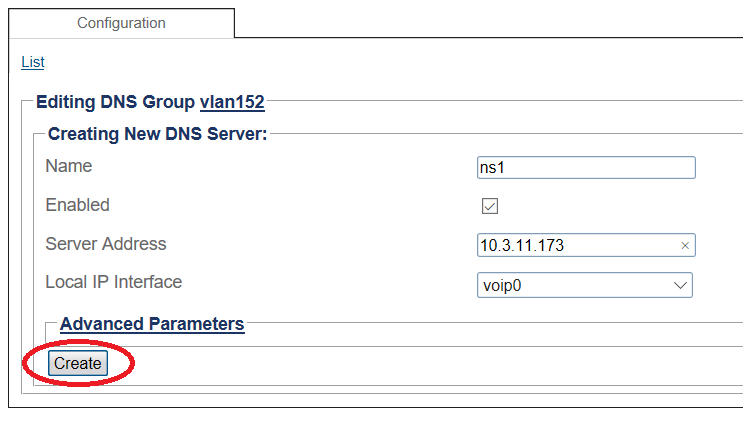
6- Configure the DNS Server.
- Enter a name for the DNS server.
- Enter an IP address for the server.
- Select a Local IP interface. This is the interface through which the DNS requests will be transmitted.
- Click Create.
7- Verify that the "DNS server was successfully created" message appears
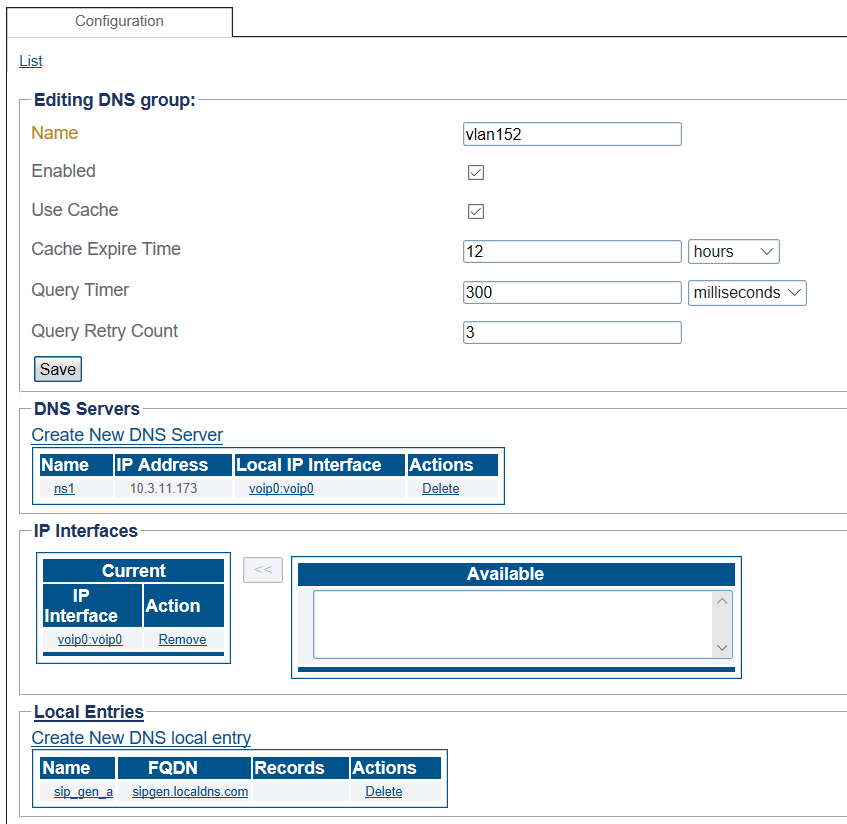
8- Select an IP interface from the list of available interfaces. The interfaces that are added will have their FQDN requests resolved by this DNS group.
- Click Create.
The DNS Group with the new DNS Server and DNS Local entries are displayed.
List of Parameters
