ProSBC:Twilio Trunking:Example A
| (4 intermediate revisions by one user not shown) | |||
| Line 8: | Line 8: | ||
From your [https://www.twilio.com/console Twilio Console], navigate to the [https://www.twilio.com/console/sip-trunking/dashboard Elastic SIP Trunking] area ( or click on the [[Image:twilio_sip_icon.png|20px]] icon on the left vertical navigation bar) | From your [https://www.twilio.com/console Twilio Console], navigate to the [https://www.twilio.com/console/sip-trunking/dashboard Elastic SIP Trunking] area ( or click on the [[Image:twilio_sip_icon.png|20px]] icon on the left vertical navigation bar) | ||
| − | <br><br>[[Image:twilio_trunk.png| | + | <br><br>[[Image:twilio_trunk.png|300px]]<br><br> |
==Create a new IP-ACL== | ==Create a new IP-ACL== | ||
| Line 14: | Line 14: | ||
Click on [https://www.twilio.com/console/sip-trunking/authentication/ip-acls Authentication] in the left navigation, and then click on [https://www.twilio.com/console/sip-trunking/authentication/ip-acls IP Access Control Lists]. | Click on [https://www.twilio.com/console/sip-trunking/authentication/ip-acls Authentication] in the left navigation, and then click on [https://www.twilio.com/console/sip-trunking/authentication/ip-acls IP Access Control Lists]. | ||
| − | <br><br>[[Image:twilio_sip_acl.png| | + | <br><br>[[Image:twilio_sip_acl.png|300px]]<br><br> |
In this example, an IP-ACL is created with the name: "MyExampleACL". Add your SBCs IP addresses to the IP-ACL you create. | In this example, an IP-ACL is created with the name: "MyExampleACL". Add your SBCs IP addresses to the IP-ACL you create. | ||
| − | <br><br>[[Image:twilio_myexample_acl.png| | + | <br><br>[[Image:twilio_myexample_acl.png|800px]]<br><br> |
==Create a new Trunk== | ==Create a new Trunk== | ||
For each geographical region desired (e.g., North America, Europe), create a new Elastic SIP Trunk. | For each geographical region desired (e.g., North America, Europe), create a new Elastic SIP Trunk. | ||
| − | Now click on [[Image:twilio_trunk_icon.png| | + | Now click on [[Image:twilio_trunk_icon.png|40px]] again on the left vertical navigation bar, and create a new Trunk. |
<br><br>[[Image:twilio_new_trunk.png|500px]]<br><br> | <br><br>[[Image:twilio_new_trunk.png|500px]]<br><br> | ||
Under the '''General Settings''' you can enable different features as desired | Under the '''General Settings''' you can enable different features as desired | ||
| Line 41: | Line 41: | ||
<br><br>[[Image:twilio_orgination_url_1.png|500px]]<br><br> | <br><br>[[Image:twilio_orgination_url_1.png|500px]]<br><br> | ||
In this example, Origination traffic is routed via Twilio’s Ashburn edge, if that fails then we'll route from Twilio’s Umatilla edge. | In this example, Origination traffic is routed via Twilio’s Ashburn edge, if that fails then we'll route from Twilio’s Umatilla edge. | ||
| + | |||
| + | ==Associate Phone Numbers on your Trunk== | ||
| + | In the '''Numbers''' section of your Trunk, add the Phone Numbers that you want to associate with each Trunk. Remember to associate the Numbers from a given country in the right Trunk. For example, associate US & Canada Numbers with the North American Trunk and European Numbers with the European Trunk etc. | ||
| + | <br><br>[[Image:twilio_numbers.png|500px]]<br><br> | ||
Latest revision as of 02:56, 25 March 2021
Contents |
Introduction
This article provides you with a step-by-step Elastic SIP Trunk Configuration on Twilio. In this guide FQDN is (telcobridges.pstn.twilio.com) configured in the Twilio console. You can find more details about how to create an Elastic Trunking in Twilio from the following link Create and Configure Trunks
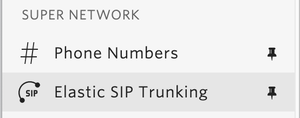
Twilio Elastic SIP Trunk Configuration
From your Twilio Console, navigate to the Elastic SIP Trunking area ( or click on the ![]() icon on the left vertical navigation bar)
icon on the left vertical navigation bar)
Create a new IP-ACL
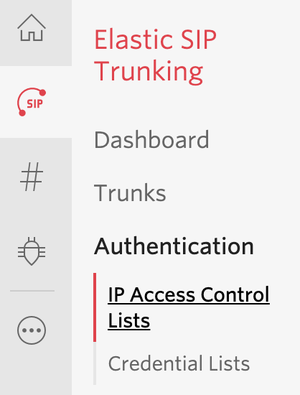
Click on Authentication in the left navigation, and then click on IP Access Control Lists.
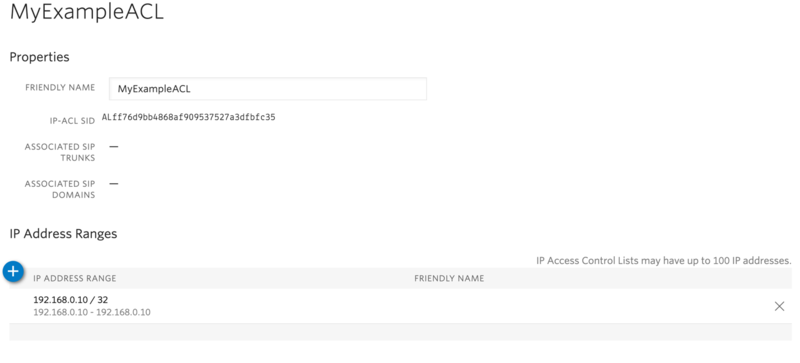
In this example, an IP-ACL is created with the name: "MyExampleACL". Add your SBCs IP addresses to the IP-ACL you create.
Create a new Trunk
For each geographical region desired (e.g., North America, Europe), create a new Elastic SIP Trunk.
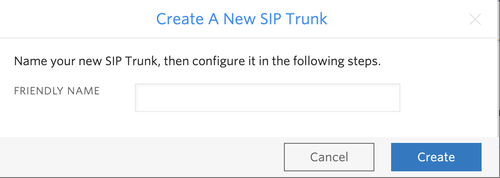
Now click on ![]() again on the left vertical navigation bar, and create a new Trunk.
again on the left vertical navigation bar, and create a new Trunk.
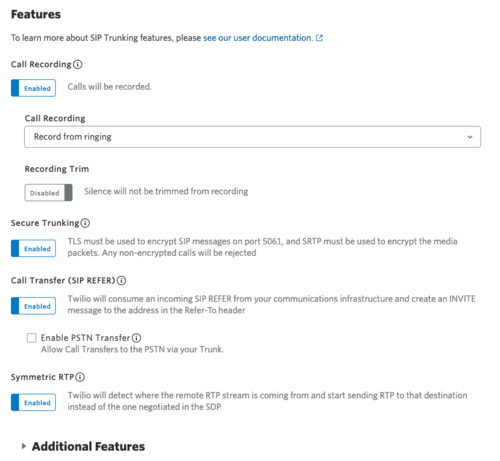
Under the General Settings you can enable different features as desired
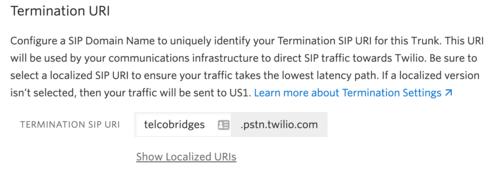
In the Termination section, select a Termination SIP URI.
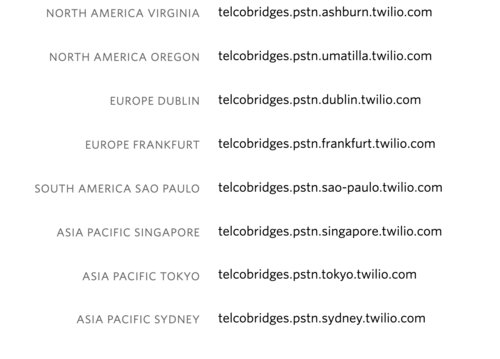
Click on "Show localized URI's" and copy and paste this information as you will use this on your SBC to configure your Trunk.
or
Assign the IP ACL ("MyExampleACL" ) that you created in the previous step.

In the Origination section, we'll add Origination URI's to route traffic towards your TelcoBridges SBC. The recommended practice is to configure a redundant mesh per geographic region (in this context a region is one of North America, Europe, etc). In this case, we configure two Origination URIs, each egressing from a different Twilio Edge.
Click on ‘Add New Origination URI’, we'll depict the configuration for North America:
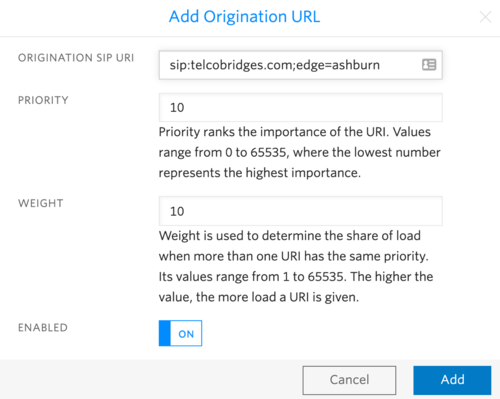
Continue to add the other Origination URIs if desired. Origination URIs are listed as follows:

In this example, Origination traffic is routed via Twilio’s Ashburn edge, if that fails then we'll route from Twilio’s Umatilla edge.
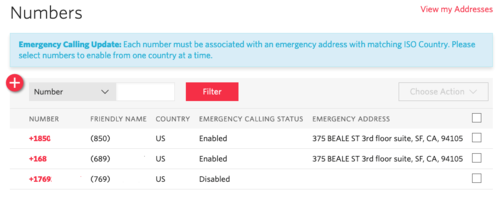
Associate Phone Numbers on your Trunk
In the Numbers section of your Trunk, add the Phone Numbers that you want to associate with each Trunk. Remember to associate the Numbers from a given country in the right Trunk. For example, associate US & Canada Numbers with the North American Trunk and European Numbers with the European Trunk etc.
