FreeSBC:SIP Trunking FusionPBX:Example A
(→FusionPBX SIP Trunk Example) |
(→NAP Configuration) |
||
| Line 42: | Line 42: | ||
* See [[Toolpack:Allocating a SIP Network Access Point (NAP) SBC A|Create SIP NAP]] | * See [[Toolpack:Allocating a SIP Network Access Point (NAP) SBC A|Create SIP NAP]] | ||
| − | + | ||
| + | In this example, we will use telcobridges.pstn.twilio.com trunk information | ||
| + | |||
| + | ===To create a new NAP=== | ||
| + | |||
| + | 1-Click '''NAPs''' in the navigation panel === | ||
| + | |||
| + | [[Image:NAP_NavigationMenu.png]] | ||
| + | |||
| + | |||
| + | 2-Click '''Create New NAP''' === | ||
| + | |||
| + | [[Image:Create_New_NAP_SIP.png]] | ||
| + | |||
| + | |||
| + | 3-Create the new NAP === | ||
| + | |||
| + | * Enter a '''name''' for the NAP | ||
| + | * Click '''Create''' | ||
| + | |||
| + | [[Image:Create_New_NAP_SIP1.png]] | ||
| + | |||
| + | |||
| + | 4-Verify that the '''NAP was successfully created''' message appears === | ||
| + | |||
| + | [[Image:Create_New_NAP_SIP2.png]] | ||
Revision as of 02:48, 4 March 2021
Contents |
Applies to version: v3.1
Introduction
SIP Trunk Configuration Instruction with FusionPBX Example Configuration provides you with a step by step SIP Trunk Configuration of ProSBC with FusionPBX systems, using the Web Portal configuration tool. Complete general installation configuration steps, before you begin configuring your specific scenario. In this guide FQDN (fusionpbx.telcobridges.com) configured in the FusionPBX server. If you don't use FQDN, you can use FusionPBX IP address too. Please check how to configure the SIP Trunk in FusionPBX for ProSBC from FusionPBX Trunk Creation
FusionPBX SIP Trunk Example
Configuration Steps
| (Step 1) Create IP Network |
(Step 2) Create Protocol Stack |
(Step 3) Create Call Route |
|---|---|---|
|
NAP Configuration
- See Create SIP NAP
In this example, we will use telcobridges.pstn.twilio.com trunk information
To create a new NAP
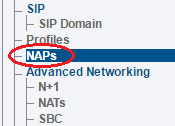
1-Click NAPs in the navigation panel ===
2-Click Create New NAP ===
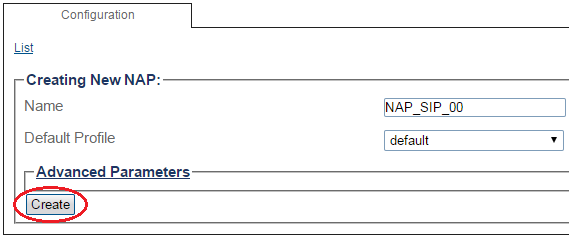
3-Create the new NAP ===
- Enter a name for the NAP
- Click Create
4-Verify that the NAP was successfully created message appears ===


