Toolpack v2.3:Creating a SIP Profile
From TBwiki
(Difference between revisions)
(→To create a SIP profile / system resource profile) |
m (Added: To have a complete SDP definition, select "Generate SDP for parameters even if it is the default value") |
||
| Line 1: | Line 1: | ||
| − | == To create a SIP profile / system resource profile == | + | == To create a SIP profile / system resource profile == |
| − | '''1. Select Profiles from the navigation panel.''' | + | '''1. Select Profiles from the navigation panel.''' |
| + | <br>[[Image:Navigation Panel v2.3 Profiles.png]] | ||
| − | + | <br>'''2. Click 'Create New Profile' from the information panel.''' | |
| + | <br>[[Image:Web Portal v2.3 Create Profile.png|700px]] | ||
| − | ''' | + | <br>'''3. Enter a name for the profile. In this example PROXY_1 is entered.''' |
| − | + | *Select a SDP generation option. The SDP description appears in the Profile SDP window. To have a complete SDP definition, select "Generate SDP for parameters even if it is the default value" | |
| − | + | *You may input a customized [[Toolpack:Profile SDP Description|Profile SDP Description]] to define which [[Voice codecs|codecs]] are allowed. | |
| − | + | ||
| − | + | ||
| − | + | ||
| − | *Select a SDP generation option. The SDP description appears in the Profile SDP window. | + | |
| − | *You may input a customized [[Toolpack:Profile SDP Description|Profile SDP Description]] to define which [[ | + | |
*Click 'Create' to save the changes | *Click 'Create' to save the changes | ||
| + | <br>[[Image:Web Portal v2.3 Creating Profile.png|700px]] | ||
| − | [[ | + | <br>'''4. Select one or more [[DTMF]] relay schemes.''' |
| − | + | *Select one or more DTMF schemes then click the << button to assign them to the current profile | |
| − | + | ||
| − | *Select one or more DTMF schemes then click the | + | |
*Click 'Save' | *Click 'Save' | ||
| + | <br>[[Image:Web Portal v2.3 Profile DTMF.png|700px]] | ||
| − | + | '''5. Validate the preferred order of DTMF relay schemes.''' | |
| − | + | *Use the up and down arrow keys to set the preferred order of the DTMF relaying scheme. | |
| − | *Use the up and down arrow keys to set the preferred order of the DTMF relaying scheme. | + | |
*Click 'Save' | *Click 'Save' | ||
| − | [[Image: | + | [[Image:Web Portal v2.3 Profile DMTF 2.png|700px]] |
| − | + | ||
| − | + | ||
| − | + | ||
| + | <br>'''Note:''' Once a profile has been created, it can be assigned to one or more NAPs. See the figure below for an example: | ||
| − | [[Image: | + | <br>[[Image:Web Portal v2.3 NAP ISUP Profile.png|700px]] |
Revision as of 14:40, 16 February 2010
To create a SIP profile / system resource profile
1. Select Profiles from the navigation panel.
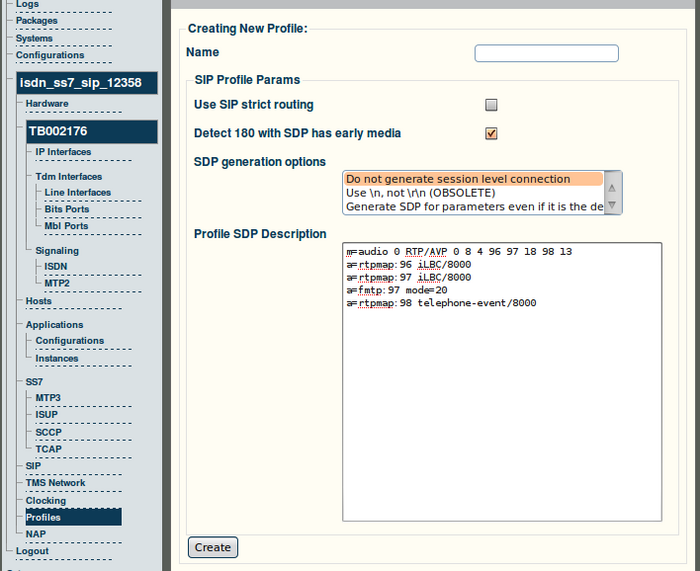
2. Click 'Create New Profile' from the information panel.
3. Enter a name for the profile. In this example PROXY_1 is entered.
- Select a SDP generation option. The SDP description appears in the Profile SDP window. To have a complete SDP definition, select "Generate SDP for parameters even if it is the default value"
- You may input a customized Profile SDP Description to define which codecs are allowed.
- Click 'Create' to save the changes
4. Select one or more DTMF relay schemes.
- Select one or more DTMF schemes then click the << button to assign them to the current profile
- Click 'Save'
5. Validate the preferred order of DTMF relay schemes.
- Use the up and down arrow keys to set the preferred order of the DTMF relaying scheme.
- Click 'Save'
Note: Once a profile has been created, it can be assigned to one or more NAPs. See the figure below for an example:


