CAF: Working With Cmc Call Legs
Call Leg Definition
The main mechanism through which the customer application controls the Toolpack system is via the management of call legs. The application creates a call leg (or more than one for conferencing and bridging) at the beginning of a call, then controls it through a simple, protocol-agnostic API. When a call is terminated, the call leg can be destroyed.
A call leg is represented by an instance of the CTBCMCLeg class. It represents a full-duplex media resource and/or its associated signaling entity. Typical examples of call legs with signaling would be an SS7 ISUP call with its associated CIC (mapped to a TDM interface such as a T1 timeslot) or a SIP call with its associated VoIP codec resource (attached to an IP/UDP endpoint). A media-only call leg would represent a standalone TDM endpoint (such as a T1 timeslot) or a VOIP endpoint (VOIP codec resource attached to an IP/UDP endpoint). The section titled Leg Creation will show how different types of call legs can be created.
The CTBCMCLeg class allows a programmer to easily act upon the call leg to influence the signaling portion (e.g. accept, answer, terminate, etc) and to use the media portion as well (e.g play prompts, record voice, play or collect digits and tones).
Other member functions are available to retrieve (and change in some cases) the call leg attributes including the media profile (e.g. parameters to the media resource) or signaling information (e.g. protocol type, called and calling party numbers, etc). Joining/unjoining (connection/disconnection) of call legs is also a typical action handled by this class for ’gateway-type’ applications. It is important to note that this class is protocol-agnostic and can handle any type of supported call legs (e.g. SIP/VOIP, ISDN, SS7, Media only, etc).
Caveats
- Do not confuse a call leg with a call. A call leg represents one full-duplex link to a party while a call represents the agglomeration of multiple (two or more) call legs. For example, a bridge is a form of call that uses two call legs.
- Do not confuse the base class CTBCMCLeg with the class CTBCAFCallLeg. The later is an implementation class specialized to be used by the ITBCAFCallFlow interface when dealing with multiple legs. It is designed to represent a leg within a call. It cannot be instanciated as a standalone object without modifications to make it independent from the ITBCAFCallFlow interface.
- If the overall goal is to bridge two or more call legs together, then the programmer would be advised to use the CTBCAFBridge class for leg creation instead of creating call legs manually. This class already deals with the issues of handling multiple legs simultaneously.
Documentation about CTBCAFBridge can be found here: [Working with CAF Call Legs and behaviors]
Audio Mixer Definition
Instead of joining call legs together to make audio flow between them, another option is to add them to an audio mixer. Audio mixers can be used, among other things, to:
- Build conferences
- Play background music to a conversation
- Record both sides of the conversation into a single recorded file.
Audio mixers are represented through class CTBCMCMixer. Information on that class can be found here: [Working with CMC Mixers]
Command Flow for Leg Actions in CAF
All actions requested on a leg are executed asynchronously. For each action DoSomething() on a leg, a corresponding OnDoSomethingResponse() event will be received on the leg once Toolpack starts processing the command. If the OnXXXResponse() function does not handle the response (the default implementation is empty) and the result of the action was a failure, the default error handling function OnLegError() will be called. Most of the actions executed on a leg can take variable time to complete. In these case, an extra event will be received on the leg once the action is complete (OnXXXResponse() is always called when Toolpack starts executing the action).
For example, to play a digit sequence, one would call PlayDigit(). It would then almost immediately receive the OnPlayDigitResponse() event indicating that Toolpack has received the command. At the same time this event is called, Toolpack will start playing the digits on the leg. Once the digits play is completed, the user will receive an OnDigitPlayingDone() event.
Leg Creation
Creating a leg is always done through the definition of a call leg attribute. The values entered in the call leg attribute will define the type of call leg created and its parameters. The following sections describe several scenarios in which you build a call leg. Instruction will be given on how to fill the leg attributes and how to use them to create the call leg.
Preparing Leg Attributes
Normal Call Leg Attributes
For calls including both the signaling and the media path, there is very few parameters that one must enter. The required parameters are:
- the called number,
- the calling number,
- the Network Access Point.
Toolpack will automatically select an available channel in the specified NAP to make the call leg. Only NAPs of type SS7, ISDN or SIP can be specified for call leg attribute (see NAP Types).
The following code snippet shows how to build the attributes.
 PTRCTBCMC_CALL_LEG_ATTRIBUTE ptrOutgoingLegAttribute;

 ptrOutgoingLegAttribute = tbnew CTBCMC_CALL_LEG_ATTRIBUTE();

 ptrOutgoingLegAttribute->GetCalledNumber()            = "123-4567";
 ptrOutgoingLegAttribute->GetCallingNumber()           = "987-6543";
 ptrOutgoingLegAttribute->GetNetworkAccessPoint()      = "NAP_SS7_MONTREAL";
Media-only Leg Attributes
For media-only legs, no signaling information is needed but the user can specify which media channel to use and which media profile to use. The only required parameters are the Network Access Point and the leg type. Only NAPs of type MEDIA TDM or MEDIA VOIP can be specified for media-only leg attribute (see NAP Types).
 PTBCMC_MEDIA_DESCRIPTION           pMediaDesc;
 PTRCTBCMC_MEDIA_ONLY_LEG_ATTRIBUTE ptrLegAttribute;

 ptrLegAttribute = tbnew CTBCMC_MEDIA_ONLY_LEG_ATTRIBUTE();
 pMediaDesc      = ptrLegAttribute->GetProfile().GetMediaDescription();

 ptrLegAttribute->GetNetworkAccessPoint()      = "NAP_MEDIA_1";
 pMediaDesc->Type                              = TBCMC_MEDIA_TYPE_AUDIO;
 pMediaDesc->Transport                         = TBCMC_MEDIA_TRANSPORT_TDM or TBCMC_MEDIA_TRANSPORT_IP;
When only the NAP and type are specified, Toolpack will automatically select an available channel in the specified NAP to allocate the media path. For MEDIA TDM NAPs, a trunk/timeslot from the specified NAP will be chosen by Toolpack. For MEDIA VOIP NAPs, an IP interface and port from the specified NAP will be chosen.
If the user wants to specify which media channel to use, it can do so by adding extra information in the leg attribute. For TDM legs, a trunk name and a timeslot number can be specified.
 PTBCMC_MEDIA_DESCRIPTION pMediaDesc;

 pMediaDesc->Settings.TdmAudio.Type            = TBCMC_MEDIA_SETTINGS_TYPE_TDM_AUDIO;
 pMediaDesc->Settings.TdmAudio.un8Timeslot     = 5;
 Strncpy
 (
     pMediaDesc->Settings.TdmAudio.szTrunkName,
     "TRUNK_TORONTO_1",
     sizeof(pMediaDesc->Settings.TdmAudio.szTrunkName)
 );
For VOIP legs, the user can control the media by providing local SDP and peer SDP. Setting the local SDP defines the codec and IP/port used to for the received media stream. Most of the time, the IP address and port should be left empty to let Toolpack choose an available port. Setting the peer SDP defines the codec and IP/port used for the transmitted media stream. Note that Toolpack only allows for the same codec to be used in RX and TX. If both local SDP and peer SDP are specified, codecs that are not in both SDP will be filtered out.
For details on how to fill the TBX_SDP_INFO structure needed for SetLocalSDP and SetPeerSDP, see Filling an SDP Structures.
 TBX_RESULT               Result;
 TBX_SDP_INFO             SdpInfo;
 PTBCMC_MEDIA_DESCRIPTION pMediaDesc;

 pMediaDesc = ptrLegAttribute->GetProfile().GetMediaDescription();
 pMediaDesc->Settings.PacketAudio.Type         = TBCMC_MEDIA_SETTINGS_TYPE_PACKET_AUDIO;

 // Set Local SDP
 Result = BuildSdpInfo("", 0, SdpInfo);                 // No IP specified, Toolpack will choose one
 TBCAF_EXIT_ON_ERROR( Result, "BuildSdpInfo failed." );
 ptrLegAttribute->GetProfile().SetLocalSDP(SdpInfo);

 // Set Peer SDP
 Result = BuildSdpInfo("10.0.0.15", 5000, SdpInfo);     // Using peer IP address and port
 TBCAF_EXIT_ON_ERROR( Result, "BuildSdpInfo failed." );
 ptrLegAttribute->GetProfile().SetPeerSDP(SdpInfo);
Choosing a unique LegId
Each leg must be assigned a unique LegId.
- The LegId of incoming call legs is chosen by Toolpack system and provided to the application upon OnCallLegPresent(). This LegId must provided when creating the new CTBCMCLeg object.
- For outgoing call legs (or media only legs), the LegId 0 should be passed to the constructor of CTBCMCLeg, which will assign an appropriate LegId to that call leg.
- For re-synchronized call legs, the LegId passed to OnCallLegSync() must be used.
Creating the Leg
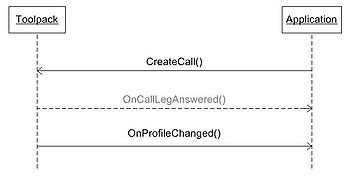
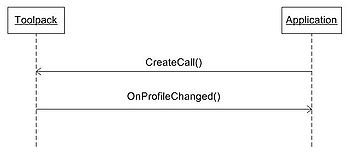
Once the leg attributes have been filled, creating the leg in Toolpack is only a matter of creating a CTBCMCLeg object and calling CreateCall() on it. No action is taken when an instance of a CTBCMCLeg is created. Call resources are only allocated in the Toolpack system when CreateCall() is called on the object.
 pCallLeg = new CTBCMCLeg( in_un32LegId /* or 0 for outgoing or media-only legs */, ptrLegAttribute, this, 0, &mLegMutex );
 pCallLeg->CreateCall();
For legs with signaling, the CreateCall() will trigger the sending of the call setup message (SIP Invite, SS7 IAM, etc.). In that case, the media resources are not allocated immediately. They will be allocated only when the signaling part of the call setup is complete. If the application requests a media action (PlayFile, StartDigitCollection, etc.) on the leg, this will immediately trigger the allocation of the media resources even if the call is not yet answered (used for early media for example).
For media-only legs, the media ressources will always be allocated as soon as CreateCall() is called.
Once a call is fully active (call answered and media allocated), event OnProfileChanged() will be sent on the leg. In the cases where the user had not specified the IP/port to use, once this event is received, the media profile has been updated with the values chosen by Toolpack and the updated values can be retrieved using the functions GetLocalSDP() and GetPeerSDP() of the profile.
Note that the OnProfileChanged() event is also sent after the media profile has been modified with the ChangeProfile() function (see Modifying Media Profile) and when a connected peer has requested it (through a SIP re-INVITE for example).
See Leg creation example for sample code of leg creation in different scenarios.
Caveats
- The call leg attribute is an object containing the call leg information (called/calling numbers, media profile, etc) that needs to be allocated by the caller and used when creating the leg object. It will be freed automatically when the leg is destroyed (it uses a shared-pointer so it is in fact destroyed when there are no more reference to it).
Interaction with Legs
Playing and Collecting Digits
You can play digits by calling PlayDigit() on a leg. Toolpack will receive the request and play the digits. Once digits are played, the leg will receive OnDigitPlayingDone() event.
You can also configure a leg to collect digits played. To start the digit collection, you have to call StartDigitCollection() on the leg. To stop the digit collection, you have to call StopDigitCollection(). A leg will receive OnDigitCollected() event when there will be a match between the asked string and the digits collected. The syntax used to described the digit mask is based on the RFC3435 in section 2.1.5 "Digit Maps".
Here are examples how to play and collect digit.
Play Digit
ptrOutgoingLeg = GetOutgoingActiveLeg();
if( ptrOutgoingLeg != NULL )
{
	/* this will play the sequence of digit 5551234 */
	ptrOutgoingLeg->PlayDigit( "5551234" );
}
Collect Digit
ptrIncomingLeg = GetIncomingActiveLeg();
if( ptrIncomingLeg != NULL )
{
	/*
	   this will collect digits 5, any sequences of 7 digits beginning by 3 or any sequences of 7 digits
	   beginning by 4,5,6 or 7 followed by 5 and 5.
	*/
	ptrIncomingLeg->StartDigitCollection( "5|3xxxxxx|[4-7]55xxxx" );
}
Playing and Collecting Tones
Tones are defined as events, this is why to play and collect tones, you have to use general event functions. You can add tones you want to play by using AddToneString() available in CTBCMC_EVENT_ATTRIBUTE class. You can then play events by calling PlayEvent() on a leg. Toolpack will receive the request and play the events. Once events are played, the leg will receive OnEventPlayingDone() event. Note that you can cancel an event to be played by calling CancelEvent() on the leg after a PlayEvent() has been called.
Two kinds of string can be passed to AddToneString() to play a tone. The first type is to play well known tones such as dtmf and fax tone. The syntax is really simple and is based on H248 package and signal ids. The first component of the string is the package id and the second is the signal id, both formated in string. So, to play dtmf 0, you have to format the following string: "dg/d0", where "dg" is for package "dtmf generation" and "d0" is for "dtmf 0". A comprehensive list of all the available well known tones is available in the Tone definitions article.
Play Tone with Signal Id String
/* this will play dtmf 7 */

CTBCMC_EVENT_ATTRIBUTE			Event;
Event.AddToneString( "dg/d7" );
ptrOutgoingLeg = GetOutgoingActiveLeg();
if( ptrOutgoingLeg != NULL )
{
	ptrOutgoingLeg->PlayEvent( Event );
}
The second type of string is to play custom tone. The syntax is much more complicated than the first one, but it follows a well described syntax which can be found in H248.6 Dynamic Tone Definition Package. This kind of string allows you to specify frequencies, duration, amplitude and repeating count of the tone. You can also specify well known tones and change their default duration, amplitude and repeating count. It is possible to describe a sequence of tones or frequencies that are played in one segment. Here are some examples of the syntax:
- Frequencies 400Hz and 600Hz mixed together for 200ms, amplitude at -10dB and repeating 3 times (playing 4 times)
- (((#400)+(#600)),200,-10)*3
- Dtmf 5 repeated infinitly
- ((0x0005,0x0015))*0
- Multifrequency tone 8
- ((mfg,mf8))
- Frequency 440Hz played for 300ms at -10dB followed by frequency 600Hz played for 200ms at -5dB and then followed by dtmf 2, all this repeated infinitly
- ((#440,300,-10),(#600,200,-5),(0x0005,0x0012))*0
Play Tone with Custom Tone String
/* this will play frequencies 1000Hz and 2100Hz mixed together */

CTBCMC_EVENT_ATTRIBUTE			Event;
Event.AddToneString( "(((#1000)+(#2100)),100,-10)" );
ptrOutgoingLeg = GetOutgoingActiveLeg();
if( ptrOutgoingLeg != NULL )
{
	ptrOutgoingLeg->PlayEvent( Event );
}
You can also configure a leg to collect events played. To start the event collection, you have to call StartEventCollection() on the leg. Note that you will have to specify which events you want to collect before starting the event collection by calling AddToneString() on a CTBCMC_EVENT_ATTRIBUTE object. To stop the event collection, you have to call StopEventCollection(). A leg will receive OnEventCollected() event on each event received that correspond to a tone string specified when calling StartEventCollection().
Only one type of string is accepted to specify which events to collect. The string is the same as the first type to play event. Signal ids that are also event id are accepted. This means that you can ask to collect "dg/d0" (dtmf generation/dtmf 0) and the detection will be done anyway. You can also detect all events from a package by putting a * as event id, so "dd/*" will detect all dtmf tones.
Collect Tone
/* this will collect all dtmf tones */

CTBCMC_EVENT_ATTRIBUTE			Event;
Event.AddToneString( "dd/*" );
ptrOutgoingLeg = GetOutgoingActiveLeg();
if( ptrOutgoingLeg != NULL )
{
	ptrOutgoingLeg->StartEventCollection( Event );
}
The most commonly used package are 5 and 6 (H248.1 Annex E): dtmf generation and dtmf detection. As H248 does not define events and signals for fax tone, we added a special package to do so. Package telcofax (0x8001) contains three events and two signals. Signals are: cng (0x0080) and g164 (0x0081) and events are: cng (0x0080), g164 (0x0081) and g165 (0x0082).
Collecting digits and tones while call legs are joined
By default, when two call legs are joined together through function CTBCMCCallLeg::Join(), tone collection is automatically disabled. One of the arguments of the Join() function ("in_fDisableToneWhileJoined") will allow to control if automatic tone collection feature is used or not on a call.
Why is Toolpack disabling tone collection on joined legs by default? That's because tone collection introduces a 40ms delay in the audio connection (required to provide tone suppression), and most of the time it is no more require to collect digits while two call legs are joined, so it would be useless to leave 40ms delay while tone collection is no more required.
Playing and Recording Audio Files
You can play an audio stream on a leg by calling PlayStream() on it. To specify which audio stream you want to play, you have to specify it by calling AddPlayFilePath() available in CTBCMC_PLAY_ATTRIBUTE class. Toolpack will receive the request and play the stream. Once it is played, the leg will receive OnStreamPlayingDone() event.
You can also configure a leg to record an audio stream. First you must specify file paths to record by calling AddRecFilePath() available in CTBCMC_RECORD_ATTRIBUTE class. The you can call RecordStream() on a leg. Once the stream is recorded, the leg will receive OnStreamRecordingDone() event.
You can pause an active playing or recording stream by calling PauseStream() and you can resume it by calling ResumeStream(). If you want to stop an active playing or recording stream, you have to call StopStream() on the leg.
Modifying Media Profile
It is always possible to modify the media profile of a leg after it was created. This can be used for example to change to a more compressed codec if bandwidth resources become sparse or to switch to T.38 Fax after a fax tone was detected.
The media profile is stored in the leg attributes and can be modified like this :
 TBX_SDP_INFO                        SdpInfo;
 PCTBCMC_MEDIA_ONLY_LEG_ATTRIBUTE    pMediaLegAttribute;

 pMediaLegAttribute = pCallLeg->GetAttributes().GetMediaOnlyLegAttribute();
 pMediaLegAttribute->GetProfile().GetLocalSDP(SdpInfo);
 Strncpy
 (
     SdpInfo.aConnections[0].szIp,
     "",
     sizeof( SdpInfo.aConnections[0].szIp )
 );
 SdpInfo.Capabilities.aCapGroups[0].aSimultaneousCap[0].un16UdpPort = 0;
 pMediaLegAttribute->GetProfile().SetLocalSDP(SdpInfo);

 pCallLeg->ChangeProfile();
Once the attributes have been modified, ChangeProfile() must be called to activate the new profile. In the case of media-only legs, activating a modified profile will immediately reallocate the media resources. In the case of a SIP call leg, activating the new profile will trigger a new negotiation with the peer (INVITE-RESPONSE) after which the media resources will be allocated using the newly negotiated codecs.
Once the profile change has completed (or failed), event OnProfileChanged() will be received on the leg.
For SIP call leg, if the peer entity sends us re-INVITE with a new SDP during a call, the media resource will be automatically updated and event OnProfileChanged() will be received on the leg.
Controlling the Signaling
When a call leg receives the OnCallLegPresent() event, it indicates an incoming call. To confirm that the call contains sufficient valid information to process the call on the system, you have to call AcceptCall() on the leg. If a call leg receives the OnCallAccepted() event, it means that an outgoing call has been accepted by the remote peer. This event usually means that the calling number has been accepted and that the call is currently being processed.
After an incoming call has been accepted, a call leg can notify the remote peer that the incoming call has been put in the "ringing" state by calling AlertCall(). In the same way, a call leg will receive OnCallAlerting() event when an outgoing call has been put in the "ringing" state by the remote peer.
When an incoming call is answered, a call leg can notify the remote peer of the incoming call answered by calling AnswerCall(). In the same way, a call leg will receive OnCallAnswered() event when an outgoing call has been answered by the remote peer.
Call flow examples are available here.
SendCallSuppInfo/OnCallSuppInfo
Leg Termination
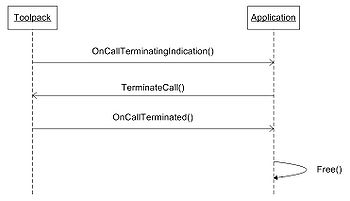
Terminating a call leg is a 2 steps process:
- Call TerminateCall()
- Free leg object on OnCallTerminated()
When TerminateCall() is called, the Toolpack framework will start leg termination. This includes media resources freeing and, for leg with signaling, sending of the appropriate signaling message to terminate the call. Once the media resources have been deallocated and call termination signaling is done, Toolpack will call OnCallTerminated() on the leg. When this event is received on the leg, this leg no more exists in Toolpack and the object can thus be freed. At the end of the OnCallTerminated() handler, the default implementation of class CTBCMCLeg will call method Free() on the leg's ITBCMCFreeListener interface. The ITBCMCFreeListener to use can be specified either in the CTBCMCLeg constructor and by calling SetFreeListener() on the leg. The leg can be it's own FreeListener, in which it just 'delete' itself when its Free() method is called. An application specific FreeListener can be used for cases where other action needs to be taken before the leg is deleted. An example could be the case where the leg object was allocated from a pool and it should be returned to that pool instead of being deleted.
In some situation, it is possible that leg termination be initiated by Toolpack. This can happen for leg with signaling, when a call termination request is received on the signaling channel. It can also happen on any type of leg in the event of sudden media resource unavailability and other media resource or signaling error. In these cases, the OnCallTerminatingIndication() is sent to the leg. On reception of this event, the application should initiate call termination as shown below.
In case of internal system error or major communication lost with the Toolpack engine, Toolpack would send the OnLegTerminated() event. This event indicates that the leg does not exist anymore on the Toolpack side and the user should free its object without trying any other interaction with Toolpack through it.
Leg Synchronization on Failover
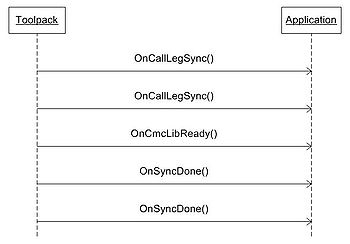
When a Toolpack application is restarted or when a standby application is activated, it goes through a synchronization phase with the Toolpack framework. During this phase, Toolpack informs the application of all the already allocated call legs through the OnCallLegSync() event of the ITBCMCLibUser interface (this interface must be implemented by all user applications). One event will be received for each leg being synchronized. The course of action to take when receiving a leg synchronization event depends on the ability of the application to resynchronize its states with theses legs.
Once all OnCallLegSync() have been sent, Toolpack will start synchronization of the links between legs through OnLinkSync(). This event indicates that two legs are connected together. It can be used by the application to rebuild its internal states. As for the legs, unwanted links can be refused by calling the static function RefuseLink().
If the application can't resynchronize active legs or if it does not want to resychronize the leg for which it is receiving an OnCallLegSync() event, it must:
- Create call leg context for all synchronized legs, and keep them until links have been synchronized too (a leg linked to anther must be un-joined before it can be terminated)
- Wait until all links have been re-synchronized (or refused using the static function RefuseLink()).
- Terminate all previously created call leg contexts that the application does not wish to keep, using the static function RefuseLeg().
Tip: The helper class CTBCAFCallLegResync has been created to simplify re-synchronizing legs. It can create and accumulate re-synchronized legs, and automatically destroy them when appropriate.
- Call function AllocateCallLeg() for each synchronized leg
- For legs that must not be destroyed after re-synchronization, call RemoveCallLeg() to remove them from this CTBCAFCallLegResync object. Application now has the ownership of the leg.
- Upon OnCmcLibReady(), application must destroy CTBCAFCallLegResync. The destructor of this class will properly refuse all legs that have been created with AllocateCallLeg(), and not removed by RemoveCallLeg().
You can refer to the code of the "Gateway" application for an example (search for variable mpCallLegResync).
When all links have been synchronized, Toolpack sends the OnCmcLibReady() event indicating that active resources synchronization is complete. At that moment, the application has all the information available on the Toolpack side to determine if the legs should be kept or release. Any leg that the application does not want to keep can be refused by calling RefuseLeg() on it. For all legs that have not been refused, an event OnSyncDone() will be sent on the leg. Once this event has been received on a leg, the leg is fully functional and the application can start calling any usual Toolpack function on it.
Loss of Communication with Toolpack Engine
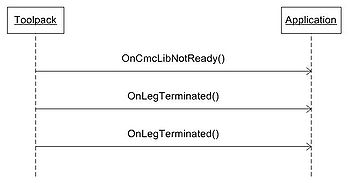
If communication is lost with the Toolpack Engine, event OnCmcLibNotReady() will be sent to the application. It indicates that the Toolpack framework is no more accessible. The legs are still valid at that time but no action can be executed on them as long the CmcLib is not ready. If the connection with the Toolpack Engine is not back up in less than 10 seconds, the CmcLib will declare a major communication loss and will call OnLegTerminated() on all the legs. In that case, when communication is regained with the Toolpack Engine, the synchronization sequence will start again from the beginning.
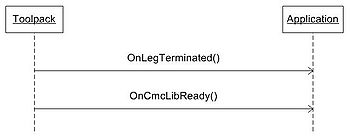
If the communication is regained before the 10 seconds timeout, event OnCmcLibReady() will be sent and the application can then continue working normally with its existing call legs. Note that you can also receive OnLegTerminated() on some legs before receiving the OnCmcLibReady() if those legs were in a transient state when disconnection occurred.
Bridging the Media Path
Join
To bridge the media path between two legs, one must call Join() on one of the leg, giving the second leg as a parameter. This will connect the media path between the two legs according to the link properties set on the leg on which Join() is called. These link properties can be modified by overloading the GetJoinAttributes(). The important attribute to set is IsFullDuplex() that indicates if the connection will be made full-duplex (A<-->B) or half-duplex (A-->B). Prior to release 2.5.2, the default connection mode is half-duplex. For all release version 2.5.2 or higher, the default connection mode is full-duplex.
Warning: If two legs are already connected in half-duplex and you want to connect them in full-duplex, you must first Unjoin() the legs, then Join() them in full-duplex. You can NOT only do another half-duplex in the opposite direction.
When legs are joined, it creates a link identified with a unique link id. It is the responsibility of the application to provide this unique link id by implementing the GetLinkId() function of the leg. It is planned to allow the user to provide a value of '0' to let the Toolpack system automatically choose a link id, but as of this writing this feature is not yet available.
Warning: When two legs are joined, the application must ensure that GetLinkId() on both leg will return the right link id. This will ensure that when the link needs to be removed, both A->Unjoin() and B->Unjoin() will work correctly.
Setting the link properties
In your leg class, add a member variable to store the join attributes for that leg.
CTBCMC_JOIN_ATTRIBUTE mJoinAttribute;
Then set the join properties you want in your leg class constructor (or at any other location that will run before the Join() is done:
mJoinAttribute.IsFullDuplex() = TBX_TRUE;
Last, implement the GetJoinAttributes() function.
 CTBCMC_JOIN_ATTRIBUTE & CH248Termination::GetJoinAttributes()
 {
 	return mJoinAttribute;
 }
Broadcasting a media source
At the time of writing this, broadcast of a single media source to multiple destinations is not yet possible.
Unjoin
To disconnect the media path between two legs, one must call Unjoin() on any of the legs. The GetLinkId() function of the leg on which Unjoin() is called must return the link id that was used when the legs were joined.
Using timers
CTBCMCTimer class can be used to attach timers to call legs, and get an event upon timer expiry. Documentation can be found here: Working with CTBCMCTimer
