FreeSBC:Cloud:Proxmox Installation
This step-by-step guide helps to install and run FreeSBC KVM image to Proxmox platform. The installation requires root-level access to Proxmox host and can not be completed with web-interface only.
Contents |
Requirements
Minimal Cloud requirements:
- 64 bits infrastructures only
- Virtio NIC interface
- qemu-kvm CPU exposed as 'host' or minimally 'core2duo'
- One Ethernet adapter for management
- One or more Ethernet adapter(s) for data
| Sessions | CPU | RAM | Disk Space | Ethernet ports |
|---|---|---|---|---|
|
Up to 5,000 |
2 |
4 Gb |
40 Gb |
1 Gbps |
|
5,000-20,000 |
4 |
8 Gb |
60 Gb |
4 X 1 Gbps or 1 X 10 Gbps |
|
20,000-50,000 |
4** |
16 Gb |
80 Gb |
1 X 10 Gbps |
|
Above 50,000 |
6** |
24+ Gb |
100 Gb |
Multiple 10 Gbps |
** The CPU number is based on Intel R630 with Xeon E5-2643. Double the CPUs number if yours are from a earlier generations.
More details on HW/CPU/NIC requirements can be found here: RequirementsMatrix
For better performance
- SR-IOV or MacVTap compatible NICs
- Overcommit set to 1:1
- No CPU (including hyperthreading) shared between infrastructure and computing section
- Dedicated memory allocation to VM
Getting the Image
Please go to our FreeSBC Download site to get a copy of the latest FreeSBC Image. In the Download Section, while filling the form, choose correct platform "KVM". As a result, you should get file fresbc_kvm.qcow2. Please, mention "Product Key" and keep containing email in a safe place.
Upload Image File to Proxmox cloud
You need an SFTP client to upload FreeSBC image to Proxmox. For example, using WinSCP SFTP Client . All the next step assumed that image file fresbc_kvm.qcow2 resides in the /root directory
Create VM for FreeSBC
Define the amount of CPUs and RAM according to requirements. Follow the VM creation process by dialog tabs as below
- General: choose VM name and location as usual. This manual uses VM ID 1000 as a reference.
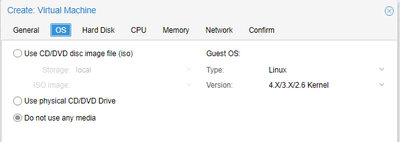
- OS: check Do not use any media, keep default Linux OS with 4.X/3.X/2.6 Kernel.
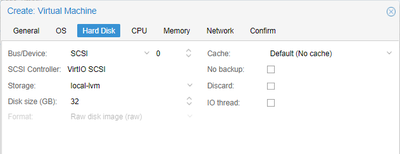
- Hard Disk: choose your favorite device type and keep all the rest to default.
- CPU: choose core count. Important: CPU Type must be set to "host".
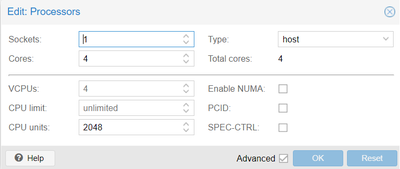
- In the advanced area parameter "CPU units" may be increased to ensure that CPU resources will be allocated to FreeSBC with priority.
- In the advanced area parameter "CPU units" may be increased to ensure that CPU resources will be allocated to FreeSBC with priority.
- Memory: Set the memory size
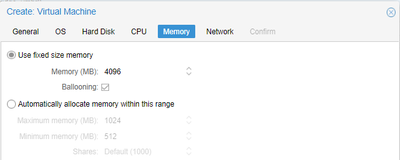
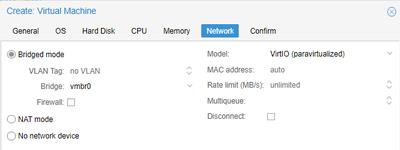
- Network: Set up the interface you will use for management according to your network configuration. Model VirtIO tested, any other may work too.
