FreeSBC:Cloud:Proxmox Installation
This step-by-step guide helps to install and run FreeSBC KVM image on Proxmox platform. The installation requires root-level access to Proxmox host and can not be completed with web-interface only.
Contents |
Requirements
Minimal Cloud requirements:
- 64 bits infrastructures only
- Virtio NIC interface
- qemu-kvm CPU exposed as 'host' or minimally 'core2duo'
- One Ethernet adapter for management
- One or more Ethernet adapter(s) for data
| Sessions | CPU | RAM | Disk Space | Ethernet ports |
|---|---|---|---|---|
|
Up to 5,000 |
2 |
4 Gb |
40 Gb |
1 Gbps |
|
5,000-20,000 |
4 |
8 Gb |
60 Gb |
4 X 1 Gbps or 1 X 10 Gbps |
|
20,000-50,000 |
4** |
16 Gb |
80 Gb |
1 X 10 Gbps |
|
Above 50,000 |
6** |
24+ Gb |
100 Gb |
Multiple 10 Gbps |
** The CPU number is based on Intel R630 with Xeon E5-2643. Double the CPUs number if yours are from a earlier generations.
More details on HW/CPU/NIC requirements can be found here: RequirementsMatrix
For better performance
- SR-IOV or MacVTap compatible NICs
- Overcommit set to 1:1
- No CPU (including hyperthreading) shared between infrastructure and computing section
- Dedicated memory allocation to VM
Getting the Image
Please go to our FreeSBC Download site to get a copy of the latest FreeSBC Image. In the Download Section, while filling the form, choose correct platform "KVM". As a result, you should get file fresbc_kvm.qcow2. Please, mention "Product Key" and keep containing email in a safe place.
Upload Image File to Proxmox cloud
You need an SFTP client to upload FreeSBC image to Proxmox. For example, using WinSCP SFTP Client . All the next step assumed that image file fresbc_kvm.qcow2 resides in the /root directory
Create VM for FreeSBC
Define the amount of CPUs and RAM according to requirements. Follow the VM creation process by dialog tabs as below
- General: choose VM name and location as usual. This manual uses VM ID 1000 as a reference.
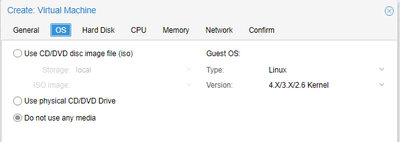
- OS: check Do not use any media, keep default Linux OS with 4.X/3.X/2.6 Kernel.
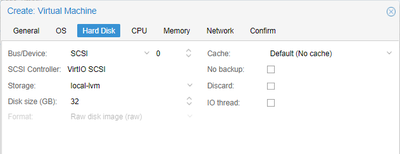
- Hard Disk: choose your favorite device type and keep all the rest to default.
- CPU: choose core count. Important: CPU Type must be set to "host".
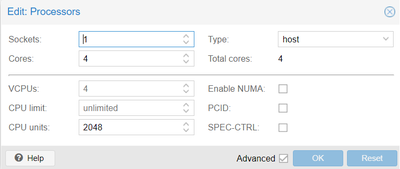
- In the advanced area parameter "CPU units" may be increased to ensure that CPU resources will be allocated to FreeSBC with priority.
- In the advanced area parameter "CPU units" may be increased to ensure that CPU resources will be allocated to FreeSBC with priority.
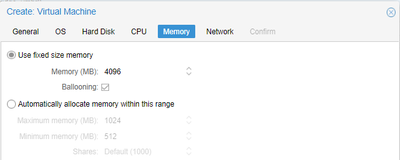
- Memory: Set the memory size
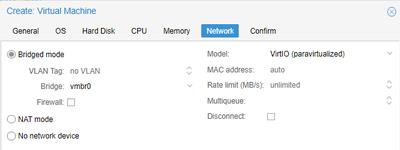
- Network: Set up the interface you will use for management according to your network configuration. Model VirtIO tested, any other may work too.


Tune VM for your FreeSBC
Go to the "Hardware" tab on your VM, then:
- Remove CD/DVD Drive, we don't need it.
- Detach and delete Hard Disk, we don't need it and we will attach KVM image later
- Add network adapters according to your network configuration. Please, mind that standalone FreeSBC needs at least one for management and one for the voice for initial setup. If you wish to use HA configuration, then you need at least one more for intra-cluster communications. While network adapters may be added any time, it's a good idea to setup correct network configuration just now.
Attaching image file to VM
Go to Proxmox host shell and copy the image file to VM's directory, root privileges required. For VM ID 1000 and image file, located in /root this will be:
cp -v /root/freesbc_kvm.qcow2 /var/lib/vz/images/1000/
After that, we need force Proxmox to include this image to VM config file and make it available for web-interface. Do that with shell command qm rescan
  # qm rescan
    rescan volumes...
    VM 1000: add unreferenced volume 'local:1000/freesbc_kvm.qcow2' as 'unused0' to config.
  #
Return to the web-interface and VM's Hardware tab. Now the image referenced as "Unused Disk 0". Select it and press "Edit".
Select bus/device and put "Write through" to the Cache selector. For some bugs, Proxmox VMs can't start with default in this field. Press "Add". Now the image attached as root drive. Make sure that device reference math in the "Boot Order" selector of VM's Options tab.
Now, VM is ready to run.
It's highly recommended to move the disk to ZFS storage and make a snapshot of this state to rollback in case of later installation mistakes. If you plan HA FreeSBC installation, this point is good to clone VM. Cloned VM can be configured as the secondary later.
Accessing the FreeSBC-SW web portal
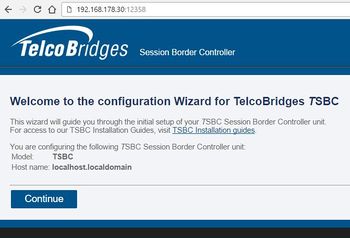
- Open a web browser to the management IP of the FreeSBC, on port 12358. Example if your server address is 192.168.178.30, the URL would be:
http://192.168.178.30:12358 - You should get to the FreeSBC Configuration Wizard

From here, you can go to Web Portal Initial Configuration Guide to continue the installation.